Home Appliances / Refrigerators
Instruction Manual for Whynter BBR-148SB Beverage Refrigerator
Quick guide for the Whynter BBR-148SB beverage refrigerator. Includes installation, operation, temperature settings, maintenance, and troubleshooting steps.
Quick answers from the manual
Quick answer
- The Whynter BBR-148SB is a built-in or freestanding beverage refrigerator. It features digital temperature control (34°F-54°F), reversible door, and an activated carbon filter. Always let it stand upright for 4 hours before first use. p. 1, 6, 7
Key actions
- Install handle p. 8
- Reverse door swing p. 9
- Set temperature p. 10
First start
- Let the unit stand upright for 4 hours before connecting to power. p. 7
Show 3 more answers Show less
Maintenance and reset
- Replace the activated carbon filter once a year. p. 11
Technical specifications
| Parameter | Value | Meaning | Pages |
|---|---|---|---|
| Capacity | 182 standard 12 oz. cans | Storage capacity | p. 6 |
| Temperature Range | 34°F - 54°F | Operating temperature | p. 6 |
| Voltage | 115V / 60Hz | Electrical requirements | p. 6 |
Where to find it in the PDF
- Installation p. 7, 8, 9
- Operation p. 10, 11
Table of contents
Manual images
Click an image to enlargeImportant Information
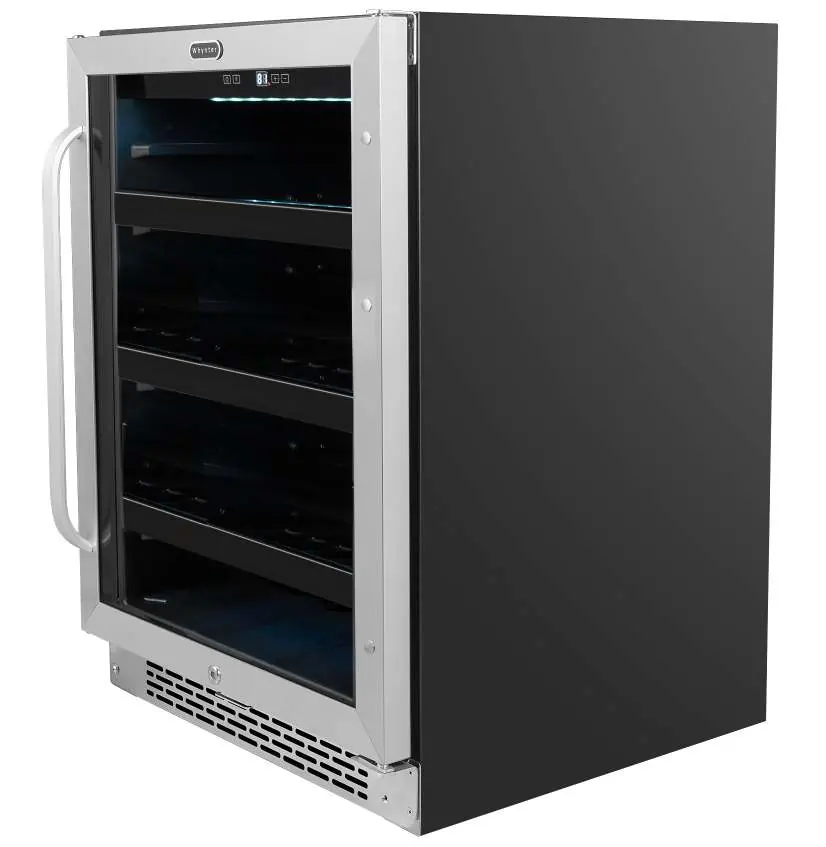
The Whynter BBR-148SB is a built-in or freestanding beverage refrigerator designed for household use. It features a digital control panel, reversible door, and an activated carbon filter to maintain air quality. Before first use, ensure the unit stands upright for at least 4 hours to allow the refrigerant to settle.
Installation
The appliance can be installed as a built-in, recessed, or freestanding unit. Ensure the floor is level and strong enough to support the unit when fully loaded. Do not install on carpet.

- Ventilation: For freestanding installation, allow 5 inches of space at the back and sides. For built-in installation, allow at least 1/4 inch of space on each side and at the top. The front air vent must never be blocked.
- Electrical: Plug into a grounded 3-prong outlet. Do not use an extension cord. A separate circuit is recommended.
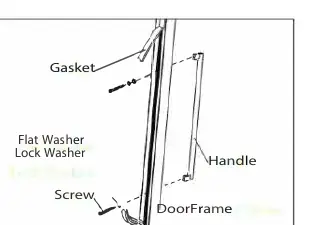
- Handle Installation: Remove the two decorative plugs from the door frame using a flat-head screwdriver. Attach the handle using the provided screws, lock washers, and flat washers. Do not overtighten.
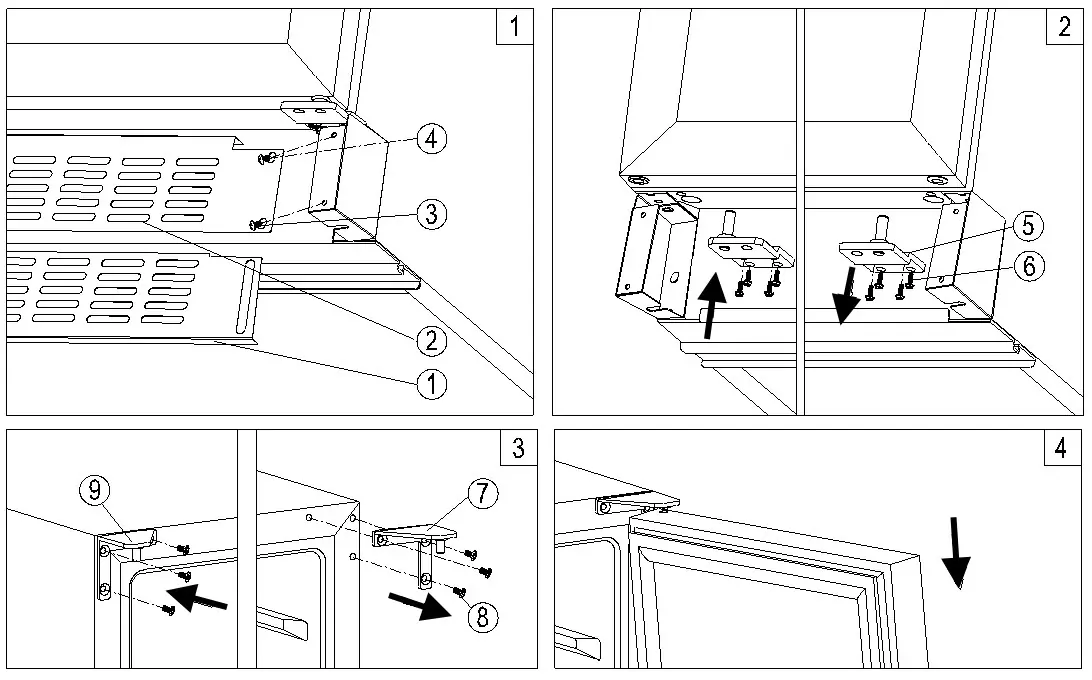
- Door Reversal: The door can be reversed. This involves removing the front ventilation grille, bottom hinge plate, and transferring the hinge pin to the opposite side. Save all removed parts for reinstallation.
Operation and Controls
The control panel allows you to manage temperature and lighting.
- Power: Press and hold the power key for 5 seconds to turn the unit on or off.
- Temperature: Use the UP and DOWN keys to adjust the temperature. The range is 34°F to 54°F (1°C to 12°C).
- °F/°C Selector: Press and hold the LIGHT key for 5 seconds to switch between Fahrenheit and Celsius.
- Interior Light: Press the light button to toggle the interior LED light.
Note: If the unit is unplugged or loses power, wait 3-5 minutes before restarting.
Maintenance
- Cleaning: Unplug the unit before cleaning. Use a soft cloth with lukewarm water. Do not use detergents that emit odors.
- Carbon Filter: Replace the activated carbon filter once a year. Rotate the filter cover 90 degrees to remove and install the new filter.
- Defrosting: The unit features an automatic defrost system. If frost accumulates and does not clear within 24 hours, manual defrosting may be required.
Troubleshooting
If the appliance does not operate, check the power supply, fuse, or circuit breaker. If the unit is not cold enough, ensure the door is closed properly, the front grille is unobstructed, and the temperature is set correctly. If the display shows error codes like E1, E2, E5, E6, EU, LO, or HI, contact Whynter Customer Support.
Practical help
Common problems
Appliance does not operate
Check if the unit is plugged in, or if a fuse has blown/circuit breaker tripped.
Appliance is not cold enough
Adjust the set temperature, ensure the front grille is not blocked, and check that the door seal is tight.
Excessive noise
Ensure the unit is on a hard, level surface. Some gurgling or popping sounds are normal due to refrigerant flow and material expansion.
Display flashing
This is normal until the unit reaches the set temperature; it may take up to 24 hours if the cabinet is full.
Before use
- Remove all exterior and interior packing.
- Let the unit stand upright for 4 hours before connecting to power.
- Clean the interior with lukewarm water.
- Install the handle.
- Ensure proper ventilation space (5 inches for freestanding, 1/4 inch for built-in).
Show more Show less
Specs in practice
- Temperature Range
- 34°F - 54°F (1°C - 12°C)
- Power Consumption
- 85W / 0.9A
Images and diagrams
- Control panel: Power, Light, Up/Down temp keys.
- Carbon filter: Rotate 90 degrees to remove/install.
- Door reversal: Requires removing hinges and grille.
Model compatibility
- Designed for household, non-commercial use only.
- Not recommended for perishable food, medicine, or medical products.

Manual page author
Michael Turner
Technical manual editor