Electronics / USB Hubs & Docking
StarTech.com 16-Port Industrial USB 3.2 Gen 1 Hub User Manual
Quick-start guide for the StarTech.com 16-Port Industrial USB 3.2 Gen 1 Hub (5G16AINDS-USB-A-HUB). Includes installation steps, power requirements, mounting instructions for DIN rail and rack, and port configuration details.
Table of contents
Manual images
Click an image to enlargeQuick Guide
The StarTech.com 16-Port Industrial USB 3.2 Gen 1 Hub is designed for industrial environments requiring ESD and surge protection. It supports dual host connectivity, allowing you to switch between two host computers. The hub can be powered via a 12-24V DC source (terminal block or power adapter) and supports both DIN rail and rack mounting.
Product Overview
The hub features 16 USB data/charge ports with screw-locking mechanisms for secure connections. Key components include:
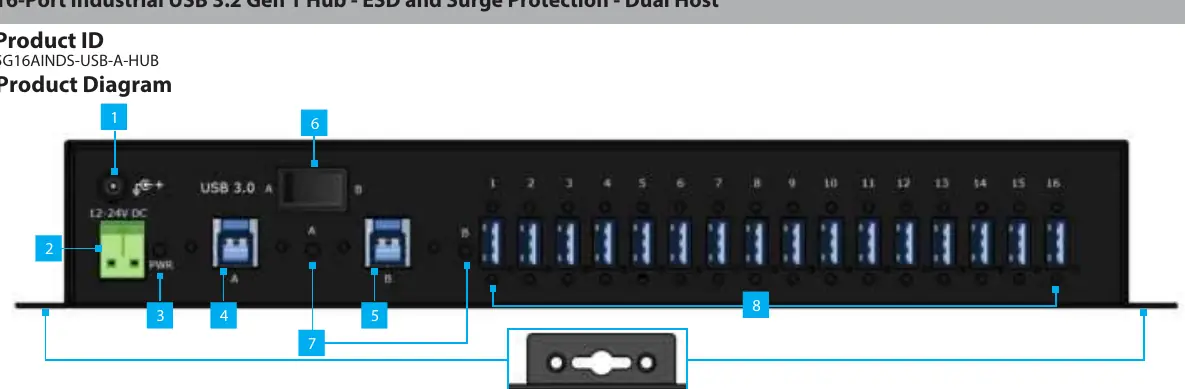
- DC Power Input: Supports 12-24V DC input.
- USB Host Ports A & B: Screw-locking USB-B ports for connecting to host computers.
- Host Device Port Switch: Toggles connectivity between Host A and Host B.
- USB Host Selection LEDs: Indicates the active host (Solid Green).
- 16x USB Data/Charge Ports: USB-A ports supporting USB 3.2 Gen 1 (5 Gbps) and BC 1.2 charging (5V 2.0A max or 1.5A simultaneous).
Installation
To install the hub, connect your USB peripherals to the 16 USB ports. Use the provided USB-A to USB-B cables to connect the hub's Host Ports A and B to your computer(s). The computer will automatically detect the device and install the necessary drivers.
Powering the Hub
There are two methods to power the device. Ensure the power source provides 12-24V DC (120W or higher recommended for maximum performance).
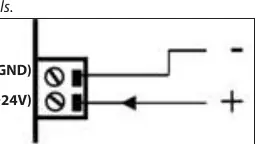
- Terminal Block: Remove the housing, loosen the terminal screws, and connect the positive and negative wires from your DC power source. Ensure correct polarity (V+ and V-).
- Power Adapter: Connect an external power adapter (not included) to the front power input port.
Mounting Options
The hub supports two mounting configurations:
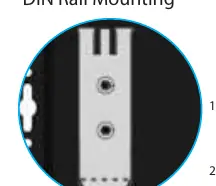

- DIN Rail Mounting: Align the included DIN rail brackets with the holes on the back of the hub and secure them with the provided mounting screws.
- Rack Mounting: Use the included rack mounting brackets to install the hub into 1U of EIA-310 compliant 19-inch rack space. The brackets can be attached to either the front or rear of the hub depending on your preference.
Official resources from the manual
Practical help
Common problems
Hub not receiving power
Check that the power source is 12-24V DC and that the polarity on the terminal block is correctly matched (V+ and V-).
Device not detected by host
Ensure the Host Device Port Switch is set to the correct host (A or B) and that the USB Host Selection LED is solid green.
Before use
- Verify 12-24V DC power source is available (120W recommended).
- Ensure you have a flat head screwdriver for terminal block wiring.
- Ensure you have a Phillips head screwdriver for mounting screws.
- Confirm USB-A to USB-B cables are ready for host connection.
- Check that the rack or DIN rail environment is compatible with 1U space requirements.
Specs in practice
- USB 3.2 Gen 1
- Data transfer speed standard supporting up to 5 Gbps.
Images and diagrams
- The product diagram on page 1 identifies all ports, LEDs, and switches.
- The terminal block diagram on page 2 illustrates correct polarity wiring (V- for GND, V+ for 12-24V).
- DIN rail and rack mounting diagrams show screw placement and bracket alignment.
Model compatibility
- Requires 1U of rack space for rack mounting.
- Supports dual host switching between two computers.
- Not all power adapters are included; ensure your DC source meets the 120W recommendation for full performance.

Manual page author
Michael Turner
Technical manual editor
Reviews PDF manuals for structure, safety notes, and practical product details so readers can find the right information quickly.