Electronics / Remote Controls
User Manual for ACiQ Air Conditioner Remote Controller
Quick guide for the ACiQ air conditioner remote controller. Learn how to use basic and advanced functions, set timers, adjust modes, and troubleshoot common issues.
Table of contents
Manual images
Click an image to enlargeQuick Start Guide
To begin using your ACiQ air conditioner remote controller, follow these steps:
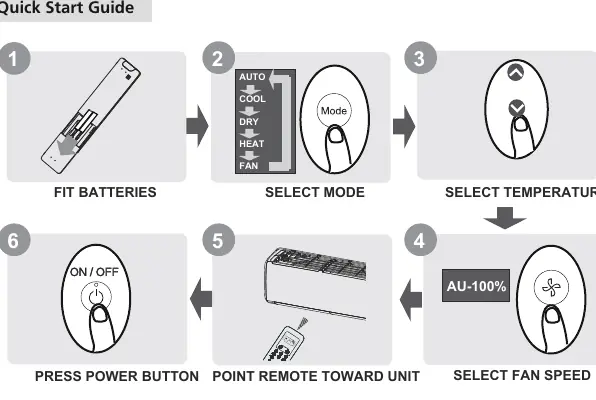
- Fit Batteries: Slide the back cover down and insert two R03/LR03 batteries, matching the (+) and (-) symbols.
- Select Mode: Press the Mode button to cycle through AUTO, COOL, DRY, HEAT, and FAN modes.
- Select Temperature: Use the up and down arrows to set your desired temperature.
- Select Fan Speed: Press the Fan Speed button to adjust the airflow.
- Point and Power: Point the remote toward the indoor unit and press the Power button.
Buttons and Functions
The remote controller features several key buttons for operation:
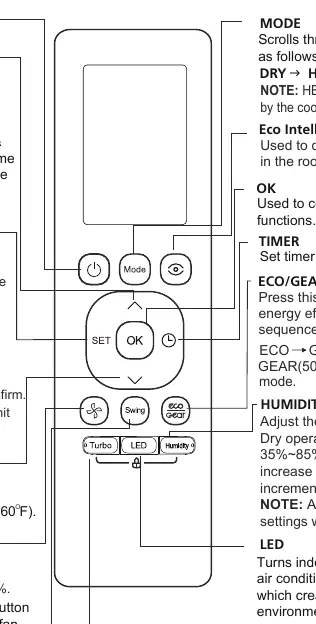
- ON/OFF: Turns the unit on or off.
- MODE: Scrolls through operation modes.
- TEMP (Up/Down): Adjusts temperature in 0.5°C (1°F) increments. Press both simultaneously for 3 seconds to toggle between °C and °F.
- FAN SPEED: Adjusts fan speed (AU, 20%, 40%, 60%, 80%, 100%).
- SWING: Controls horizontal louver movement. Hold for 2 seconds for vertical auto swing.
- ECO/GEAR: Enters energy-efficient modes (ECO, GEAR 75%, GEAR 50%).
- SET: Accesses advanced functions like Breeze Away, Active Clean, Fresh/UV-C, Sleep, Follow Me, and AP mode.
- TURBO: Enables the unit to reach the set temperature quickly.
- LED: Turns the indoor unit's display and buzzer on or off.
- HUMIDITY: Adjusts room humidity during Dry operation (35%-85%).
Remote Screen Indicators
The display shows the current status of your air conditioner, including:
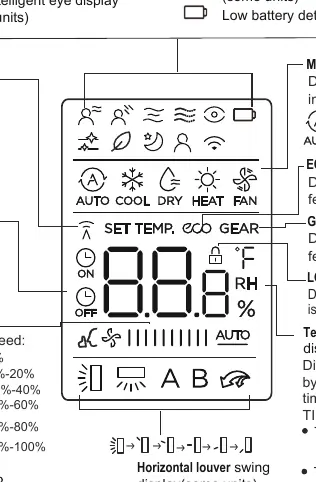
- Mode Display: Shows the active mode (AUTO, COOL, DRY, HEAT, FAN).
- Fan Speed: Indicates the current fan intensity.
- Timer: Shows TIMER ON or TIMER OFF settings.
- Feature Indicators: Icons for ECO, GEAR, LOCK, Sleep, Follow Me, and Swing functions.
- Transmission Indicator: Lights up when the remote sends a signal to the unit.
Basic Operation
AUTO Mode: The unit automatically selects COOL, FAN, or HEAT based on the set temperature. Fan speed cannot be adjusted in this mode.
COOL/HEAT Mode: Select the mode, set the desired temperature, adjust the fan speed, and turn the unit on.
DRY Mode: Used to reduce humidity. Fan speed is automatically controlled.
FAN Mode: Circulates air without changing the temperature. Temperature cannot be set in this mode.
Advanced Functions
Timer Setting: Use the TIMER button to set the time after which the unit will automatically turn on or off. Time increases in 30-minute increments up to 10 hours, then 1-hour increments.
Swing Function: Press the SWING button to start/stop horizontal louver movement. Hold for 2 seconds for vertical swing.
ECO/GEAR: Press the ECO/GEAR button to cycle through energy-saving modes. Note that this is primarily for COOL mode.
Sleep Function: Adjusts temperature settings for comfort while sleeping. Not available in FAN or DRY modes.
Silence Function: Hold the Fan button for 2 seconds to activate/disable. Reduces compressor noise.
FP Function: Press the down button twice within one second while in HEAT mode (set to 16°C/60°F) to set the unit to 8°C/46°F.
Lock Function: Press Turbo and Humidity buttons simultaneously for 5 seconds to lock/unlock the remote.
Maintenance and Troubleshooting
Battery Care: Do not mix old and new batteries. Remove batteries if the remote will not be used for more than 2 months.
Signal Interference: The remote must be used within 8 meters of the unit. Curtains, other materials, and direct sunlight can interfere with the infrared signal.
Model-Specific Features: Some features (e.g., Breeze Away, Active Clean) are model-dependent. If your unit does not support a function, pressing the corresponding button will have no effect.
Manufacturer information
ACiQ
Practical help
Common problems
Remote control not responding
Check if batteries are inserted correctly. Ensure you are within 8 meters of the unit and there are no obstructions like curtains blocking the signal.
Button press has no effect
The feature may not be supported by your specific indoor unit model. If the unit does not have the function, the button will not trigger any action.
Interference with signal
Ensure the remote is pointed directly at the unit. Avoid direct sunlight on the receiver and remove any physical obstructions.
Before use
- Insert two R03/LR03 batteries into the remote.
- Ensure the air conditioner is plugged in and powered.
- Verify the remote is within 8 meters of the indoor unit.
- Remove any obstructions (curtains, furniture) between the remote and the unit.
Specs in practice
- Signal Receiving Range
- 8 meters maximum distance from the indoor unit.
- Operating Temperature
- -5°C to 60°C (23°F to 140°F).
- Power Supply
- 3.0V using two R03/LR03 dry batteries.
Images and diagrams
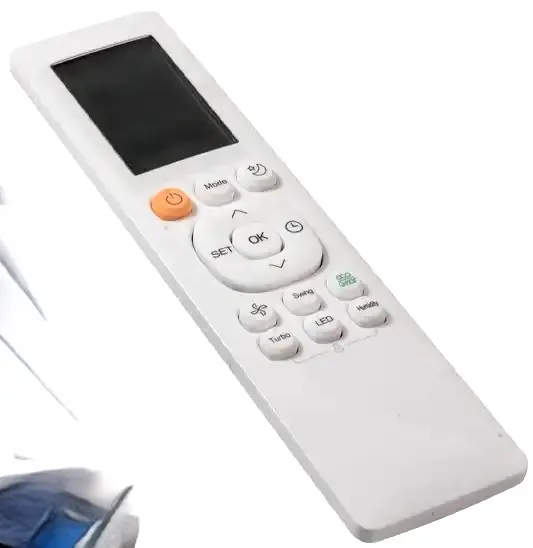
- The remote features a central OK button surrounded by Mode, Set, and arrow keys for navigation.
- The display screen provides real-time feedback on mode, temperature, fan speed, and active features like ECO or GEAR.
- Buttons are grouped by function: basic operation (Mode, Power, Temp), airflow (Fan, Swing), and advanced features (Turbo, LED, Eco/Gear, Set).
Model compatibility
- Compatible with ACiQ-06W-HH-MD, 09W-HH-MD, 12W-HH-MD, 18W-HH-MD, and 24W-HH-MD models.
- Some features like Breeze Away, Active Clean, and Sleep are model-dependent.
- If there is a conflict between this manual and the unit's Owner's Manual, the Owner's Manual prevails.

Manual page author
David Miller
Documentation analyst
Organizes user manual content into clear summaries, with attention to model details, product context, and everyday usability.