HVAC / Air Conditioners
Installation and Owner's Manual for ACIQ R32 Wall-Mounted Air Handler
Comprehensive installation and operation guide for ACIQ R32 wall-mounted air handlers. Includes mounting instructions, wiring diagrams, refrigerant handling, maintenance, and troubleshooting steps.
Table of contents
Manual images
Click an image to enlargeQuick guide from the manual
This manual provides essential installation and operation instructions for the ACIQ R32 wall-mounted air handler. Due to the use of R32 refrigerant, which is flammable, installation must be performed by a certified contractor. Key safety requirements include ensuring proper ventilation, avoiding ignition sources, and adhering to local electrical and building codes.
Safety Precautions
The unit uses R32 refrigerant. If leaked, it can pose a fire risk if exposed to an ignition source. Never attempt to repair the unit yourself. Ensure the system is grounded and installed on a secure surface. Keep the area around the unit free of flammable materials, microwaves, and high-heat sources.
Installation Requirements
The unit must be installed by a professional. Key installation steps include:
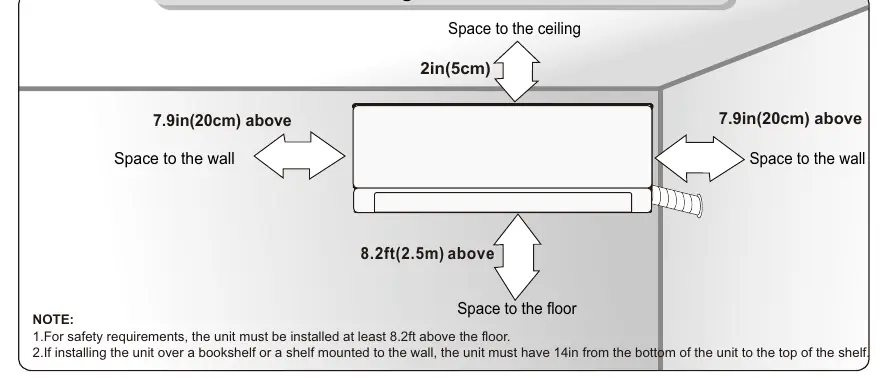
- Mounting: Ensure the wall can support the unit's weight. Maintain clearances: 2 inches from the ceiling, 7.9 inches from side walls, and at least 8.2 feet from the floor.
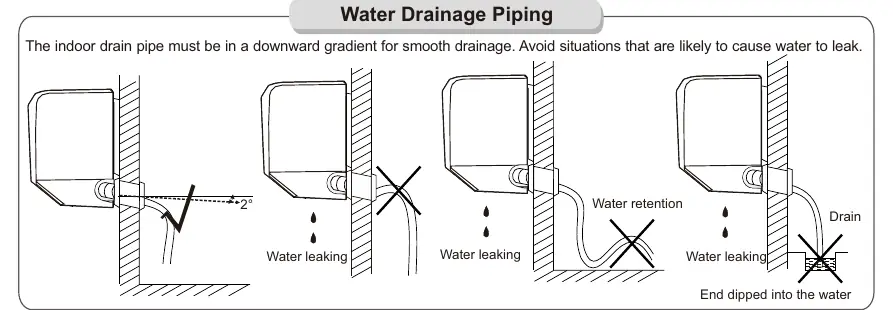
- Wall-through Hole: Drill a hole with a 5-10 degree outward slant to ensure proper drainage. Use a pipe protection ring.
- Piping: Route refrigerant piping carefully. Use insulation on joints to prevent condensation.
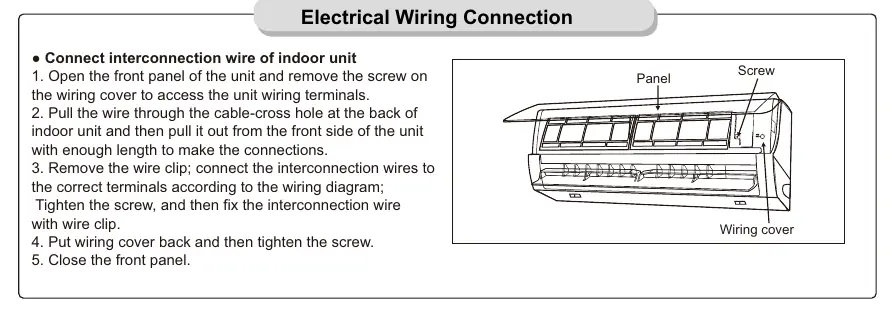
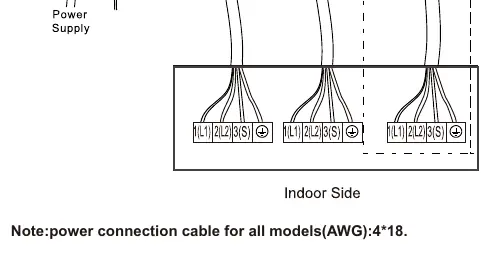
- Wiring: Use a dedicated electrical circuit. Ensure all connections are secure and match the wiring diagram.
Operation
The unit can be operated via the remote controller. If the remote is lost, an emergency force switch is located on the unit. The system includes features like airflow direction adjustment (swing) and automatic defrosting during heating cycles.
Care and Cleaning
Regular maintenance is required to ensure efficiency:
- Filters: Clean filters regularly to prevent dust accumulation. Use a vacuum or wash with warm water and mild detergent if very dirty.
- Panel: Wipe with a soft, dry cloth or a cloth slightly dampened with water.
- Outdoor Unit: Keep free of dust and debris.
Troubleshooting
Before contacting a contractor, check the following:
- Unit not cooling/heating: Check for dust on filters, open doors/windows, or incorrect mode settings.
- Abnormal sounds: Often caused by refrigerant flow or defrosting cycles, which is normal.
- Water drops: Can occur in high humidity or if the unit runs for a long time in an open space.
Manufacturer information
ACiQ
Practical help
Common problems
Air blows but unit is not cooling or heating
Check for excessive dust on filters, ensure doors and windows are closed, and verify that the mode and temperature settings are correct.
Indoor unit makes abnormal sound
Sounds like running water or clicking are often normal refrigerant flow or relay sounds. If noise is excessive, check for dust on filters or deactivate 'Strong wind' mode.
Water drops on the surface of the indoor unit
This is often a physics phenomenon in high humidity. Close doors and windows, or increase the angle of the louver blades.
Unit does not run after immediate restart
The protective delay switch will delay operation for 3 to 5 minutes. Wait for the delay to finish.
Before use
- Ensure all air inlets and outlets are unblocked.
- Verify the indoor unit drains properly.
- Confirm the ground wire is securely connected.
- Check that remote control batteries are installed and working.
- Ensure the outdoor unit is securely mounted and free from damage.
Specs in practice
- R32 Refrigerant
- A flammable refrigerant requiring specific safety handling, ventilation, and professional installation.
- Cooling Operating Range
- Indoor: 60.8°F-89.6°F (16°C-32°C); Outdoor: -13°F-125.6°F (-25°C-52°C).
- Heating Operating Range
- Indoor: 50°F-89.6°F (10°C-32°C); Outdoor: -13°F-75.2°F (-25°C-24°C).
Images and diagrams
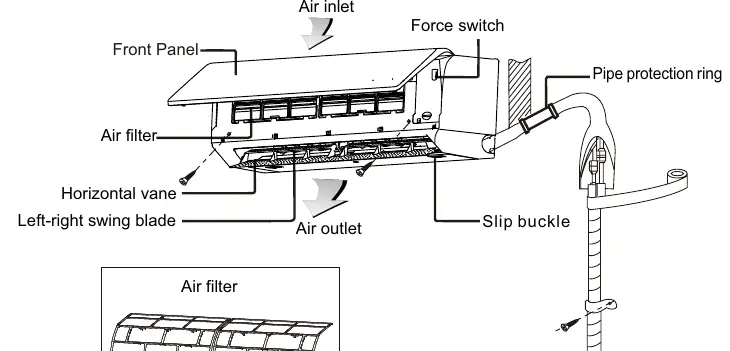
- Unit Parts: Identifies the air inlet, outlet, front panel, and force switch location.
- Mounting Plate: Shows the required clearances and screw hole locations for wall installation.
- Water Drainage: Illustrates the necessary downward gradient for the drain pipe to prevent leaks.
- Wiring Connection: Shows the terminal block layout for power and interconnection wires.
Model compatibility
- Requires professional installation by a certified contractor.
- Not for use in areas with flammable gas or poor ventilation.
- Must be installed on a dedicated electrical circuit.

Manual page author
Michael Turner
Technical manual editor
Reviews PDF manuals for structure, safety notes, and practical product details so readers can find the right information quickly.