Lighting / Fixtures
User Manual for ACME Flandina 12 LED Lighting Fixture
Quick guide for the ACME Flandina 12 LED lighting fixture. Includes installation safety, DMX configuration, menu settings, troubleshooting, and maintenance instructions.
Table of contents
Manual images
Click an image to enlargeQuick Guide
The ACME Flandina 12 is a professional LED lighting fixture designed for indoor use. Before operation, ensure the unit is installed by a qualified operator in a location with adequate ventilation (at least 50cm from adjacent surfaces). Always use a safety chain when fixing the unit and ensure the mounting structure can support 10 times the weight of the fixture. The unit must be grounded and kept away from flammable materials.
Technical Specifications
- Power Voltage: 100-240V, 50/60Hz
- Power Consumption: 55W
- Light Source: 12x3W WW LED
- Beam Angle: 4°
- Control Modes: DMX512, RDM, Primary/Secondary
- Protection Rating: IP20
- Dimensions/Weight: 998x102x106mm, 3.4kg
Control Panel and Operation
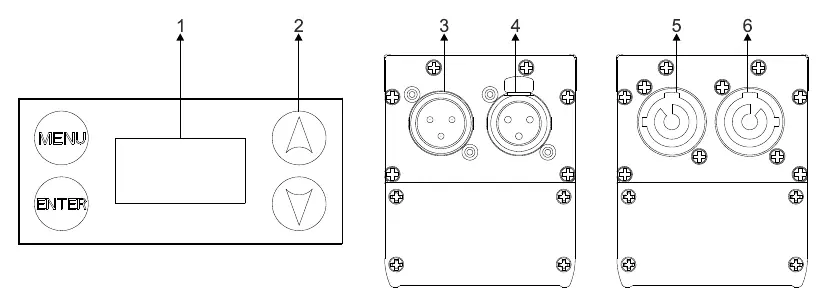
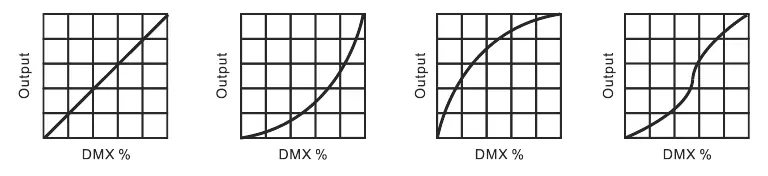
The control panel features an OLED display and four buttons: MENU, UP, DOWN, and ENTER. Use the MENU button to enter the menu mode, UP/DOWN to navigate, and ENTER to confirm selections. The unit allows for various settings including DMX address, channel modes (16/14/5 channels), dimmer curves, and display inversion.
DMX Configuration
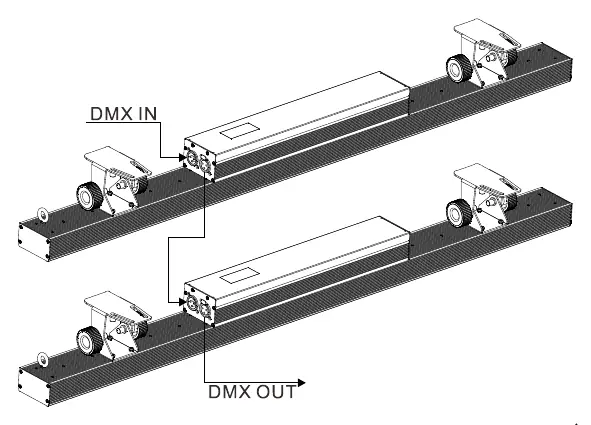
To control the fixture via DMX, connect the unit in a daisy chain using 3-pin XLR cables (5-pin optional). Ensure the last unit in the chain is terminated with a 120-ohm resistor. Each unit must be assigned a unique DMX address (1-512) to receive data from the controller.
Troubleshooting
If the unit fails to operate, check the power connection and voltage. If the unit does not respond to the DMX controller, verify the DMX cable connections and ensure the DMX address is set correctly. If a specific channel is not working, inspect the stepper motor and internal PCB cable connections.
Maintenance
Regular cleaning is essential to ensure maximum light output and reliability. Clean the fixture to remove dust, dirt, and smoke-fluid residues. Use a soft, lint-free cloth moistened with glass cleaning fluid. Do not use solvents. Clean the external optical lens at least every 20 days.
Practical help
Common problems
Unit does not work and no light
Check the connected power, measure the voltage, and verify the power indicator is lit.
Not responding to DMX controller
Check DMX connectors and cables, verify the DMX address is correctly set, and ensure cables are not running near high-voltage lines.
Channel not working
The stepper motor or the cable connected to the PCB might be damaged; contact an authorized technician.
LED Too Hot Off
The unit automatically turns off when the temperature reaches 83°C to protect the fixture.
Before use
- Inspect the unit for transportation damage before use.
- Ensure the installation location has adequate ventilation (50cm clearance).
- Verify the power voltage matches the specifications (100-240V).
- Ensure the yellow/green conductor is grounded.
- Install a safety cable capable of holding at least 12 times the fixture weight.
- Keep flammable materials away from the fixture.
Specs in practice
- Dimming/Strobe
- Smooth 0-100% dimming and variable speed strobe effect.
- DMX Channels
- Supports 16, 14, or 5 channel modes for different control complexities.
- Protection Rating
- IP20 rating indicates indoor use only, not protected against water.
Images and diagrams
- Photometric Diagram: Shows light intensity (Lux) and beam diameter at distances from 2m to 8m.
- Control Panel: Illustrates the Menu, Enter, Up, and Down buttons, and the location of DMX and Power ports.
- DMX Connections: Demonstrates how to daisy-chain multiple units using XLR cables.
Model compatibility
- Requires a universal DMX512 controller.
- 3-pin XLR connectors are standard; 5-pin is optional.
- Do not connect the device to any dimmer pack.

Manual page author
David Miller
Documentation analyst
Organizes user manual content into clear summaries, with attention to model details, product context, and everyday usability.