Lighting / Stage Lighting
QTX PAR-186 RGBWA-UV PAR Light
Quick guide for the QTX PAR-186 RGBWA-UV PAR Light. Learn how to set up, configure DMX modes, use manual controls, and troubleshoot your stage lighting fixture.
Table of contents
Manual images
Click an image to enlargeQuick Guide
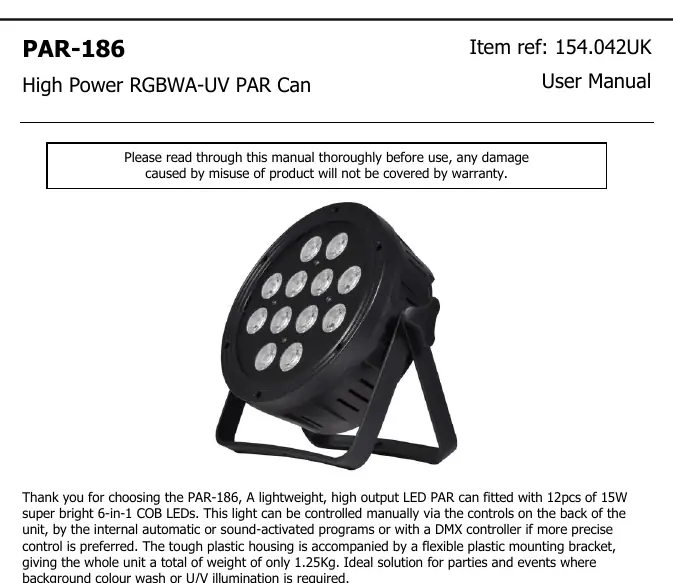
The QTX PAR-186 is a high-output LED PAR light designed for parties and events. Before use, ensure the unit is in good condition and read the safety warnings. Do not expose the unit to rain or damp environments. This device is not user-serviceable; refer all repairs to qualified personnel.
Product Overview
The PAR-186 features 12 x 15W 6-in-1 COB LEDs, providing RGBWA-UV color mixing. It is housed in a tough plastic casing with a flexible mounting bracket and weighs 1.25kg.

Installation and Placement
- Use the included mounting bracket to fix the unit to a stand or lighting truss.
- Ensure there is adequate airflow around the fixture housings to prevent overheating.
- Keep the unit away from damp or dusty environments.
- Ensure adequate access to controls and connections on the rear panel.
Operation and Controls
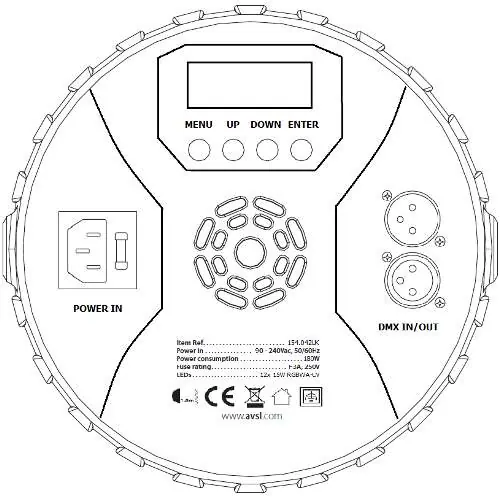
The rear panel contains the manual control buttons (Menu, Up, Down, Enter), power input, and DMX connections. Use the MENU button to enter the settings menu, UP and DOWN to navigate, and ENTER to save settings.
Manual Control Menu
- d001: DMX512 address setting (6-channel mode).
- A001: DMX512 address setting (10-channel mode).
- Various settings allow for individual color dimming (R, G, B, W, Y, P), strobe settings, color changes, fades, pulses, and sound-active modes.
DMX Mode
To use DMX control, connect the DMX signal source to the DMX input via a balanced XLR lead. You can daisy-chain extra fixtures using the DMX output. Select the appropriate mode (6CH or 10CH) from the menu and set the start address.
6 Channel Mode (d001)
Controls Red, Green, Blue, White, Amber, and UV dimming (0-100%).
10 Channel Mode (A001)
Includes Master dimmer, individual color dimming, strobe settings, and various automated modes (color change, fade, pulse, sound active) with speed control.
Maintenance
- Clean the casing using a soft cloth and a neutral detergent.
- Use a vacuum cleaner to clear dust or debris from the ventilation grilles.
- Do not use strong solvents for cleaning.
Troubleshooting
- No power: Check mains voltage and outlet. Inspect the IEC lead and fuse.
- No light output: Check control panel mode settings and DMX controller levels.
- Unresponsive to DMX: Ensure the unit is in DMX mode, the DMX address is correct, and the controller is not set to blackout. Check DMX connections and leads.
- Overheating/cutting out: Ensure adequate ventilation and distance from heat sources.
Practical help
Common problems
No power
Check that the mains voltage is correct and the outlet is switched on. Inspect the IEC lead and the fuse.
No light output
Check the control panel mode settings and verify that the DMX controller is not set to blackout or low dimmer levels.
Unresponsive to DMX
Ensure the unit is in DMX mode, the DMX address is correctly set, and the DMX controller is on the correct fixture/page. Check all DMX connections and cables.
Overheating or cutting out
Ensure there is adequate ventilation around the unit and that it is not placed too close to a heat source.
Before use
- Verify the unit arrived in good condition.
- Ensure the mounting bracket is securely attached.
- Check that the mains voltage is compatible (90-240Vac).
- Ensure adequate airflow around the fixture housing.
- Verify access to rear panel controls and connections.
Specs in practice
- 12 x 15W RGBWA-UV
- 12 LEDs, each 15W, capable of Red, Green, Blue, White, Amber, and UV color mixing.
- DMX channels 6/10CH
- Two operational modes for DMX control: 6-channel for basic color mixing and 10-channel for advanced control including strobe and automated programs.
- Beam angle 25°
- The spread of the light beam emitted by the fixture.
- Fuse rating F3A
- The required fuse type for the IEC power input.
Images and diagrams
- The rear panel diagram identifies the manual control buttons (Menu, Up, Down, Enter), the IEC power input, and the DMX input/output ports.
Model compatibility
- Requires a DMX512 controller for advanced lighting control.
- Compatible with standard IEC mains leads.

Manual page author
Emily Carter
User documentation editor
Prepares concise manual descriptions and highlights the most useful setup, operation, and maintenance information for readers.