Lighting / Fixtures
Installation Instructions for Acuity Brands CPX LED Flat Panel Light Fixture
A comprehensive installation guide for Acuity Brands CPX LED Flat Panel Light Fixtures. This manual covers safety precautions, required tools, T-bar ceiling installation steps, and electrical wiring instructions.
Table of contents
Manual images
Click an image to enlargeQuick Guide from the Manual
The Acuity Brands CPX LED Flat Panel is designed for installation in T-bar ceiling grids. Before beginning, ensure the power is turned off at the circuit breaker. The installation requires basic tools and adherence to local electrical codes. Always secure the fixture to the building structure using hanger wires for safety.
Tools Required for Installation
- Safety glasses and protective gloves
- Phillips screwdriver and flat blade screwdriver
- Pencil, ruler, and pliers
- Hammer and wire strippers
Installation Steps
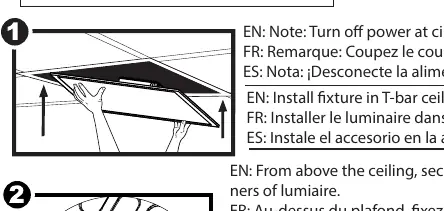
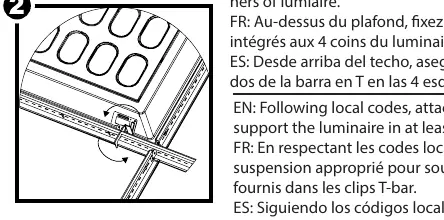
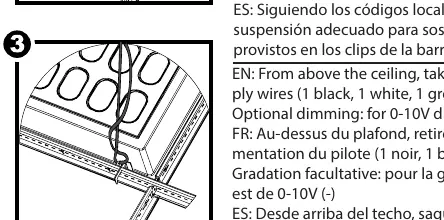
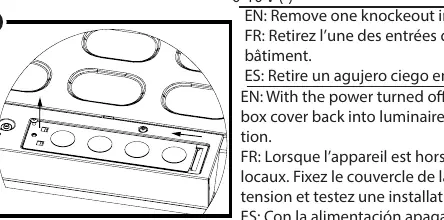
- Preparation: Turn off power at the circuit breaker box.
- Placement: Install the fixture into the T-bar ceiling opening.
- Securing: From above the ceiling, secure the luminaire to the T-bar grid by bending the built-in T-bar clips in all 4 corners.
- Safety Support: Attach the luminaire to the building structure using proper hanger wire in at least two opposite corners, using the holes provided in the T-bar clips.
- Wiring: Remove the junction box cover and locate the driver supply wires (Black, White, Green/Ground).
- Dimming (Optional): For 0-10V dimming, connect the Purple wire (0-10V+) and Gray/Pink wire (0-10V-).
- Finalizing: Remove a knockout in the access plate, attach the building supply conduit, make electrical connections according to local codes, and secure the junction box cover with the screw. Turn the power back on to test.
Safety Precautions
- Electrical Shock: Disconnect power before installation or servicing. Verify supply voltage matches the luminaire label.
- Fire/Burn Hazard: Allow the fixture to cool before handling. Do not exceed the maximum wattage marked on the label. Keep combustible materials away from the lens.
- Product Damage: Do not connect components under load. Ensure proper polarity before installation. LED products are polarity sensitive.
- Grounding: Ensure the electrical distribution system has proper grounding to avoid fixture failure and voiding the warranty.
Practical help
Common problems
Fixture is not secure in the ceiling
Ensure all 4 built-in T-bar clips are bent correctly and that hanger wires are attached to the building structure in at least two opposite corners.
Dimming function is not working
Verify that the 0-10V dimming wires are connected correctly: Purple is 0-10V(+) and Gray/Pink is 0-10V(-).
Before use
- Turn off power at the circuit breaker box
- Wear safety glasses and protective gloves
- Verify supply voltage matches the luminaire label
- Ensure proper grounding of the electrical system
- Check that the fixture is not damaged before installation
Show more Show less
Specs in practice
- 0-10V Dimming
- Control wires for dimming: Purple is positive (+), Gray/Pink is negative (-).
Images and diagrams
- The installation guide provides a 6-step visual process for T-bar ceiling mounting.
- Wiring diagrams illustrate the junction box access and the specific wire colors for power and optional dimming.
Model compatibility
- Designed for T-bar ceiling grid systems.
- Requires proper hanger wire support attached to the building structure.

Manual page author
David Miller
Documentation analyst