Home / Security
AcuRite 06008RM 3-in-1 Weather Sensor Instruction Manual
Quick guide for the AcuRite 06008RM 3-in-1 Weather Sensor. Learn how to install, mount, and set up your sensor for accurate weather tracking, including battery installation and placement tips.
Table of contents
Manual images
Jump to the sectionQuick guide from the manual
This document provides essential instructions for setting up and installing the AcuRite 06008RM 3-in-1 Weather Sensor. For optimal performance, ensure the sensor is placed away from heat and humidity sources, at least 5 feet (1.5 m) off the ground, and free from obstructions like thick walls or metal surfaces that may interfere with the wireless signal.
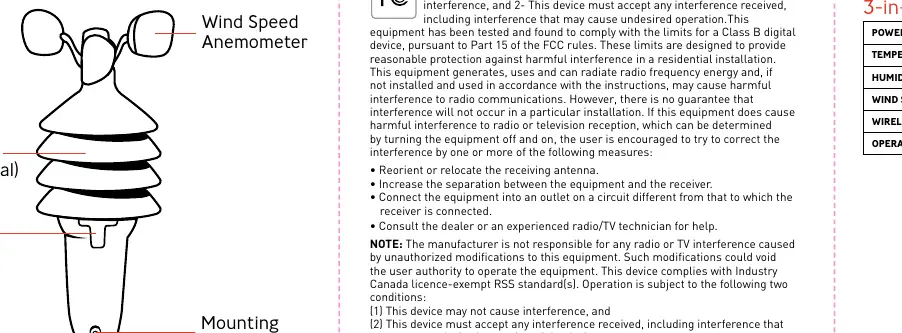
Package Contents
- 3-in-1 Weather Sensor (Model 06008RM)
- Mounting Bracket
- Mounting Hardware (4 screws, 4 anchors)
- Mounting Sleeve
Sensor Setup
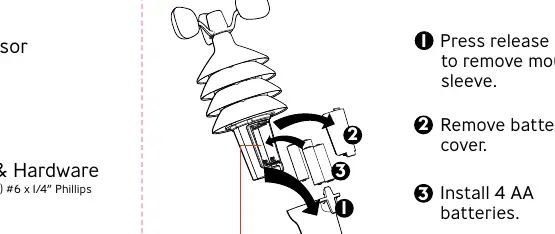
- Battery Installation: Press the release lever to remove the mounting sleeve, then remove the battery cover. Insert 4 AA batteries.
- Syncing: If you are using a display unit (not included), ensure the A-B-C switch located in the battery compartment matches the setting on your display unit.
Installation and Placement
Proper placement is critical for accuracy. Ensure no obstructions are above or around the sensor. The sensor transmits a wireless signal up to 330 ft (100 m), though this range may be reduced by home construction materials.
Mounting Methods
Top or Side Mount
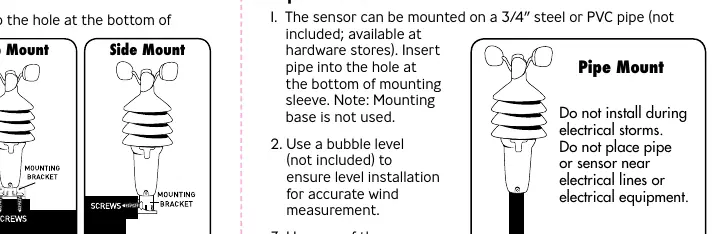
- Insert the mounting bracket into the hole at the bottom of the mounting sleeve.
- Use the small screw included in the hardware bag to fasten the mounting sleeve to the mounting bracket.
- Use a bubble level to ensure the sensor is level.
- Fasten the mounting bracket to a post or railing using 2 screws.
Pipe Mount

- The sensor can be mounted on a 3/4 inch steel or PVC pipe (not included).
- Insert the pipe into the hole at the bottom of the mounting sleeve.
- Use a bubble level to ensure level installation for accurate wind measurement.
- Use one of the screws included in the hardware bag to fasten the mounting sleeve securely to the pipe.
Specifications
- Power: 4 x AA alkaline or lithium batteries
- Temperature Range: -40°F to 158°F (-40°C to 70°C)
- Humidity Range: 1% to 99%
- Wind Speed: 0 to 99 mph (0 to 159 kph)
- Wireless Range: 330 ft (100 m)
- Operating Frequency: 433 MHz
Manufacturer information
AcuRite
Practical help
Common problems
Wireless signal issues
Ensure the sensor is not placed near thick walls or metal surfaces that may limit communication.
Inaccurate wind readings
Ensure there are no obstructions above or around the sensor and that it is mounted level.
Sensor not syncing with display
Verify that the A-B-C switch in the battery compartment matches the setting on your display unit.
Before use
- Check that the A-B-C switch matches your display unit.
- Install 4 fresh AA batteries.
- Choose a location at least 5 feet (1.5 m) off the ground.
- Ensure the location is away from heat and humidity sources.
- Verify no obstructions are above or around the sensor.
Specs in practice
- Wireless Range
- Up to 330 ft (100 m) depending on home construction materials.
- Operating Frequency
- 433 MHz, used for wireless communication.
- Temperature Range
- Operational range from -40°F to 158°F (-40°C to 70°C).
Images and diagrams
- The battery compartment is accessed by removing the mounting sleeve and battery cover.
- The mounting bracket can be configured for top or side mounting on wooden posts.
- The mounting sleeve is designed to fit over a 3/4 inch pipe for pipe mounting.
Model compatibility
- Requires a compatible AcuRite display unit (not included) for data readout.
- Compatible with 3/4 inch steel or PVC pipe for mounting.

Manual page author
David Miller
Documentation analyst
Organizes user manual content into clear summaries, with attention to model details, product context, and everyday usability.