Electronics / Monitors
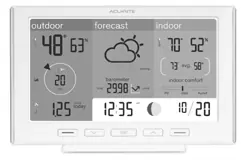
User Guide for AcuRite 06101M 5-in-1 Direct-To-Wi-Fi Display
Quick setup and operation guide for the AcuRite 06101M 5-in-1 Direct-To-Wi-Fi Display. Learn how to install batteries, mount the sensor, configure Wi-Fi, and view weather data.
Table of contents
Quick guide from the manual
This document provides instructions for setting up the AcuRite 06101M 5-in-1 Direct-To-Wi-Fi Display. The system requires the display unit, the AcuRite Iris (5-in-1) sensor, and a 2.4 GHz Wi-Fi network. Note that the Wi-Fi feature is optional; if you only wish to view data locally on the display, you can skip the Wi-Fi configuration steps.
Installation and setup
Follow these steps to prepare your hardware:
- Sensor Batteries: Open the outdoor sensor battery compartment and install four AA alkaline or lithium batteries. Lithium batteries are recommended for temperatures below -4°F (-20°C).
- A-B-C Switch: Ensure the small A-B-C switch inside the sensor battery compartment matches the setting on your display. Both are set to A by default.
- Display Power: Plug in the power adapter. The port is located inside the battery compartment on the back of the display. It is recommended to install three AAA backup batteries at this time.
- Initial Configuration: Once powered, the display will begin configuration automatically. Use the Up and Down buttons to select options and the set button to confirm. You can configure the clock, date, and units of measurement (U.S. Standard/Metric).
Mounting the sensor
For accurate weather reporting, mount the AcuRite Iris sensor outdoors following these guidelines:
- Place the sensor at least 5 ft (1.5 m) off the ground.
- Ensure the front solar cell is facing south.
- Keep the sensor away from heat and humidity sources.
- Ensure the sensor is level for accurate rain reporting.
Wi-Fi configuration
To push weather data to the internet, follow these steps:
- Connect to Temporary Network: Once the display is on, open the Wi-Fi settings on your device (phone, tablet, or computer) and connect to the network named "AcuRite".
- Access Setup Page: Open a web browser and enter 192.168.4.1 in the address bar.
- Add Credentials: Select your personal Wi-Fi network name, enter the password, and press Save.
- Complete Setup: Once connected, the Wi-Fi icon on the display will turn solid black. Reconnect your device to your normal Wi-Fi network and download the My AcuRite app or visit myacurite.com to finish.
Operation and settings
You can interact with the display using the buttons on the front:
- Blue Button: View recent outdoor historical records.
- Yellow Button: View indoor historical records.
- Set Button: Access configuration options. Use Up and Down buttons to adjust settings.
The system is compatible with Amazon Alexa and Google Assistant. Visit acurite.com/skill-setup for integration instructions.
Troubleshooting
If you encounter issues with Wi-Fi:
- Setup page does not load: Ensure you are still connected to the "AcuRite" Wi-Fi network. Try unplugging the display and plugging it back in.
- Wi-Fi icon flashes with an X: Wi-Fi needs to be configured. Repeat the Wi-Fi setup steps.
- Flashing X above Wi-Fi icon: Wi-Fi credentials may be incorrect. Re-enter them.
- Wi-Fi Signal: The display broadcasts the Wi-Fi signal for 30 minutes after power-up. Press the set button to reactivate the broadcast at any time.
Official resources from the manual
Manufacturer information
AcuRite
Practical help
Common problems
Wi-Fi setup page does not load
Ensure you are connected to the 'AcuRite' Wi-Fi network, unplug and replug the display, and try again.
Wi-Fi icon flashes with an X
Wi-Fi needs to be configured. Repeat the Wi-Fi setup steps.
Flashing X above Wi-Fi icon
Wi-Fi credentials may be incorrect. Re-enter them.
Before use
- Install 4 AA alkaline or lithium batteries in the outdoor sensor.
- Ensure the A-B-C switch in the sensor battery compartment matches the display setting (default is A).
- Install 3 AAA backup batteries in the display.
- Ensure your Wi-Fi network is 2.4 GHz (5 GHz is not supported).
- Have a phone, tablet, or computer with Wi-Fi access ready for setup.
Specs in practice
- Wi-Fi Frequency
- 2.4 GHz networks only; not compatible with 5 GHz networks.
- Sensor Mounting Height
- At least 5 ft (1.5 m) off the ground.
- Sensor Orientation
- Front solar cell must face south.
Images and diagrams
- The A-B-C switch is located inside the sensor battery compartment and must match the display setting.
- The power adapter port is located inside the battery compartment on the back of the display.
Model compatibility
- Compatible with Amazon Alexa and Google Assistant via the AcuRite skill.

Manual page author
Michael Turner
Technical manual editor
Reviews PDF manuals for structure, safety notes, and practical product details so readers can find the right information quickly.