Electronics / Monitors
AcuRite 06042M Rain Gauge Station User Guide
Quick guide for the AcuRite 06042M Rain Gauge Station. Learn how to set up the sensor, calibrate the rain gauge, and interpret display readings.
Table of contents
Manual images
Jump to the sectionQuick guide from the manual
To ensure your AcuRite 06042M Rain Gauge Station functions correctly, follow these essential steps:
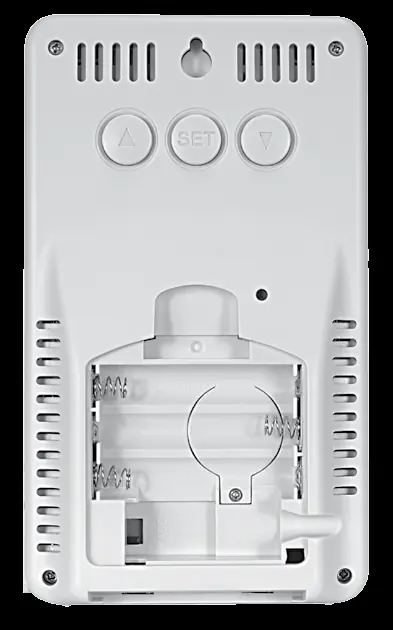
- A-B-C Switch: Before installing batteries, ensure the A-B-C switch inside the battery compartment is set to the same letter (A, B, or C) on the display, the wireless sensor, and the rain gauge.
- Batteries: Use high-quality alkaline batteries. For the wireless sensor, use lithium batteries if temperatures drop below -4°F (-20°C).
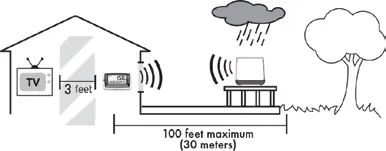
- Placement: Place the rain gauge on a flat, level surface away from obstructions. Keep the display and sensors away from large metallic items and electronic devices (TVs, microwaves) to avoid interference.
- Synchronization: After installing batteries, allow a few minutes for the units to synchronize.
Device Overview
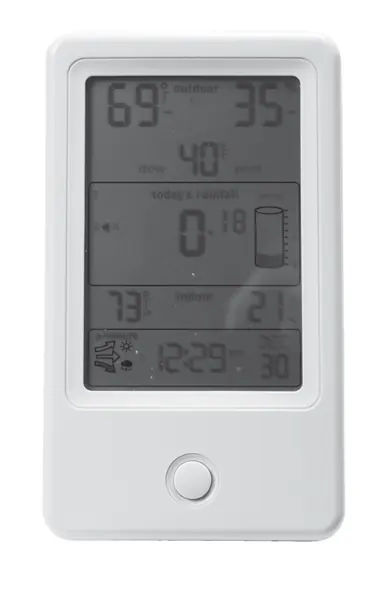
The system consists of a display unit, a wireless sensor, and a self-emptying rain gauge. The display shows indoor/outdoor temperature, humidity, rainfall totals, barometric pressure trends, and time.
Setup
A-B-C Switch: This ID code must match across all units to ensure they synchronize. Locate the switch inside the battery compartment of each device.
Battery Installation:
- Wireless Sensor: Slide off the cover, set the A-B-C switch, and insert 2 AA batteries.
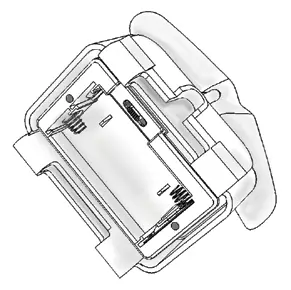
- Rain Gauge: Separate the cover from the base, remove the battery box, set the A-B-C switch, and insert 2 AA batteries.
- Display: Remove the battery cover and insert 3 AAA batteries.
Installation
Placement Guidelines:
- Rain Gauge: Must be placed on a flat, level surface. Avoid low spots that could flood or areas with overhead obstructions. Fasten to a sturdy surface using the included screws.
- Wireless Sensor: Place outside in a location protected from direct weather elements, 4 to 8 feet above the ground.
- Range: The display and rain gauge must be within 100 ft (30 m) of each other. The display and wireless sensor must be within 330 ft (100 m) of each other.
Operation
Programmable Rain Alarm: You can set an alarm to notify you when a programmed rainfall value is reached. Use the SET button to enter setup mode and navigate to the alarm settings.
Rainfall Tracking: Press the arrow button on the front of the display to review historical rainfall records, including previous day, current week, monthly totals, and yearly totals.
Calibration
Temperature & Humidity: You can calibrate readings to improve accuracy. Press and hold the up, down, and SET buttons for 10 seconds to enter calibration mode.
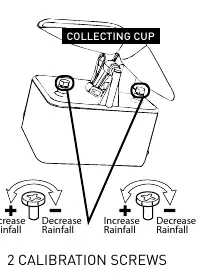
Rain Gauge: If the rain gauge is inaccurate, you can calibrate it using the two screws located beneath the tipping cups. Turning the screws counter-clockwise increases the rainfall reading, while clockwise decreases it.
Maintenance
Clean the display, sensor, and rain gauge with a soft, damp cloth. Do not use caustic cleaners. During freezing temperatures, bring the rain gauge indoors to prevent damage from expanding ice.
Troubleshooting
- No reception: Relocate units to ensure they are within range and away from electronic interference. Check battery levels.
- Flashing/Dashes: Indicates wireless interference. Remove batteries from all units, reinstall, and place them near each other for a few minutes to re-establish a strong connection.
Specifications
Temperature Range: Outdoor: -40°F to 158°F (-40°C to 70°C); Indoor: -4°F to 122°F (-20°C to 50°C).Humidity Range: 1% to 99% RH.Operating Frequency: 433 MHz.Power: Display: 3 x AAA; Wireless Sensor: 2 x AA; Rain Gauge: 2 x AA.
Manufacturer information
AcuRite
Practical help
Common problems
No wireless sensor or rain gauge reception
Relocate the display and/or sensors to be within range (330ft/100m for sensor, 100ft/30m for rain gauge). Ensure they are at least 3 feet away from electronics like TVs or microwaves.
Outdoor temperature or humidity is flashing or showing dashes
This indicates wireless interference. Bring the sensor and display indoors, remove batteries from both, reinstall them, and let the units sit near each other for a few minutes to gain a strong connection.
Rain gauge freezing
Bring the rain gauge indoors during freezing temperatures. Water expands when it freezes, which can crack the plastic and cause permanent damage.
Before use
- Remove the protective film from the LCD screen.
- Set the A-B-C switch to the same letter on the display, sensor, and rain gauge.
- Install fresh alkaline batteries in all units.
- Place the rain gauge on a flat, level surface.
- Ensure all units are within the specified wireless range.
Specs in practice
- Operating Frequency
- 433 MHz wireless signal used for communication between units.
- Wireless Range
- Up to 330 ft (100 m) for the sensor and 100 ft (30 m) for the rain gauge, depending on home construction materials.
- Temperature Range
- Outdoor: -40°F to 158°F (-40°C to 70°C); Indoor: -4°F to 122°F (-20°C to 50°C).
Images and diagrams
- The A-B-C switch is located inside the battery compartment of each device and must match for synchronization.
- Calibration screws are located beneath the tipping cups in the rain gauge; turn counter-clockwise to increase rainfall readings and clockwise to decrease them.
Model compatibility
- The rain gauge is not designed for use in freezing temperatures.
- Use lithium batteries in the wireless sensor if temperatures drop below -4°F (-20°C).

Manual page author
Emily Carter
User documentation editor
Prepares concise manual descriptions and highlights the most useful setup, operation, and maintenance information for readers.