Power / Batteries Chargers
Instruction Manual for Acurite 06102M Wireless HD Weather Station with WiFi
Quick setup guide for the Acurite 06102M weather station, including sensor installation, Wi-Fi configuration, calibration, and troubleshooting steps.
Table of contents
Manual images
Jump to the sectionQuick guide from the manual
This document provides setup instructions for the Acurite Iris (5-in-1) Direct-To-Wi-Fi Display (model 06102M) and the associated weather sensor. It covers initial hardware installation, Wi-Fi connectivity, and basic maintenance.
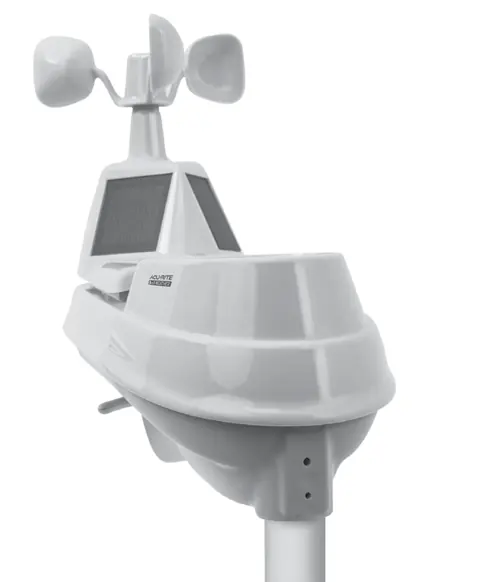
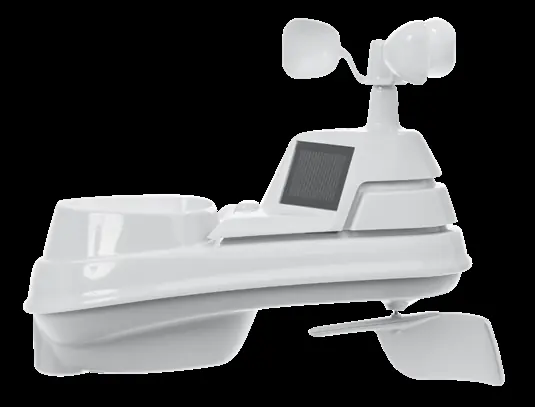
Sensor installation
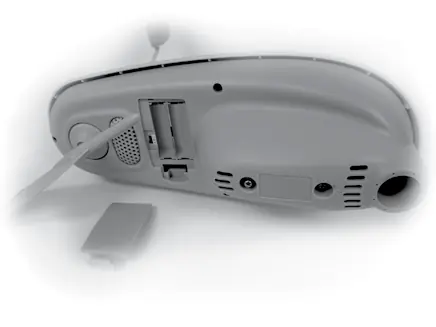
- Install four AA alkaline or lithium batteries in the outdoor sensor battery compartment. Use lithium batteries if temperatures drop below -4°F (-20°C).
- Ensure the A-B-C switch inside the sensor battery compartment matches the setting on your display unit (default is A).
- Remove the plastic rain gauge stabilizer tab from the bottom of the sensor.
- Mount the sensor at least 5 feet (1.5 m) off the ground in an open area, with the solar cell facing south, away from heat, humidity, and obstructions.
Display and Wi-Fi setup
Once the display is powered on, configuration begins automatically. Use the Up/Down buttons to adjust settings and the Checkmark button to confirm.
To connect to Wi-Fi:
- Connect your phone or computer to the temporary Wi-Fi network named "AcuRite".
- Open a web browser and navigate to 192.168.4.1.
- Select your home Wi-Fi network (2.4 GHz only) and enter your password.
- Once connected, the Wi-Fi icon on the display will turn solid gray.
Calibration and maintenance
The rain gauge can be calibrated by dripping exactly 1 cup (8oz) of water through it over a period of more than 20 minutes. If the reading is not 1.06", adjust the two calibration screws on the bottom of the sensor. Turning screws clockwise increases the rainfall reading; counter-clockwise decreases it.
Troubleshooting
- If the Wi-Fi setup page does not load, ensure you are connected to the "AcuRite" network, or power cycle the display.
- If the Wi-Fi icon shows a red X, credentials may be incorrect; repeat the setup process.
- For interference issues, ensure the sensor is at least 3 feet away from electronics like TVs, computers, or microwaves.
Manufacturer information
AcuRite
Practical help
Common problems
Wi-Fi setup page does not load
Ensure you are connected to the 'AcuRite' network, or unplug the display and plug it back in to restart the 30-minute setup window.
Wi-Fi icon shows a red X
Wi-Fi credentials may be incorrect. Re-enter your network name and password.
Rain gauge reading inaccurate
Calibrate the gauge using the 1-cup water test and adjust the two calibration screws on the bottom of the sensor.
Before use
- Install 4 AA batteries in the sensor (lithium recommended for cold weather).
- Ensure A-B-C switch on sensor matches the display.
- Remove the plastic rain gauge stabilizer tab.
- Mount sensor at least 5 feet off the ground.
- Ensure Wi-Fi network is 2.4 GHz (5 GHz is not supported).
Specs in practice
- Wireless Range
- 330 feet (100 meters) depending on home construction materials.
- Operating Frequency
- 433 MHz.
- Temperature Range
- -40°F to 158°F (-40°C to 70°C).
Images and diagrams
- The A-B-C switch must be set to the same letter on both the sensor and the display unit to ensure synchronization.
- The rain gauge stabilizer is a plastic tab that must be removed for the rain gauge to function.
- The solar cell on the sensor must face South for optimal performance.
Model compatibility
- Compatible with Amazon Alexa and Google Assistant via the AcuRite skill.
- Wi-Fi setup requires a 2.4 GHz network; 5 GHz networks are not supported.

Manual page author
Emily Carter
User documentation editor
Prepares concise manual descriptions and highlights the most useful setup, operation, and maintenance information for readers.