Home Appliances / Air Fryers
User Manual for Adexa 12L Air Fryer
Quick guide for the Adexa 12L Air Fryer (model BF929A). Learn how to operate the digital control panel, use cooking presets, clean the unit, and troubleshoot common issues.
Table of contents
Manual images
Click an image to enlargeQuick Start Guide
Before using your Adexa 12L Air Fryer for the first time, remove all packaging materials, stickers, and labels. Hand wash the round basket and cooking accessories with warm soapy water. Wipe the interior and exterior of the unit with a clean, moist cloth. Preheat the unit for a few minutes to burn off any manufacturing residue.
Product Overview
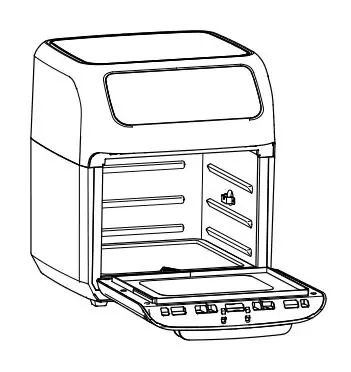
The unit features a main housing with a digital control panel, air intake and outlet vents, and various accessories including crisper trays, a drip tray, a round basket, a rotisserie shaft with forks, and a rotisserie fetch tool. Always ensure the unit is placed on a stable, level, heat-resistant surface with at least 12cm of free space on all sides.
Using the Digital Control Panel
The control panel allows you to manage cooking functions:
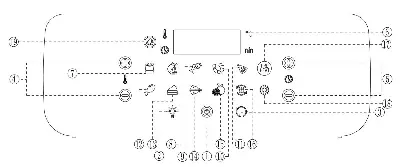
- Power/Start-Stop Button: Plug in the unit to illuminate the panel. Press once to light up, and a second time to start the default cooking process (150°C for 15 mins). Pressing during operation shuts down the unit.
- Internal Light: Use to check cooking progress. Opening the door also pauses the unit and illuminates the light.
- Rotation Button: Use when cooking with the Rotisserie mode.
- Temperature Control: Adjust temperature from 80°C to 200°C (Dehydration: 30°C to 75°C).
- Time Control: Set cooking time from 1 to 90 minutes (Dehydration: 2-24 hours).
- Cooking Presets: Select from various presets (French Fry, Roast, Fish, Shrimp, Pizza, Chicken, Baking, Rotisserie, Dehydrator, Reheat, Preheat, Frozen Food) to automatically set time and temperature.
Cooking Instructions
Place ingredients on a crisper tray, rotisserie accessory, or in the round basket. Insert into the unit and close the door. Select a preset or manually adjust time and temperature. The unit will start automatically after a few seconds or when the Power Button is pressed. Always use oven mitts when handling hot accessories. If the unit emits black smoke, unplug it immediately.
Cleaning and Maintenance
Clean the unit after each use. The round basket and accessories are dishwasher safe. Never use abrasive cleaning materials. To clean the glass door, open the door, push the button on the bottom side, and slide the glass out. Wipe the unit exterior with a warm, moist cloth and mild detergent. Ensure the unit is completely cool before cleaning or storing.
Troubleshooting
If the unit does not work, ensure it is plugged into a dedicated outlet and the door is fully closed. If food is not cooked evenly, try smaller batches or adjust the temperature. For white smoke, clean the unit of excess grease. If error codes E1 or E2 appear, contact customer service as this indicates a thermal sensor issue.
Manufacturer information
Adexa Direct
Practical help
Common problems
Unit does not work
Ensure the power cord is plugged into a dedicated wall socket and the door is securely closed.
Food not cooked
The basket may be overloaded; use smaller batches. Alternatively, raise the temperature.
White smoke coming from unit
Wipe down the unit to remove excess oil and clean the round basket thoroughly after each use.
Error codes E1 or E2
This indicates a broken or short circuit of the thermal sensor. Contact customer service.
Before use
- Remove all packaging, warning stickers, and labels.
- Hand wash the round basket and cooking accessories.
- Wipe the inside and outside of the unit with a clean, moist cloth.
- Preheat the unit for a few minutes to burn off any residue.
Specs in practice
- Supply Power
- 220-240V 50Hz
- Temperature Range
- 80-200°C (Dehydration: 30-75°C)
Images and diagrams
- The control panel includes buttons for power, internal light, rotation, temperature, and time adjustments.
- The rotisserie fetch tool is used to safely remove hot rotisserie shafts or baskets.
Model compatibility
- Only the accessories are dishwasher safe; the main unit is not.
- Do not use with any type of extension cord.
- Operate on a dedicated electrical circuit to avoid overloading.

Manual page author
David Miller
Documentation analyst
Organizes user manual content into clear summaries, with attention to model details, product context, and everyday usability.