Furniture / Beds & Mattresses
Assembly Guide for Alcott Hill 1000LBS Platform Bed
Step-by-step assembly instructions for the Alcott Hill 1000LBS Platform Bed with Wingback Headboard. Includes parts list, hardware guide, and safety warnings.
Table of contents
Manual images
Click an image to enlargeQuick Guide from the Manual
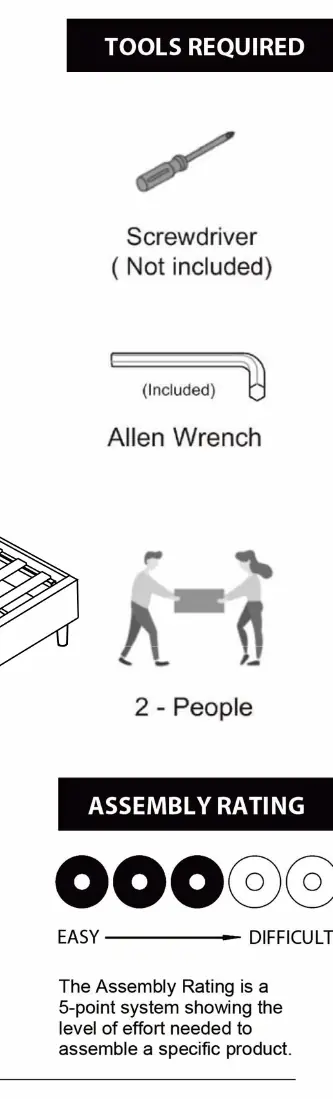
This document provides assembly instructions for the Alcott Hill 1000LBS Platform Bed. The assembly requires two people and a screwdriver (not included). An Allen wrench is provided. Please review all parts and hardware before beginning assembly to ensure nothing is missing.
Assembly Preparation
Before starting, verify that all parts and hardware are accounted for. If any parts are missing or damaged, contact the manufacturer for replacements. Review the assembly diagrams thoroughly. The assembly rating is a 5-point system indicating the level of effort required.
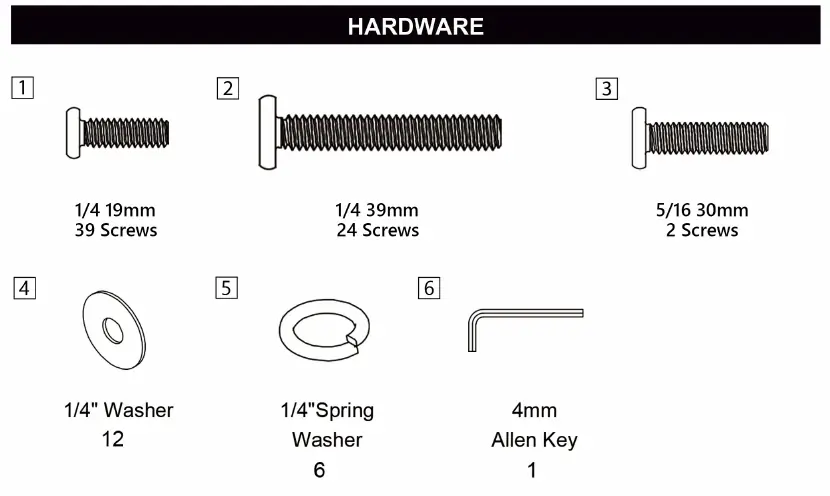
Parts and Hardware
The bed frame consists of various components labeled with letters (A, A1, A2, B, C, D, E, F, G, H, I, J, K, L, N, P, S, T, Z). Hardware includes 1/4 19mm screws, 1/4 39mm screws, 5/16 30mm screws, 1/4 washers, 1/4 spring washers, and a 4mm Allen key.

Assembly Instructions
Follow these steps to assemble the bed:
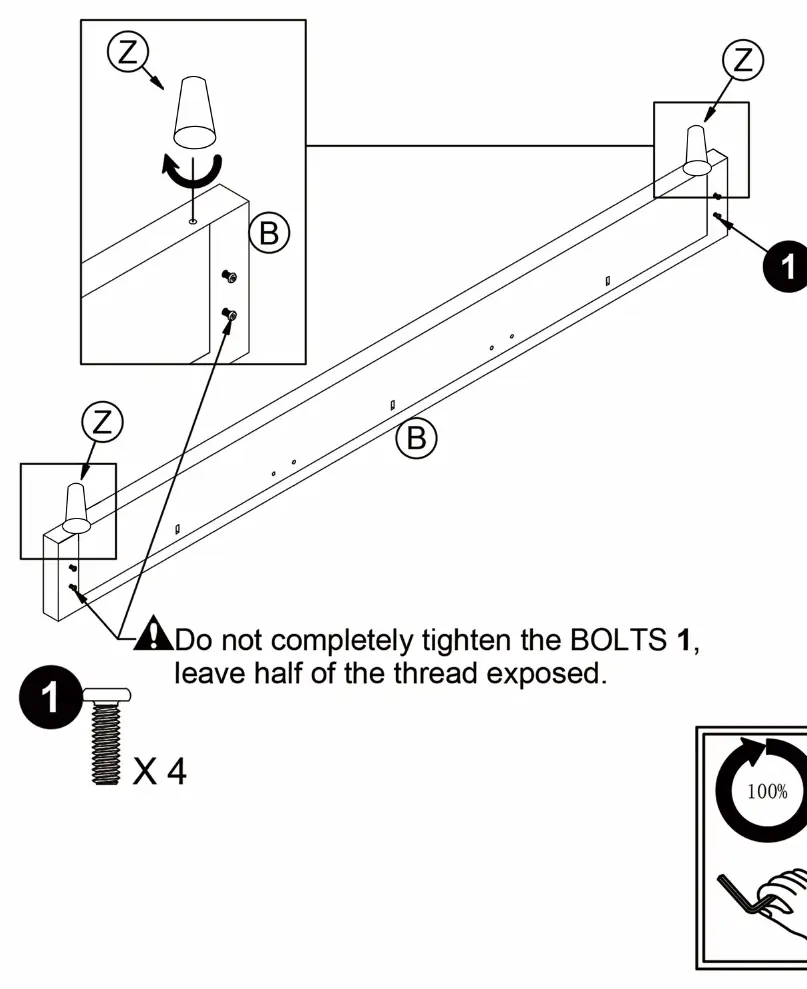
- Step 1: Attach the legs (Z) to the side rails (B) using screws (1). Do not fully tighten the bolts; leave half the thread exposed.
- Step 2: Attach the brackets (S, T, I) to the side rails (C, D, E, F) using screws (1).
- Step 3: Connect the side rails (B, D, F) using the brackets (S).
- Step 4: Attach the headboard components (A1, A2) to the frame using screws (2), washers (4), and spring washers (5).
- Step 5: Secure the headboard (A) to the frame using screws (2) and washers (4).
- Step 6: Attach the support legs (J) to the center support rails (H) using screws (1).
- Step 7: Connect the center support rails (H) to the frame using screws (1).
- Step 8: Install the cross slats (K) and support rails (L) using screws (1) and (3).
- Step 9: Secure the remaining frame components using screws (2).
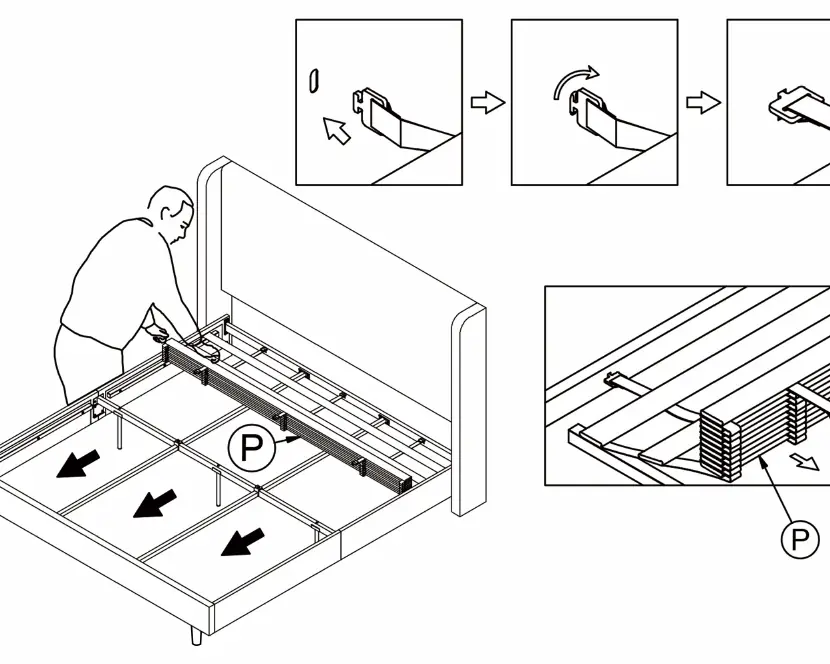
- Step 10-11: Install the slat system (P) onto the frame.
- Step 12: Attach the final headboard panel (N).
Care and Maintenance
To maintain the bed, position each part correctly and insert screws or bolts into their respective holes. Turn clockwise to tighten. Use appropriate hand tools or power tools for assembly, but be careful not to overtighten. Save the instructions and store the supplied tools for later maintenance. After two weeks, check and tighten all loose hardware, and repeat this process every six months.
Safety Warnings
- This bed is not intended for use by children under 4 years old.
- Prohibit jumping and horseplay on this bed.
- Do not use risers under this bed.
- Failure to follow guidelines may result in injury or property damage.
Practical help
Common problems
Missing parts or hardware
Double-check all parts and hardware against the list before starting assembly.
Loose hardware over time
Check and tighten all hardware after two weeks, then every six months.
Before use
- Verify all parts and hardware are present.
- Ensure two people are available for assembly.
- Have a screwdriver ready (not included).
- Review all assembly diagrams.
- Ensure the assembly area is clear.
Specs in practice
- Weight Limit
- 1000LBS
- Assembly Rating
- A 5-point system showing the level of effort needed to assemble the product.
Images and diagrams
- Steps 1-12 illustrate the sequential assembly of the frame, headboard, and slat system.
- Hardware diagrams show specific screw sizes and washer types for each step.
Model compatibility
- Not intended for use by children under 4 years old.
- Do not use risers under this bed.

Manual page author
David Miller
Documentation analyst
Organizes user manual content into clear summaries, with attention to model details, product context, and everyday usability.