Automotive / Electric Scooters
Installation Guide for Alpine S-S65C Component Speakers
A comprehensive installation guide for the Alpine S-S65C 2-way component speaker system. Includes instructions for woofer and tweeter mounting, wiring connections, and tweeter height adjustments.
Quick answers from the manual
Quick answer
- The Alpine S-S65C is a 2-way component speaker system. Installation involves mounting the woofer and tweeter, connecting the wiring network, and adjusting tweeter height. p. 1
Key actions
- Mount the woofer using the provided screws and clips based on your vehicle's mounting style. p. 1
- Install the tweeter using either the swivel flush mount or stealth mount method. p. 1
- Connect the wiring according to the provided diagram, ensuring proper polarity to the amplifier. p. 1
Technical specifications
| Parameter | Value | Meaning | Pages |
|---|---|---|---|
| Tweeter Height Adjustment | 4 settings (A, B, C, D) | Allows for physical height adjustment of the tweeter. | p. 1 |
Where to find it in the PDF
- Installation Guide p. 1
Table of contents
Manual images
Click an image to enlargeQuick guide from the manual
This document provides the installation procedure for the Alpine S-S65C 2-way component speaker system. It covers the mounting of woofers and tweeters, wiring connections, and tweeter height adjustments. Ensure you have all components listed in the contents before beginning the installation.
Parts list
The package includes the following components:
- 2x Woofers
- 2x Tweeters
- 2x Networks
- Mounting screws (M4x6mm and 4x30mm)
- Mounting clips
- Various mounting rings and grilles
- Wiring harness
Woofer installation
The woofer can be installed using different methods depending on your vehicle's requirements:
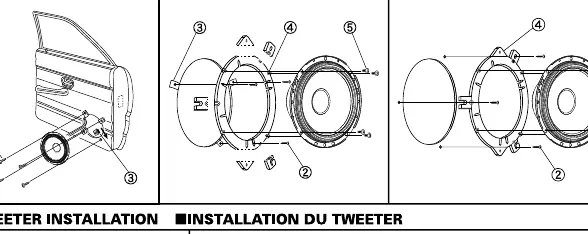
- Factory/size-down/stealth: Follow the diagram to secure the woofer using the provided screws and clips.
- Factory/OEM custom fit/stealth: Utilize the specific mounting hardware provided to ensure a secure fit within the factory speaker location.
Tweeter installation
The tweeter supports two primary mounting methods:
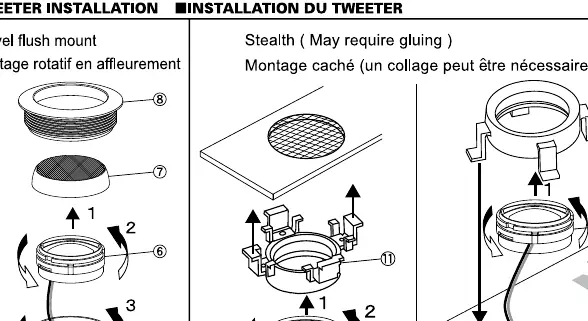
- Swivel flush mount: Assemble the tweeter housing, ring, and grille as shown in the diagram to create a flush mount.
- Stealth mount: This method may require gluing. Follow the assembly steps to secure the tweeter in the desired location.
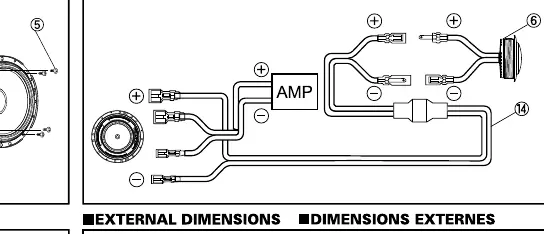
Wiring connection
Connect the speakers to the network and amplifier as illustrated in the wiring diagram. Ensure that the positive (+) and negative (-) terminals are connected correctly to maintain proper phase and sound quality.
Tweeter height adjustment
The tweeter height can be adjusted to four different positions (A, B, C, D) to suit your installation requirements. Select the position that best fits your mounting depth and aesthetic preference.
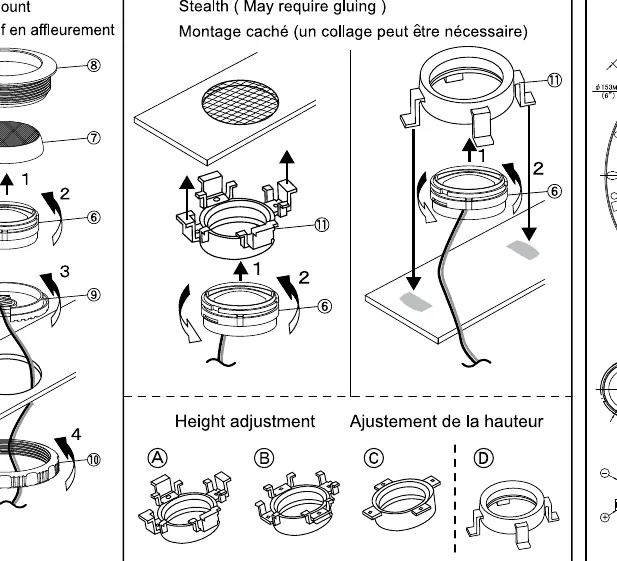
External dimensions
Refer to the external dimensions diagram for precise measurements of the woofer and tweeter to ensure compatibility with your vehicle's door panels and mounting locations.
Practical help
Common problems
Tweeter fitment issues
If the standard swivel flush mount does not fit, use the 'Stealth' mounting method, which may require adhesive.
Woofer mounting depth
Check the 'External Dimensions' section to verify the speaker depth against your vehicle's door panel clearance.
Before use
- Verify all parts (woofer, tweeter, network, screws, clips) are present.
- Check vehicle door panel space for woofer mounting.
- Determine if factory/OEM custom fit or stealth mounting is required for the woofer.
- Decide on swivel flush mount or stealth mount for the tweeter.
- Ensure you have the necessary tools for installation.
Specs in practice
- Woofer mounting
- Supports factory/size-down/stealth or factory/OEM custom fit/stealth configurations.
- Tweeter mounting
- Supports swivel flush mount or stealth mounting (may require gluing).
- Tweeter height
- Adjustable via four different height settings (A, B, C, D).
Images and diagrams
- The diagram shows the assembly of the woofer and tweeter components.
- Wiring diagram illustrates the connection between the speakers, network, and amplifier.
Model compatibility
- Designed for vehicle audio systems.
- Tweeter stealth mounting may require adhesive.

Manual page author
Emily Carter
User documentation editor
Prepares concise manual descriptions and highlights the most useful setup, operation, and maintenance information for readers.