Automotive / Car Audio
Installation Manual for Metra 99-7876 Dash Kit
Step-by-step installation guide for the Metra 99-7876 dash kit designed for the Honda Pilot 2009-up. Includes instructions for dashboard disassembly, kit preparation, radio assembly, and wiring connections.
Quick answers from the manual
Quick answer
- The Metra 99-7876 is a dash kit for installing an aftermarket radio in a 2009-up Honda Pilot. The process involves disassembling the dashboard, preparing the kit with factory clips, assembling the radio with the climate control, and wiring the connections using standard EIA color codes. p. 1, 3, 4, 5
Key actions
- Disconnect the negative battery terminal p. 3
- Strip and solder wiring connections p. 7
Technical specifications
| Parameter | Value | Meaning | Pages |
|---|---|---|---|
| 12V Ignition / Acc. | Red | Power source | p. 7 |
| Ground | Black | Chassis ground | p. 7 |
Where to find it in the PDF
- Dash Disassembly p. 3, 4
- Kit Preparation p. 5
- Kit Assembly p. 6
- Final Assembly p. 7
Table of contents
Manual images
Click an image to enlargeQuick guide from the manual
This document provides instructions for installing the Metra 99-7876 dash kit in a 2009-up Honda Pilot. Before beginning, ensure you have the necessary tools: a small flat blade screwdriver, a panel removal tool, a Phillips screwdriver, and wire cutters. Always disconnect the negative battery terminal before starting to prevent accidental short circuits.
Dash Disassembly
Follow these steps to remove the factory radio:
- Disconnect the negative battery terminal.
- Unclip and remove the left and right A/C vent panels surrounding the shifter.
- Remove the two Phillips screws securing the pocket below the radio, then unclip and remove the pocket.
- Remove the four Phillips screws securing the radio, unplug, and remove the radio.
- Remove the six screws retaining the three clip assemblies at the top edge of the factory radio/climate control assembly. Retain these screws and clips for reuse.
- Remove the four Phillips screws securing the factory climate control. Unplug and remove the climate control, retaining the screws for later use.
Kit Preparation
Prepare the new radio housing for installation:
- Cut and remove the support strut on the radio housing.
- Attach the three clips removed during the disassembly process to the new radio housing using the factory hardware.
Kit Assembly
Assemble the new unit:
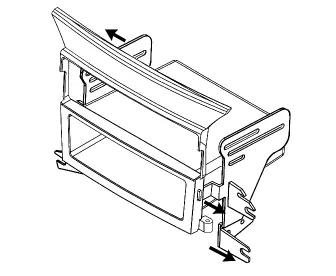
- Attach the corresponding radio housing bracket to the radio housing.
- Attach the factory climate control to the assembly using the four Phillips screws removed during disassembly.
- Position the aftermarket radio into the radio housing and secure it using the hardware supplied with the radio.
Final Assembly
Complete the installation by connecting the wiring:
- Locate the factory wiring harness in the dash.
- Use a proper mating adapter for connections.
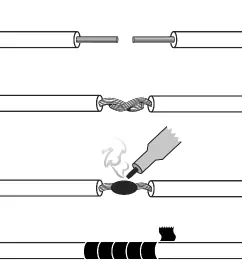
- Strip wire ends back 1/2 inch, twist ends together, solder, and tape.
- Isolate and individually tape off the ends of any unused wires to prevent electrical short circuits.
- Re-connect the negative battery terminal and test the unit for proper operation.
- Reassemble the radio and dash assemblies in reverse order of disassembly.
Practical help
Common problems
Accidental short circuit during installation
Always disconnect the negative battery terminal before starting any work.
Electrical issues from unused wires
Isolate and individually tape off the ends of any unused wires.
Before use
- Disconnect the negative battery terminal
- Gather tools: Small flat blade screwdriver, panel removal tool, Phillips screwdriver, wire cutters
- Verify vehicle compatibility: Honda Pilot 2009-up
- Ensure you have the required wiring harness (70-1729) and antenna adapter (40-HD10) if applicable
Specs in practice
- 12V Ignition / Acc.
- Red wire connection
- 12V Batt / Memory
- Yellow wire connection
Images and diagrams
- Wiring connection steps: Strip 1/2 inch of insulation, twist wires together, solder the connection, and wrap with electrical tape.
Model compatibility
- Designed specifically for Honda Pilot 2009-up vehicles.

Manual page author
Michael Turner
Technical manual editor
Reviews PDF manuals for structure, safety notes, and practical product details so readers can find the right information quickly.