Power / Batteries & Chargers
User Manual for Jump Starter Q6
Quick guide for the Jump Starter Q6. Learn how to safely jump-start your vehicle, understand LED indicators, use the flashlight, and troubleshoot common issues.
Table of contents
Manual images
Click an image to enlargeQuick guide from the manual
The Jump Starter Q6 is designed to start vehicles with gas engines up to 7.2L or diesel engines up to 5.5L. Before use, ensure the device is charged to over 50%. Always check that the battery clamps and cables are intact and the battery connector is clean before connecting to your vehicle.
Safety Instructions
- Keep the product away from liquids or corrosive materials.
- Do not operate if the product has been dropped or damaged; seek qualified service.
- Do not disassemble the product.
- Unplug the product before attempting any maintenance.
- Avoid long exposure to direct sunlight and open flames.
- If the battery is swollen, leaking, or smells bad, discard it immediately.
- Ensure the battery clamp is fully plugged in to avoid damage.
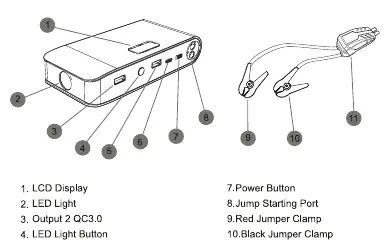
At A Glance
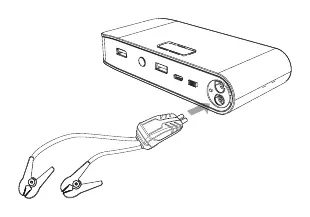
The device features an LCD display, LED light, two USB-A output ports, a Type-C input port, a power button, and a jump starting port. The smart clamp plug connects to the jump starting port.
Jump Starting Your Car
- Turn on the jump starter and ensure it is over 50% charged.
- Insert the jumper cables into the jump starting port; the cable indicator light will flash red and green alternately.
- Connect the red clamp to the positive (+) terminal and the black clamp to the negative (-) terminal of the car battery. The indicator light will turn green.
- Start your car.
- After a successful start, promptly remove the clamps from the car battery and store them.
Mandatory Start Steps
If the car fails to start with the normal steps, use the Force Start function:
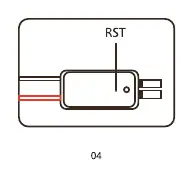
- Remove the black clamp.
- Press the RST button with a needle until the indicator turns green.
- Connect the red clamp to the positive (+) end and the black clamp to the negative (-) end of the car battery.
- Start the car.
- Remove the clamps and pack away.
LED Indicator Guide
- Solid red light: Battery voltage is too low or too high. Check that the jump starter has enough power.
- Red/green light flashes alternately: Ready to work.
- Solid red light with a long beep: Short circuit. Disconnect cables immediately.
- Solid red light with short beeps: Clamps are connected incorrectly. Ensure red is on positive (+) and black is on negative (-).
- Solid red light after green: Failed to start within 30 seconds. Disconnect and wait 30 seconds before reconnecting.
Using The Flashlight
To operate the flashlight:
- Long press for 3 seconds to turn the flashlight on.
- Press again for Strobe light.
- Press again for SOS light.
- Press again to turn the light off.
Technical Specifications
- Model No.: Q6
- Capacity: 16000mAh
- Starting Current: 800A
- Peak Current: 1600A
- Input: 5V/3A
- USB Output: QC3.0: 5V/9V 2A; USB-A Port: 5V/2.1A
- Compatible Vehicle Type: Up to 7.2L Gas or 5.5L Diesel Engine
- Working Temperature: -20°C to 65°C
Troubleshooting
If you cannot jump start the car, ensure the clamps are connected correctly, the 30-second timer has not expired, and the battery status is sufficient (recharge if necessary). If the flashlight or indicator lights are not working, recharge the device via the USB cable.
Practical help
Common problems
Cannot jump start
Check that clamps are connected to the correct terminals, ensure the 30-second timer has not expired, and verify the device has at least 3 solid lights (over 50% charge).
Flashlight is not working
The battery is low; please recharge the jump starter via the USB cable.
No indicator light
Recharge the device or press the power on/off button to start the power bank mode.
Before use
- Ensure the device is charged to over 50%.
- Check that battery clamps and cables are intact.
- Ensure the battery connector is clean.
- Verify vehicle compatibility (up to 7.2L Gas or 5.5L Diesel).
- Ensure the battery clamp is fully plugged into the jump starter.
Specs in practice
- Peak Current
- 1600A - The maximum current the device can deliver for starting.
- Compatible Vehicle Type
- Supports up to 7.2L Gas or 5.5L Diesel engines.
- Working Temperature
- -20°C to 65°C - The operational temperature range for the device.
Images and diagrams
- At A Glance: Identifies the LCD display, LED light, output ports, input port, power button, and jump starting port.
- RST Button: Located on the jumper cable box, used for force starting if normal steps fail.
Model compatibility
- Compatible with Gas engines up to 7.2L.
- Compatible with Diesel engines up to 5.5L.

Manual page author
David Miller
Documentation analyst
Organizes user manual content into clear summaries, with attention to model details, product context, and everyday usability.