Power / Batteries & Chargers
User Manual for Amazon Basics 12V Battery Charger AB107
Quick guide for the Amazon Basics 12V Battery Charger (AB107). Learn how to safely charge 6V and 12V lead-acid batteries, understand LED indicators, and follow step-by-step charging procedures for in-vehicle and external batteries.
Table of contents
Manual images
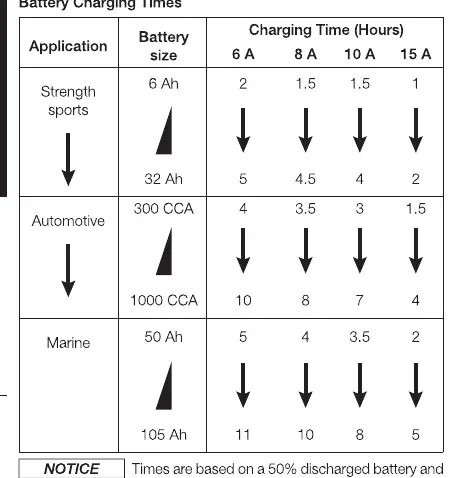
Click an image to enlargeQuick guide from the manual
The Amazon Basics 12V Battery Charger (AB107) is designed for 6V and 12V lead-acid (STD or AGM) rechargeable batteries. It features an auto-start function, meaning the clamps will not spark when touched together until a battery is properly connected. Always ensure the area is well-ventilated and follow the specific connection steps to avoid sparks and potential battery explosions.

Important Safety Instructions
Risk of explosive gases: Lead-acid batteries generate explosive gases during normal operation. Follow these precautions:
- Keep out of reach of children.
- Do not expose the charger to rain or snow.
- Never smoke or allow sparks/flames near the battery or engine.
- Remove personal metal items like rings, bracelets, and watches when working near a lead-acid battery.
- Wear complete eye and clothing protection.
- If battery acid contacts skin or clothing, wash immediately with soap and water. If it enters eyes, flood with cold water for at least 10 minutes and seek medical attention.
- Never charge a frozen battery.
Preparing to Charge
Before connecting the charger, perform the following steps:
- If removing the battery from the vehicle, always remove the grounded terminal first.
- Ensure the area is well-ventilated.
- Clean battery terminals to prevent corrosion.
- Check battery voltage and ensure the charger is set to the correct voltage (the unit uses Auto Voltage Detection).
- If the battery has removable cell caps, add distilled water as specified by the manufacturer.
Operation
Charging Battery In-Vehicle
- Turn off all vehicle accessories and keep the hood open.
- Clean battery terminals.
- Place the charger on a dry, non-flammable surface.
- Lay AC/DC cables away from fan blades, belts, and moving parts.
- Connect the battery following polarity guidelines (Positive/Red to Positive post; Negative/Black to vehicle body/engine block away from the battery).
- Connect the charger to an electrical outlet.
- When charging is complete, disconnect the charger from AC power, remove the clamp from the vehicle body, then remove the clamp from the battery terminal.
Charging Battery Outside Vehicle
- Place the battery in a well-ventilated area.
- Clean battery terminals.
- Connect the battery following polarity guidelines.
- Connect the charger to an electrical outlet.
- When charging is complete, disconnect the charger from AC power, disconnect the negative clamp, and finally the positive clamp.
Control Panel and LED Indicators
- CLAMPS REVERSED (red) LED flashing: Connections are reversed.
- (Yellow/orange) LED lit: The charger is charging the battery.
- (Yellow/orange) LED flashing: The charger is in abort mode.
- CHARGED/MAINTAINING (green) LED lit: The battery is fully charged and the charger is in maintain mode.
Cleaning and Maintenance
- Clean the clamps after each use to prevent corrosion.
- Wipe the charger case with a soft cloth.
- Coil input and output cords neatly when storing.
- Store the charger unplugged in an upright position in a cool, dry place.
Troubleshooting
If you encounter issues, check the following:
- Clamps do not spark: This is normal; the charger has an auto-start feature and will not supply current until a battery is detected.
- Charger will not turn on: Check if the AC outlet is energized, check for loose connections, or have the battery checked as it may be defective.
- Yellow/orange LED flashing: The battery is not accepting a normal charge. Do not continue attempting to charge; check the battery and replace if necessary.
Practical help
Common problems
Battery clamps do not spark when touched together
This is normal. The charger has an auto-start feature and will not supply current until a battery is properly connected.
Charger will not turn on when connected
Check for an open fuse or circuit breaker, ensure the power cord is plugged in securely, or have the battery tested.
Yellow/orange LED is flashing
The battery is not accepting a charge. Stop charging and check the battery condition.
Before use
- Check for transport damage.
- Remove all cord wraps and uncoil cables.
- Clean battery terminals.
- Ensure the charging area is well-ventilated.
- Verify the battery is a 6V or 12V lead-acid type.
Specs in practice
- Input Voltage
- 120 V~, 60 Hz, 2.2 A
- Output Voltage
- 6 V or 12 V (Auto-detected)
- Output Current
- 8 A / 2 A
Model compatibility
- Compatible with 6 V and 12 V LEAD-ACID (STD or AGM) rechargeable batteries.
- Not intended for industrial applications.
- Do not use for dry-cell batteries commonly used in home appliances.

Manual page author
Michael Turner
Technical manual editor
Reviews PDF manuals for structure, safety notes, and practical product details so readers can find the right information quickly.