Lighting / Fixtures
American Lighting SPKPL-RDLRE LED Down Light Installation Guide
Quick installation and setup guide for the American Lighting SPKPL-RDLRE Spektrum+ Regressed LED Down Light. Includes wiring instructions, mounting steps, and Bluetooth control setup.
Table of contents
Manual images
Click an image to enlargeQuick Guide and Safety Information
The American Lighting SPKPL-RDLRE is a 120V AC LED downlight suitable for wet locations. Important: This fixture is not intended for use with standard wall plate dimmer switches. It must be controlled via the Spektrum+ Smart Lighting Bluetooth App or the Spektrum+ handheld remote controller (sold separately). Installation requires knowledge of recessed lighting systems; if you are not qualified, contact a professional electrician.
Installation
The installation process varies depending on whether you are performing a new construction or a remodel.
New Construction
An aluminum rough-in plate is recommended. Position the plate across two joists and secure it in four places using the mounting slots. Run electrical wire from the switch to the location and anchor it appropriately.
Remodel Installation
No mounting plate or can is required.
- Turn off power at the electrical panel.
- Locate the installation spot and trace the outline of the cut-out template on the ceiling.
- Cut the hole following the outline. Refer to the Hole Cut Sizes table in the manual for specific dimensions (2-inch or 4-inch round/square).
- Run electrical wire from the switch through the mounting hole using NMD90 Romex or BX cable.
Wiring
Ensure power is turned off at the source before proceeding.
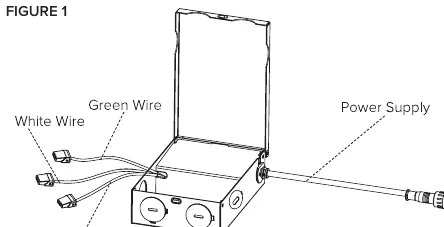
- Open the hardwire box swing cover and remove the appropriate knockout.
- Insert the electrical supply cable and secure it with a cable connector.
- Connect the wires using wire nuts: green/ground to green, white to white, and black to black.
- Use the CCT slider switch inside the driver junction box to set the desired color temperature.
- Place all wiring back into the box, close the cover, and ensure wires are not pinched.
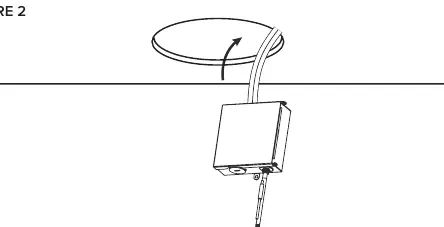
- Insert the hardwire box through the mounting hole.
Fixture Installation
- Connect the fixture to the hardwire box by twisting the male/female connectors together.
- Push the spring-loaded clips on the fixture upwards and insert the base into the mounting hole.
- Release the clips so the fixture is pulled flush to the ceiling.
- Turn on the power to confirm the fixture is working.
Control and Setup
The fixture uses Bluetooth Wireless Technology. To reset the device, power it ON and OFF 3 times in succession; the device will pulse BLUE once reset. Follow the Spektrum+ Smart Lighting App guide for full configuration.
Care and Maintenance
Clean the fixture using only a mild soap and water with a soft cloth. Do not use harsh chemicals or rough cloths that may scratch the finish or the lens.
Manufacturer information
American Lighting Inc.
Practical help
Common problems
Fixture does not turn on
Verify power supply is ON at the circuit breaker. Ensure wiring connections are secure and correct.
Standard dimmer switch is not working
This fixture is not compatible with standard wall plate dimmers. Use the Spektrum+ App or remote controller.
Device needs to be reset
Power the device ON and OFF 3 times in succession. The device will pulse BLUE to indicate a successful reset.
Before use
- Turn off power at the electrical panel.
- Verify 120V AC power supply.
- Ensure supply conductors are rated for at least 90°C (194°F).
- Confirm the installation location is suitable for wet locations.
- Have the Spektrum+ App or remote controller ready for setup.
Images and diagrams
- Figure 1: Wiring connections inside the hardwire box.
- Figure 2: Inserting the hardwire box into the ceiling.
- Figure 3: Connecting the fixture to the hardwire box.
- Figure 4: Securing the fixture into the ceiling using spring clips.
Model compatibility
- Not compatible with standard wall plate dimmer switches.
- Compatible with Spektrum+ Smart Lighting Bluetooth App.
- Compatible with Spektrum+ handheld remote controller (SPKPL-CTRL-W-RGBTW).

Manual page author
David Miller
Documentation analyst
Organizes user manual content into clear summaries, with attention to model details, product context, and everyday usability.