Home Appliances / Cookers & Ranges
User Manual for Amica 2015C(GX)2.334eEDHbS Ceramic Hob Cooker
Comprehensive user manual for the Amica 2015C(GX)2.334eEDHbS ceramic hob cooker. Includes installation instructions, operating procedures, safety guidelines, cleaning tips, and technical specifications.
Quick answers from the manual
Quick answer
- This manual provides installation, operation, and maintenance instructions for the Amica 2015C(GX)2.334eEDHbS cooker. p. 1
Key actions
- Install the gasket before placing the hob in the worktop. p. 13
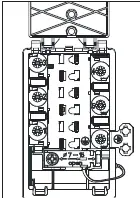
- Connect the earth lead to the terminal marked with the earth symbol. p. 15
First start
- Heat the oven to 250°C for 30 minutes and the hob zones for 4 minutes without a pan. p. 19
Show 3 more answers Show less
Problems and fixes
The appliance does not work
Check the household fuse box.
p. 35Technical specifications
| Parameter | Value | Meaning | Pages |
|---|---|---|---|
| Voltage | 230/400V~50 Hz | Operating voltage | p. 36 |
Where to find it in the PDF
- Installation p. 12, 13, 14, 15
- Operation p. 19, 20, 21, 22
- Cleaning p. 30, 31, 32, 33
Table of contents
Manual images
Click an image to enlargeQuick guide from the manual
This manual provides essential information for the safe and efficient use of your Amica ceramic hob cooker. Before first use, ensure all packaging is removed, the oven and hob are cleaned, and the oven is heated to 250°C for approximately 30 minutes to remove any manufacturing residues. Always ensure the cooker is switched off and cooled before cleaning.
Safety instructions
- Children: Keep children under 8 years old away from the appliance unless supervised.
- Hot surfaces: The appliance and accessible parts become hot during use. Avoid touching heating elements.
- Fire safety: Never leave the cooker unattended when frying. If a fire occurs, switch off the appliance and cover the flame with a lid or fire blanket; never use water.
- Damage: If the ceramic surface is cracked, switch off the appliance immediately to avoid electric shock.
Installation
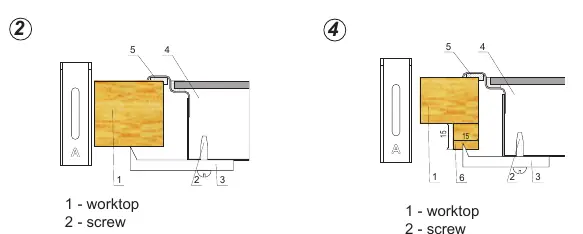
Installation must be performed by a qualified electrician. Ensure the worktop is 28-40 mm thick and resistant to 100°C. The appliance must be earthed. Follow the connection diagram provided in the manual for 1-phase, 2-phase, or 3-phase electrical connections.
Operation
The cooker features a ceramic hob with multiple heating zones and an oven with various functions, including rapid preheating, defrosting, and grill modes. Use the control knobs to select functions and temperatures. The oven includes a steam cleaning function: pour 250ml of water into a bowl on the first level, set the temperature to 50°C and the function to bottom heater for 30 minutes.
Cleaning and maintenance
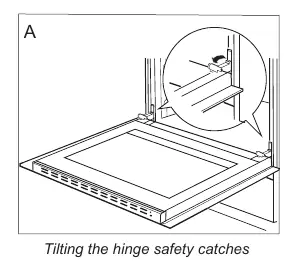
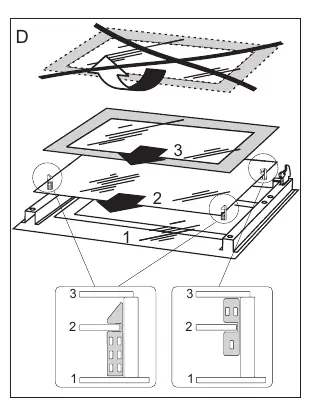
Clean the hob regularly after each use. Do not use abrasive cleaners or sharp metal scrapers. The oven door and inner glass panels can be removed for easier cleaning. Replace the halogen bulb (230V, 25W, G9) only after disconnecting the appliance from the power supply.
Troubleshooting
If the appliance does not work, check the household fuse box. If the oven light does not work, check if the bulb is loose or damaged and replace it if necessary.
Manufacturer information
Amica S.A.
Practical help
Common problems
The appliance does not work
Check the household fuse box; if there is a blown fuse, replace it.
The oven lighting does not work
Tighten or replace the blown bulb.
Before use
- Remove all packaging materials
- Clean the interior of the oven and the hob
- Heat the oven to 250°C for approximately 30 minutes
- Heat the hob zones for 4 minutes without a pan
Show more Show less
Specs in practice
- Voltage rating
- 230/400V~50 Hz
- Power rating
- max. 10.2 kW
Images and diagrams
- Wiring diagram for 1-phase, 2-phase, and 3-phase connections
- Installation dimensions for worktop cutout
- Door removal and inner glass panel disassembly
Model compatibility
- Use pans with flat, thick bases
- Do not use pans with concave or convex bases
- Ensure pan diameter matches the heating zone

Manual page author
Michael Turner
Technical manual editor