Electronics / Gaming Peripherals
User Manual for Aorus M6 Wireless Gaming Mouse
Quick guide for the Aorus M6 Wireless Gaming Mouse. Learn how to activate, charge, understand DPI indicators, and configure settings using the GIGABYTE Control Center.
Table of contents
Manual images
Click an image to enlargeQuick guide from the manual
The Aorus M6 is a wireless gaming mouse that requires an initial full charge before its first use. A depleted battery takes approximately 3 hours to charge fully. The mouse can operate in wired mode while charging via a USB connection.
Activation
To activate the mouse, locate the power switch on the bottom of the device and toggle it to the ON position. You can connect the mouse to your computer using the provided USB cable or the wireless receiver.

Charging the battery
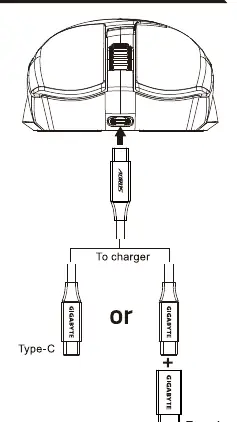
Connect the provided USB cable to the port on the front of the mouse. The other end can be connected to a USB Type-C or Type-A port on your computer or charger. When charging begins, the DPI indicator will display a static green light for 5 seconds.
DPI indicator and battery status
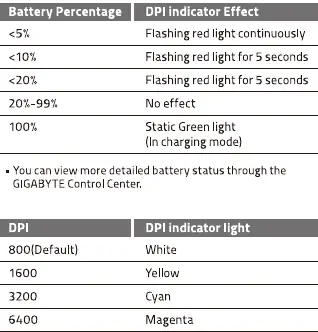
The DPI indicator light serves two purposes: displaying battery percentage and indicating the current DPI sensitivity setting.
Battery status
- <5%: Flashing red light continuously.
- <10% and <20%: Flashing red light for 5 seconds.
- 100% (Charging): Static green light.
DPI sensitivity
- 800 (Default): White light.
- 1600: Yellow light.
- 3200: Cyan light.
- 6400: Magenta light.
You can cycle through these DPI settings using the DPI cycle button on the mouse or fine-tune your sensitivity settings using the GIGABYTE Control Center software.
Manufacturer information
AORUS
Practical help
Common problems
Mouse does not respond
Ensure the power switch on the bottom of the mouse is turned on.
Battery is low
Connect the USB charging cable. The mouse can be used in wired mode while charging.
Before use
- Charge the mouse fully before first use.
- Ensure the power switch on the bottom is set to ON.
- Connect the USB receiver or cable to your computer.
Images and diagrams
- The activation diagram shows the power switch location on the bottom of the mouse and the connection ports.
- The charging diagram illustrates the USB-C connection to the mouse and the options for Type-C or Type-A connection to the charger/PC.
Model compatibility
- Requires GIGABYTE Control Center for detailed battery status and advanced sensitivity tuning.

Manual page author
David Miller
Documentation analyst
Organizes user manual content into clear summaries, with attention to model details, product context, and everyday usability.