Lighting / Fixtures
User Manual for Artika Bolero LED Pendant Light 21PDT-BOL5C-BL
Quick guide for the Artika Bolero LED Pendant Light (21PDT-BOL5C-BL). Includes installation steps, wiring instructions, height adjustment, and safety warnings.
Quick answers from the manual
Quick answer
- The Artika Bolero LED Pendant Light (21PDT-BOL5C-BL) is an indoor residential fixture. Installation involves mounting the bracket, connecting the wires (Ground, Neutral, Live), and securing the canopy. Height should be adjusted before installation. p. 1, 3, 5, 7
Key actions
- Turn off power at the breaker panel. p. 4
- Connect wires: Ground (GND), White (N), and Black (L). p. 7
First start
- Adjust the height of the light fixture before installation. p. 5
Show 3 more answers Show less
Problems and fixes
Dimmer issues
Ensure the dimmer is LED compatible.
p. 4Technical specifications
| Parameter | Value | Meaning | Pages |
|---|---|---|---|
| Color Temperature | 2700K - 5000K | Selectable white technology settings. | p. 9 |
Where to find it in the PDF
- Included Hardware p. 2
- Installation p. 3, 6, 7, 8
Table of contents
Manual images
Click an image to enlargeImportant Information
This manual provides installation and safety instructions for the Artika Bolero LED Pendant Light. This product is designed for indoor residential use only. It is recommended that this product be installed by a certified electrician in accordance with local building and electrical codes.
Safety Warnings
- Electrical Shock Risk: Always turn off the power at the breaker panel before beginning installation or performing maintenance.
- Dimmer Compatibility: If using a dimmer switch, it must be compatible with LED lights.
- Usage: Do not use this product outdoors.
Included Hardware
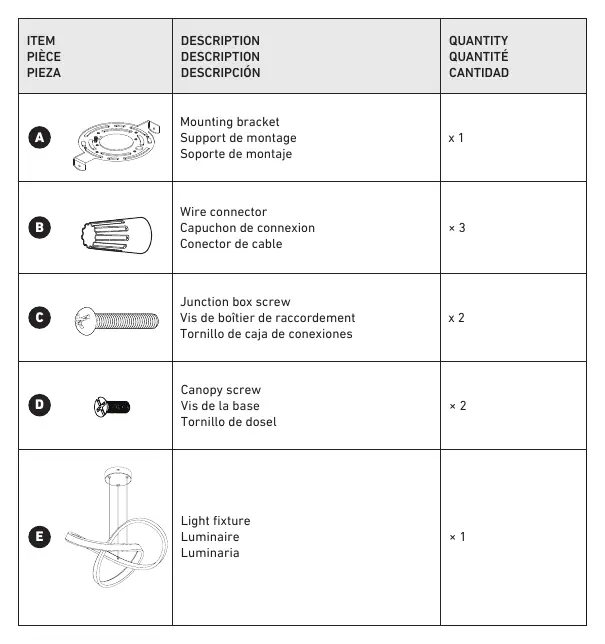
- Mounting bracket
- Wire connectors (x3)
- Junction box screws (x2)
- Canopy screws (x2)
- Light fixture
Height Adjustment
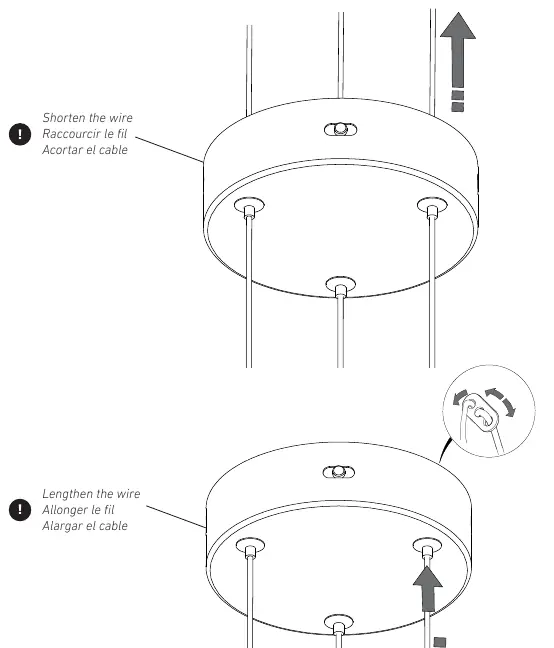
It is recommended to make any major adjustments to the height of the light fixture before proceeding with the installation. You can shorten or lengthen the wire as needed using the adjustment mechanism on the canopy.
Installation Steps
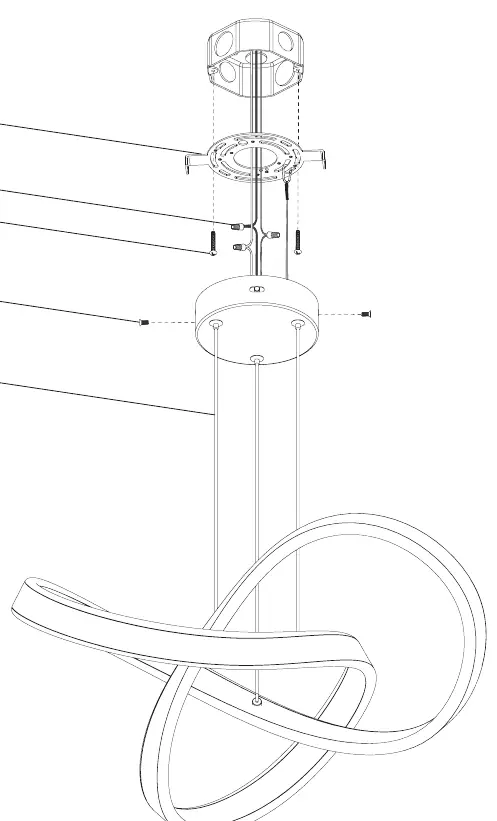
- Mounting Bracket: Secure the mounting bracket to the junction box using the provided junction box screws.
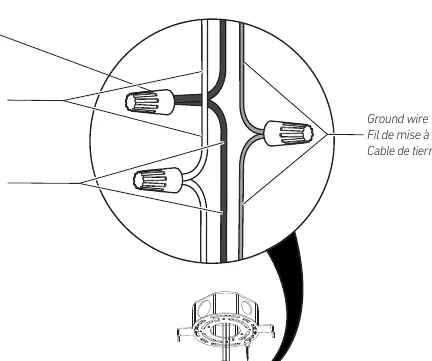
- Wiring: Connect the wires using the provided wire connectors. Ensure the Ground wire (GND), White (Neutral) wire, and Black (Live) wire are connected correctly to the corresponding house wires.
- Final Installation: Secure the light fixture canopy to the mounting bracket using the canopy screws.
Selectable White Technology
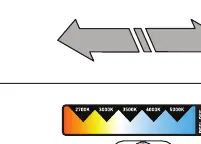
The fixture features selectable white technology, allowing you to choose between five color temperatures: 2700K, 3000K, 3500K, 4000K, and 5000K. The switch is located on the fixture.
Warranty
Artika For Living Inc. offers a five-year limited warranty on manufacturing defects for residential use. The warranty is non-transferable and requires the original sales receipt. It does not cover improper installation, misuse, or normal wear and tear.
Manufacturer information
Artika
Practical help
Common problems
Light not working or flickering
Ensure the dimmer switch is LED compatible. Check all wire connections to ensure they are secure.
Installation difficulties
The manufacturer recommends installation by a certified electrician to ensure compliance with local building codes.
Before use
- Turn off the main electrical supply at the fuse box or circuit breaker.
- Verify that your dimmer switch is LED compatible.
- Adjust the fixture height before mounting.
- Ensure all hardware (bracket, screws, connectors) is present.
Show more Show less
Specs in practice
- Selectable White Technology
- Allows adjustment of color temperature between 2700K (warm) and 5000K (cool).
- Indoor Use Only
- The fixture is not rated for outdoor environments.
Images and diagrams
- The wiring diagram illustrates the connection of the Ground (GND), White (Neutral), and Black (Live) wires using the provided wire connectors.
- The installation diagram shows the sequence of attaching the mounting bracket to the junction box, followed by the fixture canopy.
Model compatibility
- Requires LED-compatible dimmer if dimming is desired.
- For residential use only.

Manual page author
Emily Carter
User documentation editor