Lighting / Fixtures
Artika Flint 21 LED Ceiling Light Instruction Manual
Quick guide for the Artika Flint 21 LED ceiling light. Includes installation steps, wiring instructions, CCT color temperature settings, and safety warnings.
Quick answers from the manual
Quick answer
- The Artika Flint 21 is an LED ceiling light. Installation involves mounting the base to the junction box, connecting the wires (Neutral, Live, Ground), selecting the color temperature (3000K, 4000K, or 5000K), and attaching the diffuser. p. 3, 5, 6, 7
Key actions
- Install the base p. 5
- Connect the wires p. 6
- Select color temperature p. 7
- Attach the diffuser p. 8
First start
- Turn off the main electrical supply at the fuse box or circuit breaker before installing. p. 4
Show 3 more answers Show less
Problems and fixes
Dimmer not working correctly
Ensure the dimmer is LED compatible.
p. 4Technical specifications
| Parameter | Value | Meaning | Pages |
|---|---|---|---|
| CCT | 3000K, 4000K, 5000K | Selectable color temperature | p. 7 |
Where to find it in the PDF
- Included Hardware p. 2
- Installation p. 3, 5, 6, 8
- Warranty p. 10
Table of contents
Manual images
Click an image to enlargeQuick guide from the manual
The Artika Flint 21 is an indoor LED ceiling light designed for residential use. Before installation, ensure the power is turned off at the circuit breaker. The unit features selectable color temperatures (3000K, 4000K, 5000K) and requires a standard electrical connection. If using a dimmer, it must be LED compatible.
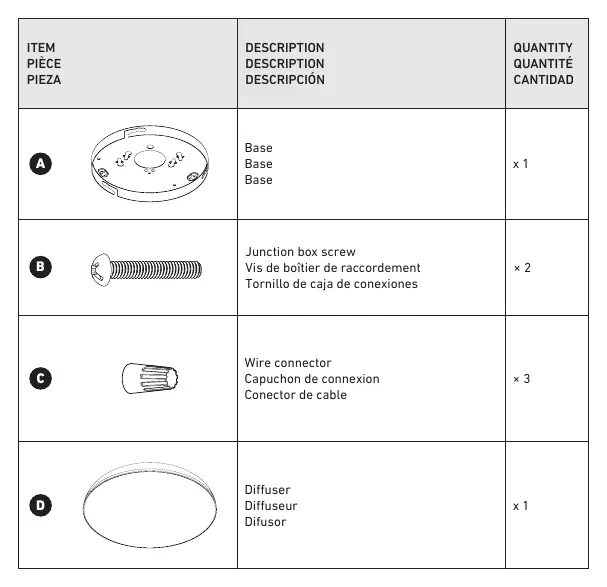
Included hardware
- Base
- Junction box screws (x2)
- Wire connectors (x3)
- Diffuser
Tools needed: Screwdriver.
Installation
1. Prepare the base: Secure the base to the junction box using the provided junction box screws.
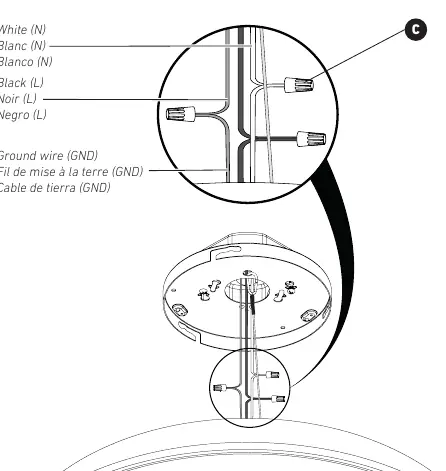
2. Wiring: Connect the wires from the ceiling to the fixture wires using the provided wire connectors. Match the colors: White (Neutral) to White, Black (Live) to Black, and connect the Ground wire to the Ground wire.
3. Select color temperature: Before attaching the diffuser, use the switch on the fixture to select your preferred color temperature: 3000K (warm), 4000K (neutral), or 5000K (cool).
4. Attach diffuser: Align the diffuser with the base and rotate it to lock it into place.
Safety and maintenance
This product is for indoor and residential use only. Do not use outdoors. Always switch off the main electrical supply before performing any maintenance. The manufacturer is not responsible for problems caused by improper installation or failure to follow these instructions. We recommend installation by a certified electrician.
Manufacturer information
Artika
Practical help
Common problems
Light does not turn on
Check that the circuit breaker is on and that all wiring connections are secure.
Dimmer issues
Ensure the dimmer switch being used is compatible with LED lights.
Before use
- Turn off the main electrical supply at the fuse box or circuit breaker.
- Verify that you have all included hardware (Base, screws, connectors, diffuser).
- Ensure you have a screwdriver.
- Confirm the dimmer switch is LED compatible if you intend to use one.
Show more Show less
Specs in practice
- CCT (Selectable White Technology)
- Allows you to choose between 3000K (warm), 4000K (neutral), and 5000K (cool) light color temperatures.
Images and diagrams
- Wiring: Connect White (N) to White (N), Black (L) to Black (L), and Ground (GND) to Ground (GND) using the provided wire connectors.
Model compatibility
- Indoor use only.
- Residential use only.
- Requires LED compatible dimmer.

Manual page author
David Miller
Documentation analyst