Lighting / Fixtures
User Manual for Artika Delta 21 LED Wall Light
Quick guide for the Artika Delta 21 LED Wall Light. Includes installation steps, wiring instructions, CCT color temperature settings, and outdoor mounting requirements.
Quick answers from the manual
Quick answer
- The Artika Delta 21 is an LED wall light. Installation involves mounting the bracket, connecting the wires (Neutral, Live, Ground), and securing the fixture. For outdoor use, apply sealant to the sides and top, leaving the bottom open for drainage. p. 3, 8, 10
Key actions
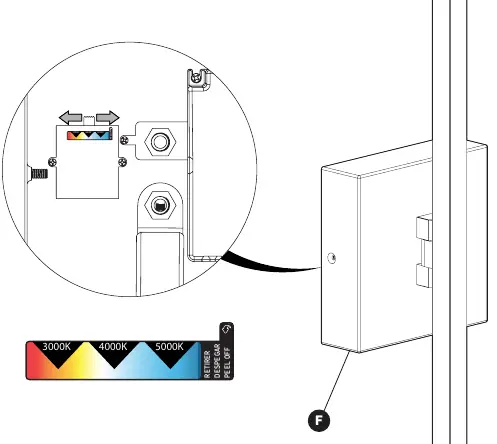
- Adjust color temperature p. 7
- Apply sealant for outdoor installation p. 10
First start
- Turn off power at the circuit breaker before installation. p. 4
Show 2 more answers Show less
Technical specifications
| Parameter | Value | Meaning | Pages |
|---|---|---|---|
| Color Temperature | 3000K, 4000K, 5000K | Adjustable white light settings | p. 7 |
Where to find it in the PDF
- Included Hardware p. 2
- Installation Steps p. 3, 6, 8
- Outdoor Installation p. 10
Table of contents
Manual images
Click an image to enlargeQuick guide from the manual
This document provides installation and usage instructions for the Artika Delta 21 LED Wall Light. It is intended for residential use and can be installed indoors or outdoors, provided specific sealing instructions are followed.
Safety and warnings
- Electrical Shock Hazard: Always turn off the circuit breaker at the panel before starting installation or maintenance.
- Dimmer Compatibility: If using a dimmer, it must be LED compatible.
- Professional Installation: It is recommended that this product be installed by a certified electrician in accordance with local building and electrical codes.
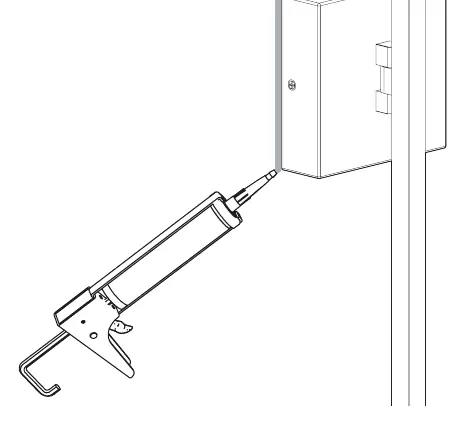
- Outdoor Use: When installing outdoors, sealant must be applied to the sides and top of the fixture to the wall. Do not seal the bottom side to allow moisture to drain.
Included hardware
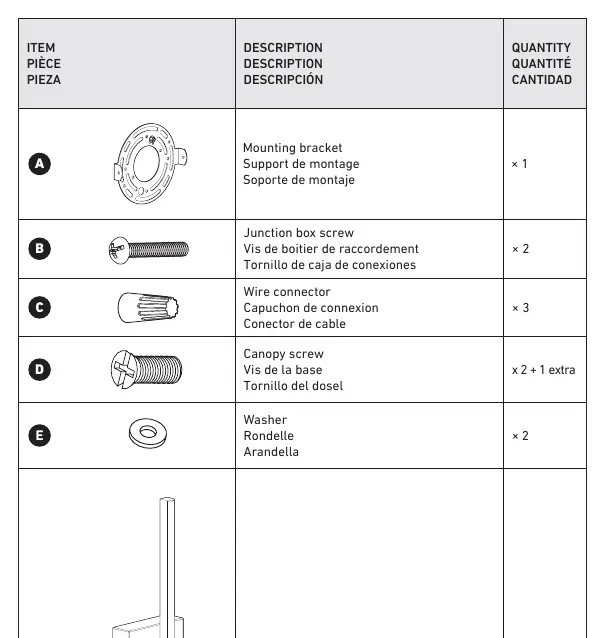
- Mounting bracket
- Junction box screws
- Wire connectors
- Canopy screws
- Washers
Installation
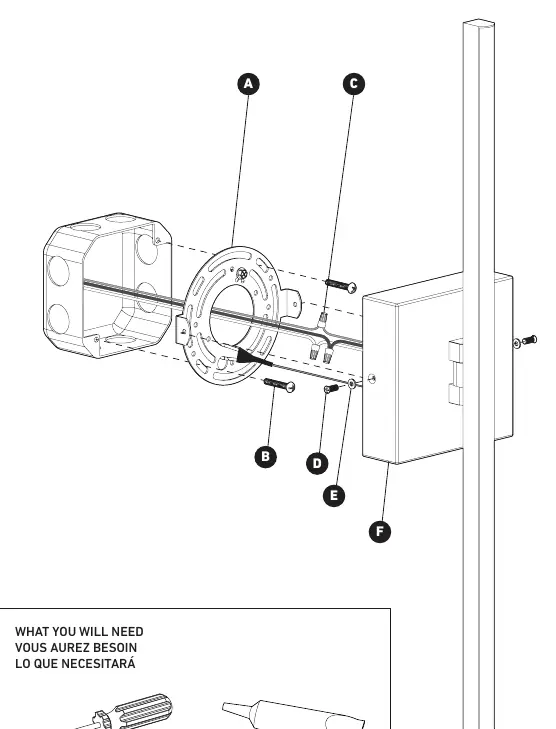
- Preparation: Turn off the main electrical supply. Plan the desired height (minimum clearance 1.2m).
- Mounting Bracket: Install the mounting bracket to the junction box using the provided screws.
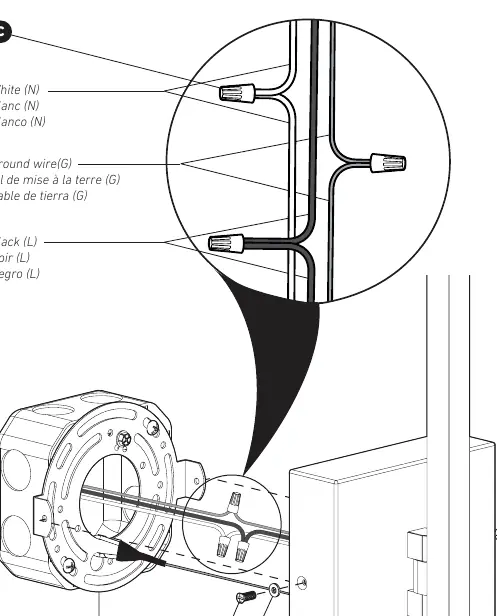
- Wiring: Connect the fixture wires to the house supply wires using the provided wire connectors:
- White (N) to White (N)
- Black (L) to Black (L)
- Ground (G) to Ground (G)
- Final Assembly: Secure the light fixture to the mounting bracket using the canopy screws and washers.
Tunable white technology (CCT)
The fixture features adjustable color temperature. Use the switch located on the fixture to select between 3000K, 4000K, or 5000K color temperatures.
Contact information
For customer service, contact Artika For Living Inc. at 1-866-661-9606 or [email protected]. Service is available Monday to Friday, 9 am to 5 pm EST.
Manufacturer information
Artika
Practical help
Common problems
Light not working with dimmer
Ensure the dimmer switch is LED compatible.
Moisture accumulation during outdoor use
Ensure the bottom side of the backplate is not sealed to allow moisture to drain.
Before use
- Turn off the circuit breaker at the panel
- Verify you have a screwdriver and sealant
- Ensure the mounting surface is suitable
- Check that the dimmer (if used) is LED compatible
Show more Show less
Specs in practice
- CCT (Tunable White)
- Adjustable color temperature settings: 3000K (warm), 4000K (neutral), 5000K (cool).
Images and diagrams
- Page 3 illustrates the step-by-step installation sequence.
- Page 8 provides a detailed wiring diagram showing connections for Neutral, Live, and Ground wires.
- Page 10 shows where to apply sealant for outdoor installations.
Model compatibility
- Suitable for indoor and outdoor use.
- Requires LED compatible dimmer.

Manual page author
Michael Turner
Technical manual editor