Computers / Desktop Computers
Quick Installation Guide for Asrock NUC 1300/D4 BOX Series
A comprehensive quick installation guide for the Asrock NUC 1300/D4 BOX Series. Includes step-by-step instructions for installing memory, WiFi modules, M.2 SSDs, 2.5-inch hard drives, and VESA mounting, along with port layouts and safety...
Table of contents
Manual images
Click an image to enlargeQuick guide from the manual
The Asrock NUC 1300/D4 BOX Series is a barebone system, meaning it does not include memory, hard drives, or M.2 SSDs. Users must install these components before operation. Ensure you use the included power adapter to avoid regulatory compliance issues and safety hazards. For optimal cooling, it is recommended to place the unit in a vertical position.
Package Contents
- NUC 1300/D4 BOX Series unit
- 19V/120W Power Adapter (i7 SKU) or 19V/90W Power Adapter (i5/i3 SKU)
- M.2 Screw
- VESA Mount Bracket & Screw Package
- Quick Installation Guide
Product Overview
Front Panel: Audio (Mic-in, Line-out), USB 3.2 Gen2 (Type C, supports DP1.4a display output), USB 3.2 Gen2 (Type A).
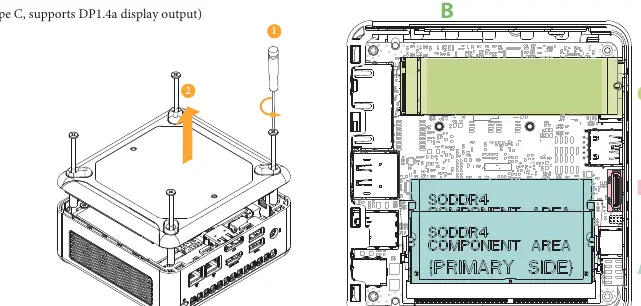
Rear Panel: DC-IN, RJ-45 (2.5G), HDMI, DisplayPort, USB 3.2 Gen2 (Type A), USB 4 (supports DP1.4a display output).
Installation Procedures
SO-DIMM Memory Modules
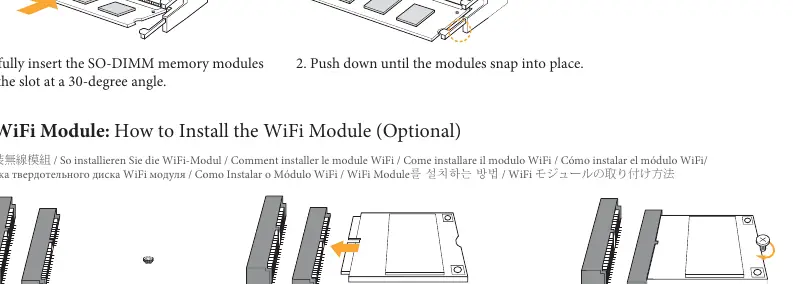
- Carefully insert the DDR4 SO-DIMM memory modules into the slot at a 30-degree angle.
- Push down until the modules snap into place.
- Note: For dual-channel configuration, use identical pairs (same brand, speed, size, and chip-type).
WiFi Module
- Locate the WiFi Module slot on the motherboard.
- Carefully insert the WiFi Module into the slot.
- Tighten the screw to secure the WiFi Module to the motherboard.
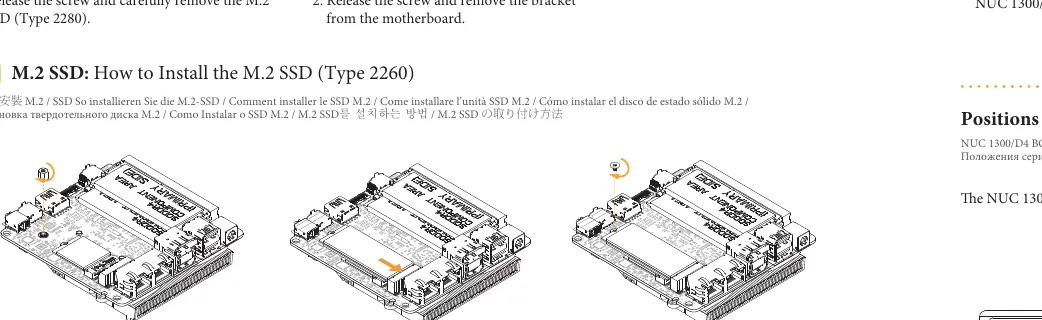
M.2 SSD (Type 2260)
- Locate the M.2 slot on the motherboard and install the standoff.
- Carefully insert the M.2 SSD into the slot.
- Tighten the screw to secure the M.2 SSD to the motherboard.
2.5-inch Hard Drive
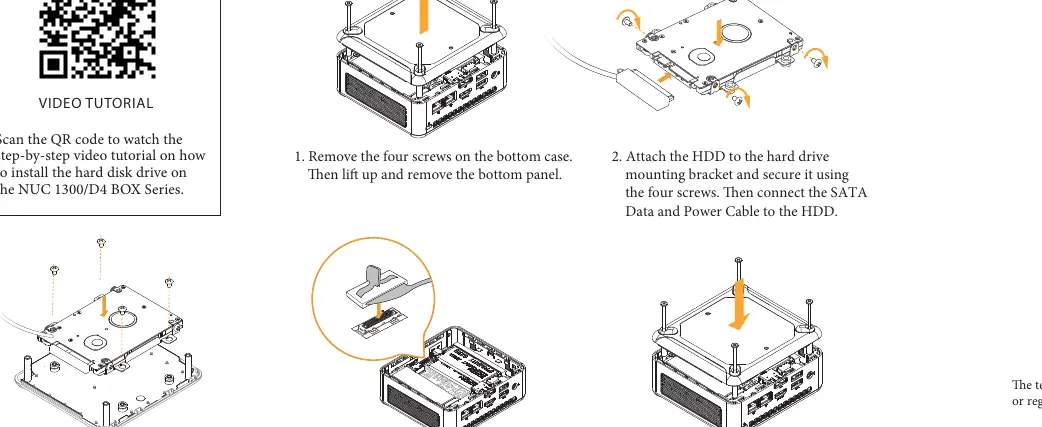
- Remove the four screws on the bottom case and remove the bottom panel.
- Attach the HDD to the mounting bracket and secure it with four screws.
- Connect the SATA Data and Power Cable to the HDD.
- Attach the HDD assembly to the bottom panel and secure it.
- Connect the SATA cable to the connector and reinstall the bottom panel.
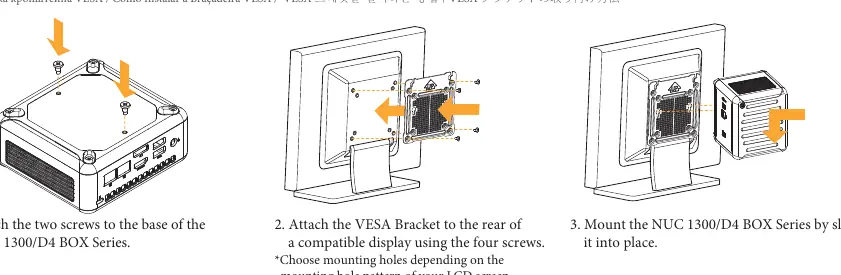
VESA Bracket
- Attach the two screws to the base of the NUC 1300/D4 BOX Series.
- Attach the VESA Bracket to the rear of a compatible display using four screws (supports 75mm x 75mm or 100mm x 100mm patterns).
- Mount the NUC 1300/D4 BOX Series by sliding it into place.
Safety and Regulatory Information
Battery Warning: Risk of explosion if the battery is replaced with an incorrect type. Dispose of used batteries according to local environmental regulations. Always use the included power adapter to prevent safety hazards.
Practical help
Common problems
DisplayPort not working
Connect the monitor to the HDMI port when installing the OS. DisplayPort only supports DP to HDMI or DP to DVI dongles; it does not support DP to D-Sub dongles.
System not booting or memory issues
Ensure you are using DDR4 SO-DIMM modules. For dual-channel configuration, modules must be identical in brand, speed, size, and chip-type.
Overheating
Ensure the unit is placed in a vertical position, as this ensures better cooling performance.
Before use
- Verify all package contents are present.
- Ensure you have compatible DDR4 SO-DIMM memory modules.
- Have a screwdriver ready for installation.
- Back up important data regularly, as repairs or reformatting may cause data loss.
Specs in practice
- DDR4 SO-DIMM
- Required memory type for the NUC 1300/D4 BOX Series.
- 19V/120W Power Adapter
- Included with i7 SKU models.
- 19V/90W Power Adapter
- Included with i5/i3 SKU models.
Images and diagrams
- The front panel features audio jacks and USB 3.2 Gen2 ports (Type C and A).
- The rear panel features DC-IN, RJ-45, HDMI, DisplayPort, and USB 4 ports.
Model compatibility
- Barebone system does not include memory, hard drive, or M.2 SSD.
- DisplayPort does not support DP to D-Sub dongles.

Manual page author
Emily Carter
User documentation editor
Prepares concise manual descriptions and highlights the most useful setup, operation, and maintenance information for readers.