Tools / Air Compressors & Pneumatics
User Manual for AstroAI Digital Dual-Head Tire Pressure Gauge
Quick guide for the AstroAI Digital Dual-Head Tire Pressure Gauge (GL-0911). Learn how to operate the device, replace batteries, troubleshoot common issues, and understand technical specifications.
Table of contents
Manual images
Click an image to enlargeQuick Guide
The AstroAI Digital Dual-Head Tire Pressure Gauge is designed for measuring tire pressure on vehicles using Schrader valves. It features a backlit screen and a built-in flashlight for night use. The device operates on 2 AAA batteries and shuts off automatically after 20-60 seconds of inactivity.
Product Overview
The device consists of the following components:
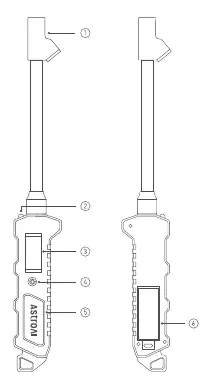
- Dual Head Nozzle: Used to connect to the tire valve.
- Flashlight: Integrated light for visibility.
- LCD Display: Shows pressure readings.
- ON / UNIT / OFF Button: Powers the device, cycles through units (PSI, bar, kPa, kg/cm²), and turns it off.
- Durable Rubber-grip Handle: Ergonomic grip.
- Battery Compartment: Located on the back for 2 AAA batteries.
Operation Instructions
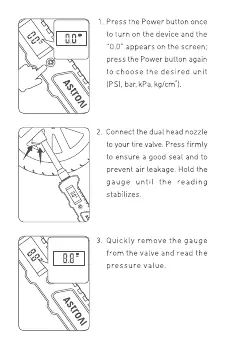
- Power On: Press the Power button once to turn on the device. The screen will display 0.0.
- Select Unit: Press the Power button again to cycle through and select the desired unit (PSI, bar, kPa, kg/cm²).
- Measure: Connect the dual head nozzle firmly to the tire valve to ensure a good seal and prevent air leakage. Hold the gauge until the reading stabilizes.
- Read: Quickly remove the gauge from the valve to read the pressure value.
Note: To take subsequent measurements, simply repeat the steps. There is no need to restart or reset the units. You can manually turn off the device by pressing and holding the Power button for a few seconds.
Battery Replacement
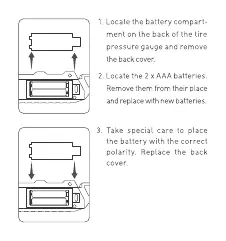
- Locate the battery compartment on the back of the gauge and remove the cover.
- Remove the 2 old AAA batteries.
- Insert 2 new AAA batteries, ensuring correct polarity.
- Replace the back cover.
Troubleshooting
- Inaccurate or Unstable Readings: Adjust the angle between the air chuck and the tire valve to ensure a better seal. A ± 2 PSI difference is considered normal.
- Air Leakage: It is normal for small amounts of air to escape during connection. Ensure a tight seal and adjust the angle if necessary.
- Device Won't Turn On: Check if the batteries are dead and replace them if necessary. Inspect the device for physical damage.
- Flashing Screen: Replace the batteries.
Specifications
- Range: 0-230 PSI, 0-16 bar, 0-1600 kPa, 0-16 kg/cm²
- Display Resolution: 0.1 PSI
- Operating Temperature: 23°F-122°F (-5°C-50°C)
- Power Source: 2 x AAA batteries
Warranty
AstroAI provides a 1-Year Limited Warranty covering defects in material and workmanship. The warranty does not cover damage from negligence, misuse, contamination, alteration, accident, or abnormal conditions. For support, contact [email protected].
Manufacturer information
AstroAI
Practical help
Common problems
Inaccurate or unstable readings
Adjust the angle between the air chuck and the tire valve to ensure a strong seal. Note that a ± 2 PSI difference is normal.
Air leakage during connection
It is normal for small amounts of air to escape. Ensure a good seal and adjust the angle between the chuck and valve.
Device will not turn on
Check if batteries are dead and replace them. Check for physical damage from drops or misuse.
Flashing screen
Replace the batteries.
Before use
- Ensure the device is used only on Schrader valves.
- Check that 2 AAA batteries are installed with correct polarity.
- Ensure the device is not stored in extreme temperatures.
- Check for physical damage before use.
Specs in practice
- Measurement Range
- 0-230 PSI, 0-16 bar, 0-1600 kPa, 0-16 kg/cm²
- Power Source
- Requires 2 x AAA batteries.
- Operating Temperature
- -5°C to 50°C (23°F to 122°F).
Images and diagrams
- 1: Dual Head Nozzle
- 2: Flashlight
- 3: LCD Display
- 4: ON / UNIT / OFF Button
- 5: Durable Rubber-grip Handle
Model compatibility
- This product only works on Schrader valves.

Manual page author
Emily Carter
User documentation editor
Prepares concise manual descriptions and highlights the most useful setup, operation, and maintenance information for readers.