Automotive / Electrical Accessories
User Manual for AstroAI S8 12V 1500A Jump Starter
Quick guide for the AstroAI S8 12V 1500A Jump Starter. Learn how to safely jump-start your vehicle, use the power bank and flashlight features, charge the device, and troubleshoot common issues.
Table of contents
Manual images
Click an image to enlargeQuick Guide
The AstroAI S8 is a multifunctional jump starter designed for 12V vehicles. Before use, ensure the battery level is above 75%. Always follow safety precautions: do not use on 24V vehicles, do not reverse polarity, and do not use while the jump starter is charging.
Package Contents
- Multifunctional Jump Starter
- Smart Battery Clamps
- USB-A to USB-C Charging Cable
- Storage Bag
- User Manual
Device Diagram
The device features a power button, battery level indicator, 12V jumpstart port, quick-charge input port, and output ports for charging external devices. The smart battery clamps include indicators for correct/reverse connection and a boost button.
Preparation
Charging: Connect the included USB-C cable to the device's input port and a 5V power source (wall charger, car charger). The battery indicators will illuminate circularly while charging and turn off when complete.
Checking Battery Level: Press the Power Button. 1 bar indicates under 25%, 2 bars 25-50%, 3 bars 50-75%, and 4 bars 75-100%.
Jumpstarting Procedure
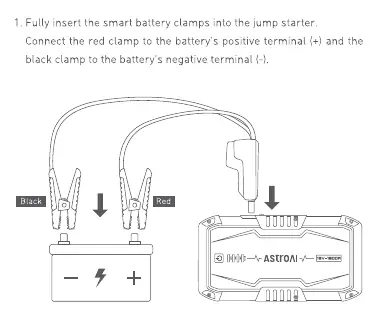
- Insert the smart battery clamps into the jump starter.
- Connect the red clamp to the positive (+) terminal and the black clamp to the negative (-) terminal of the car battery.
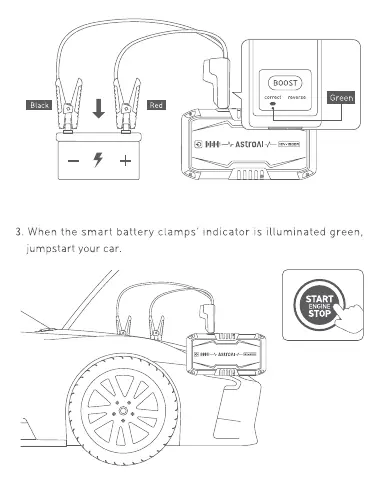
- Check the indicator on the clamps:
- Green: Correct connection, safe to proceed.
- Red: Reversed connection, reconnect terminals correctly.
- Flashing Green: Low battery voltage. Press the Boost Button and wait for the indicator to turn solid green, then start the engine within 30 seconds.
- Start the engine. If it does not start within 5 seconds, stop, wait 60 seconds, and retry.
- Once started, disconnect the clamps immediately.
Power Bank & Illumination
Power Bank: Insert a USB cable into the 5V/2.4A output port and connect your device. Press the Power Button to begin charging.
Flashlight: Press and hold the Power Button for 3 seconds to turn on the light. Press again to cycle through Flashlight, Strobe, SOS, and OFF modes.
Maintenance
To maximize battery life, keep the battery level above 75% and charge the device every three months if it is not in use. Store in a cool, dry place; do not store at temperatures above 70°C (158°F).
Specifications
- Model: S8
- Capacity: 37 Wh
- Jumpstart Current: 300 A
- Peak Current: 1500 A
- USB Output: 5V/2.4A
- USB Input: 5V/3A
- Operating Temperature: -20°C to 50°C (-4°F to 122°F)
Manufacturer information
AstroAI
Practical help
Common problems
Vehicle fails to start
Ensure battery level is >75%, clean battery terminals of rust/dirt, ensure clamps are connected to correct terminals, or wait for the unit to cool down if overheating protection is active.
Failure to power on
Check if the battery level is sufficient or if the device is currently charging.
Failure to charge
Verify the charging cable is connected correctly, the power source is active, or allow the unit to cool down to room temperature.
Before use
- Ensure the jump starter battery level is above 75%.
- Remove all metal accessories (rings, bracelets, necklaces).
- Turn off all electrical devices in the vehicle.
- Ensure the blue plug on the smart clamps is fully inserted into the jump starter.
- Verify battery terminals are clean and free of corrosion.
Specs in practice
- Peak Current (1500A)
- The maximum instantaneous current the device can provide for starting.
- Jumpstart Current (300A)
- The continuous current provided during the starting attempt.
- Capacity (37Wh)
- The total energy storage capacity of the internal lithium battery.
Images and diagrams
- 1: Power Button
- 2: Battery Level Indicator
- 3: 12V Jumpstart Port
- 4: Quick-Charge Input Port
- 5: Smart Battery Clamps
Model compatibility
- Compatible with 12V vehicles only.
- Do not use on 24V vehicles, airplanes, or boats.
- Use only the included smart battery clamps.

Manual page author
Emily Carter
User documentation editor
Prepares concise manual descriptions and highlights the most useful setup, operation, and maintenance information for readers.