Automotive / Tyre Inflators
User Manual for AstroAI DK-MF139 Jump Starter & Air Compressor
Quick guide for the AstroAI DK-MF139 Jump Starter & Air Compressor. Learn how to safely jump-start your 12V vehicle, use the built-in air compressor, charge the device, and troubleshoot common issues.
Quick answers from the manual
Quick answer
- The AstroAI DK-MF139 is a multifunctional device that acts as a 12V vehicle jump starter, tire inflator, power bank, and flashlight. p. 6, 8
Key actions
- Jump starting a vehicle p. 9, 10
- Inflating tires p. 11, 12, 13
First start
- Charging the device p. 7
Problems and fixes
Jump start failure
Check battery level (>60%), clean terminals, ensure correct polarity, allow cooling.
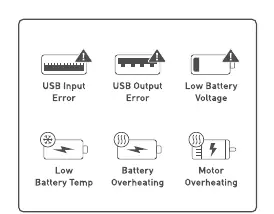
p. 15Error codes
| Code | Meaning | Action | Pages |
|---|---|---|---|
| USB Input Error | Voltage/current exceeds maximum. | Disconnect USB input. | p. 17 |
| Low Battery Voltage | Battery too low. | Charge immediately. | p. 17 |
Maintenance and reset
- Battery maintenance p. 18
Technical specifications
| Parameter | Value | Meaning | Pages |
|---|---|---|---|
| Capacity | 48100mWh | Total battery energy capacity. | p. 18 |
| Peak Current | 1750A | Maximum jump-start current. | p. 18 |
Where to find it in the PDF
- Specifications p. 18
Table of contents
Manual images
Click an image to enlargeQuick Guide
The AstroAI DK-MF139 is a multifunctional device designed for emergency vehicle jump-starting, tire inflation, and as a power bank. Important: Only use this device on 12V vehicles. Ensure the battery level is above 60% before attempting to jump-start a car. Always allow a 60-second interval between continuous operations to prevent overheating.
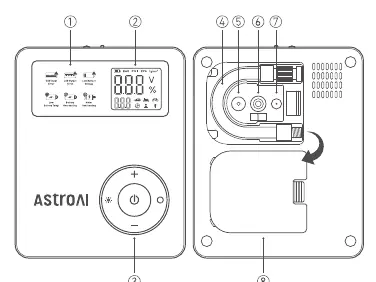
Product Overview
The device features a status display, air hose, 12V jump start port, USB ports, and a flashlight. The back cover houses the air nozzles and adapters.
Charging
To charge the device, insert the charger into a power socket and connect the Type-C cable to the product. Disconnect the charger and cable once the device is fully charged. For optimal performance, use the included charger.
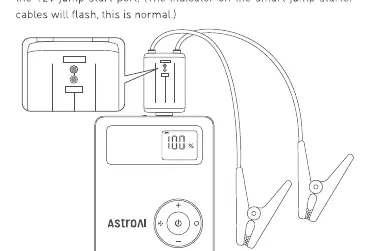
Jump Starting
- Press and hold the power/start button for 2 seconds to turn on the product.
- Ensure the smart jump starter cables are completely inserted into the 12V jump start port.
- Connect the positive (red) and negative (black) clamps to the corresponding battery terminals. The smart indicator will turn green.
- Start the vehicle.
- Remove the jumper cables after the car has successfully started.
Tip: If it fails to start, stop, remove the clamps, wait 60 seconds, and retry.
Inflating
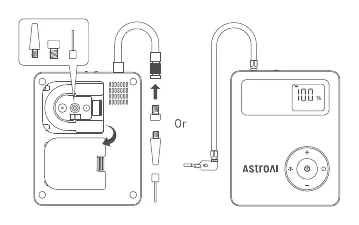
- Turn on the product.
- Take out the air hose and connect it to the device.
- Choose the suitable nozzle for your item.
- Press the switch button to choose the desired mode.
- Press and hold the switch button to select the unit (PSI, BAR, KG/CM², KPA).
- Use the '+' and '-' buttons to adjust the pressure value.
- Press the power/start button to begin inflation. The device will automatically shut off when complete.
LED Light
Press the light button to cycle through flashlight, SOS, and Strobe illumination modes.
Troubleshooting
If the device fails to jump-start or inflate, check the following:
- Insufficient power: Ensure the battery level is above 60%.
- Connection issues: Clean battery terminals and ensure clamps are securely connected to the correct poles.
- Overheating: If the device activates overheating protection, allow it to cool down before trying again.
- Error Indicators: Check the screen for specific error icons like USB Input/Output Error or Low Battery Voltage.
Maintenance
To maintain battery health, charge the product when the level drops below 80%. If the device is idle, charge it fully every three months to extend its service life.
Specifications
- Model: DK-MF139
- Capacity: 48100mWh (48.1Wh)
- Jump-start current: 800A
- Peak current: 1750A
- Pressure range: 0-150 PSI (Inflate), 0-250 PSI (Measure)
- Charging time: Approximately 4.5 hours
Manufacturer information
AstroAI
Practical help
Common problems
Vehicle fails to jump-start
Ensure battery level is >60%, clean rusted/dirty battery terminals, verify correct clamp polarity, and check for overheating protection.
Tire inflation fails
Check hose connection, ensure preset pressure is higher than current tire pressure, check for clogs in the nozzle, and allow the motor to cool if overheated.
Device will not power on
Check if the device is currently charging (it will not turn on while charging) or if the battery is depleted.
Before use
- Ensure battery level is above 60% for jump starting.
- Verify the preset pressure value and unit before inflating.
- Check that the blue plug is fully inserted into the 12V jump start port.
- Ensure the device is only used on 12V vehicles.
- Check that the inflation hose is connected correctly.
Specs in practice
- Peak current (1750A)
- The maximum current the device can deliver for a short burst to start a vehicle.
- Jump-start current (800A)
- The standard current output for jump-starting.
- Pressure range (0-150 PSI)
- The operational range for inflating tires.
Images and diagrams
- The status display shows battery percentage, pressure units, and error icons.
- The 12V jump start port is located on the side, protected by a cover.
- Air nozzles and adapters are stored in the back cover.
Model compatibility
- Only compatible with 12V vehicles.
- Not suitable for high-volume objects like air mattresses or inflatable pools.

Manual page author
Emily Carter
User documentation editor
Prepares concise manual descriptions and highlights the most useful setup, operation, and maintenance information for readers.