Automotive / Jump Starters
Schumacher Rugged SBX Series Jump Starter User Manual
Quick guide for the Schumacher Rugged SBX Series jump starter. Learn how to charge the internal battery, jump start your vehicle, use the work light, and troubleshoot common issues.
Table of contents
Manual images
Click an image to enlargeQuick guide from the manual
Charge the booster immediately after purchase, after each use, and every 30 days or when the charge level falls below 75% to maintain battery health and extend its lifespan. Ensure the vehicle has a 12V lead-acid battery system before attempting a jump start.
Device Description
The unit includes the following components:
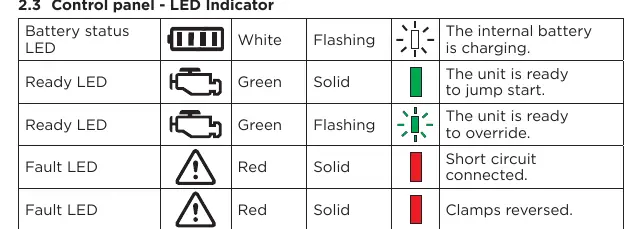
- Power/Light button: Turns on power and checks battery status; controls the work light.
- Jump start/Override button: Initiates jump start or manual override mode.
- Battery status indicators: Shows current charge level.
- LED indicators: Ready, Fault, and Battery status LEDs.
- Ports: USB output, USB input, and 12V input.
- Work light: Built-in light with steady, SOS, and strobe modes.
- Battery clamps: For connecting to the vehicle battery.
Charging the Internal Battery
Use a 2A USB charger (not included) or a 2A USB charging port for faster charging. Alternatively, use the included 12V DC car charger while the vehicle is running.
- USB Charging: Plug the USB cable into the input port and a charger. Charging time varies by model (4-8 hours).
- 12V DC Charging: Plug the adapter into the unit's 12V input and the vehicle's accessory outlet. Charging time varies by model (2-4 hours).
Jump Starting a Vehicle
Important: Only jump start 12V lead-acid battery systems. Do not use the booster without a battery installed in the vehicle.
- Ensure the vehicle ignition and all electrical devices are OFF.
- Connect the red clamp (+) to the positive terminal (+) of the battery.
- Connect the black clamp (-) to the earth/chassis of the vehicle (a heavy gauge metal part of the frame or engine block). Do not connect to the carburetor or fuel lines.
- Press the Jump start/Override button to turn on the unit. The green ready LED will light.
- Wait 30 seconds, then crank the engine for a maximum of 5 seconds.
- If the engine does not start, wait at least 30 seconds before a second attempt. Do not attempt more than three consecutive times.
- After the engine starts, turn off the unit and disconnect the clamps in reverse order (black first, then red).
Manual Override
If the vehicle battery voltage is too low for the unit to detect the connection, use the manual override:
- Ensure clamps are correctly connected.
- Press twice and hold the Jump start/Override button for 5 seconds to activate override mode. The green ready LED will flash.
Warning: This overrides a safety feature. It will energize the clamps and cause sparking if touched together.
Maintenance and Storage
Wipe all battery corrosion, dirt, or oil from the clamps, cords, and outer case with a dry cloth after use. Store in a dry place between -10°C and +45°C. Charge at least once a month if not in frequent use.
Practical help
Common problems
The booster will not operate.
The internal battery voltage is too low. Use a USB adapter to charge and activate the unit.
The battery in the booster does not hold a charge.
The battery may be defective and unable to accept a charge. Have the battery checked.
The booster does not jump start the vehicle.
Check for poor clamp connection to the battery and frame. Ensure connection points are clean. Ensure the booster is turned on.
Connections are reversed.
Disconnect the booster and reverse the clamps.
Before use
- Charge the unit immediately after purchase.
- Ensure the vehicle has a 12V lead-acid battery.
- Turn off vehicle ignition and all electrical devices.
- Check that clamps are clean and free of corrosion.
- Ensure the internal battery is charged to at least 75%.
Images and diagrams
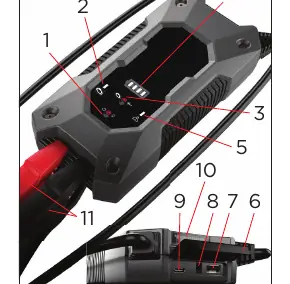
- 1. Power/Light button
- 2. Jump start ready LED
- 3. Jump start/Override button
- 4. Battery status indicators
- 11. Battery clamps
Model compatibility
- Only for 12V lead-acid battery systems.
- Do not use without a battery installed in the vehicle.

Manual page author
Emily Carter
User documentation editor
Prepares concise manual descriptions and highlights the most useful setup, operation, and maintenance information for readers.