Automotive / Car Audio
User Manual for AudioControl THREE.2 In-Dash System Controller
Comprehensive user guide for the AudioControl THREE.2 in-dash system controller. Learn about installation, wiring, level matching, Para-BASS adjustments, and troubleshooting.
Table of contents
Manual images
Click an image to enlargeQuick guide from the manual
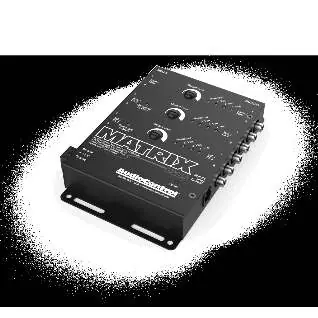
The AudioControl THREE.2 is an in-dash system controller, precision equalizer, and crossover with auxiliary inputs. This guide provides essential information for installation, wiring, and tuning your audio system. For optimal performance and a 5-year warranty, professional installation by an authorized AudioControl dealer is recommended. If you choose to install it yourself, the warranty is 1 year.
Features and Highlights
- Graphic Stereo Equalization: Three frequency controls at 125Hz, 1.25KHz, and 10KHz.
- Para-BASS: Adjustable bass response with sweep (40-80Hz) and gain controls.
- Input Selection: Main RCA input, rear auxiliary input, and front panel 1/8 inch auxiliary input.
- 24dB/Octave Linkwitz Riley Crossover: Programmable crossover for precise frequency routing.
- Pre-Amp Line Driver: Increases signal voltage up to 13 volts peak.
- Master Volume and Fader Control: Centralized control for all amplifiers.
Installation and Mounting
The THREE.2 is designed to be mounted on or near the dashboard. Ensure the location is safe from water, heat sources (engine compartment, firewall), and is secure to prevent damage from vehicle movement. Use the provided brackets for under-dash or glove box mounting.

Power Wiring
Important: Disconnect the negative battery terminal before starting electrical work.
- Remote Turn-On: Connect a 22-18 gauge wire from the head unit's remote turn-on to the THREE.2 'Remote' connector.
- Positive (+12V): Connect an 18 gauge or larger wire to a constant fused 12V source (battery recommended).
- Ground: Connect to a verified ground location or battery negative terminal. Avoid using the factory head unit ground.
- Illumination: Connect to a switched 12V source or factory dash light dimmer to control backlighting.
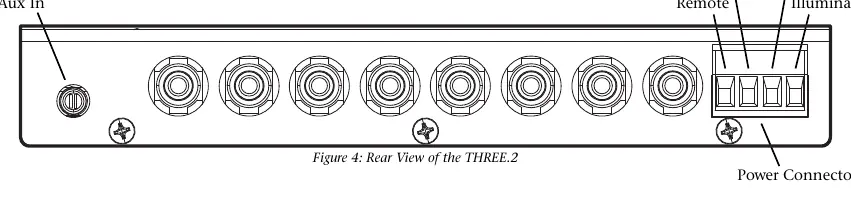
Audio Wiring
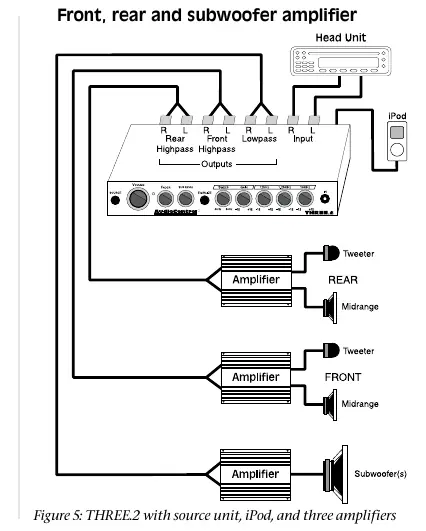
The THREE.2 supports various configurations. Connect your head unit to the 'Main' inputs. Use the 'Front', 'Rear', and 'Subwoofer' outputs to connect to your respective amplifiers. If using an iPod or other portable device, use the front or rear auxiliary inputs.
Level Matching
To achieve the best signal-to-noise ratio:
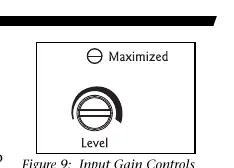
- Disconnect RCA cables leading to amplifiers.
- Turn the THREE.2 volume knob to maximum.
- Play dynamic music and turn the source unit volume to maximum (avoid clipping/distortion).
- Adjust the 'Input Gain' on the THREE.2 until the yellow 'Maximized' LED flickers with the music.
- Turn off the system and reconnect amplifier RCA cables.
- Turn down amplifier gain controls to the least sensitive setting (counter-clockwise) to allow for a hotter signal.
Adjusting the Equalizer and Para-BASS
The equalizer bands (125Hz, 1.25KHz, 10KHz) allow for tonal adjustments based on your preference. The Para-BASS system helps restore low frequencies. Use the 'Sweep' knob to select the center frequency (40-80Hz) and the 'Gain' knob to boost or cut that frequency.
Troubleshooting
- No Sound: Check source button position, auxiliary input status, power/remote voltage, fader position, input gain, and ground connections.
- Hiss: Turn down amplifier gains and adjust source unit output.
- Distortion: Adjust equalization levels, gain levels, or lower the source unit/subwoofer volume.
- Whine: Confirm all components share the same ground point and check ground isolation jumper settings.
Specifications
- Frequency Response: 20Hz-20kHz (+/- 1dB)
- Maximum Input/Output Level: 9.5Vrms / 13V peak
- Total Harmonic Distortion: 0.01%
- Signal to Noise Ratio: -110dB
- Input Impedance: 20K ohms
- Output Impedance: 150 ohms
- Power Draw: 250mA
Practical help
Common problems
No Sound
Check if the 'Source' button is in the correct position, ensure Aux input is active, verify power/remote voltage, center the fader, turn up 'Input Gain', and check ground connections.
Hissing noise
Turn down amplifier gains and adjust the source unit output level.
Distorting speakers
Adjust equalization levels, lower gain levels, reduce source unit volume, or lower subwoofer level.
Whine (alternator noise)
Confirm all components use the same ground point and experiment with ground isolation jumper settings.
Before use
- Disconnect the negative battery terminal before wiring.
- Plan your system configuration and sketch it out.
- Ensure the mounting location is safe from water and heat.
- Have a small screwdriver ready for gain adjustments.
- Verify amplifier input voltage handling capabilities.
Specs in practice
- Max input/output level
- 9.5Vrms/13V peak; allows for a high-voltage signal to amplifiers for better dynamic range.
- Frequency response
- 20Hz-20kHz; covers the full range of human hearing.
- Crossover slope
- 24dB/octave Linkwitz Riley; provides a steep, precise filter for separating frequencies.
Images and diagrams
- Front View: Identifies volume, fader, sub level, Para-BASS, EQ bands, and Aux input.
- Rear View: Shows power connector, inputs, outputs, and ground isolation/illumination jumpers.
- Wiring Diagrams: Illustrate connections for source units, iPods, and amplifiers.
Model compatibility
- Compatible with most car audio systems.
- Requires 12V constant power source.
- Supports balanced and unbalanced inputs via internal jumpers.

Manual page author
David Miller
Documentation analyst
Organizes user manual content into clear summaries, with attention to model details, product context, and everyday usability.