Home / Window Treatments
Automate Push 5 Channel Remote Control User Manual
Quick guide for the Automate Push 5 Channel Remote Control. Learn how to pair the remote, set shade limits, replace the battery, and configure favorite positions.
Table of contents
Manual images
Click an image to enlargeQuick guide from the manual
This guide is intended for new installations or factory-reset motors. Ensure you follow the steps in order. The remote is compatible with various Automate motors, including Internal Tubular, Cord Lift, and Tilt Motors. Always ensure the motor is fully charged before beginning the setup process.
Safety
Warning: This product contains a coin/button cell battery. If swallowed, it can cause severe internal burns in just 2 hours and can lead to death. Keep batteries away from children. Do not expose the remote to water, moisture, or extreme temperatures. Installation and programming should be performed by a suitably qualified installer.
Battery Replacement
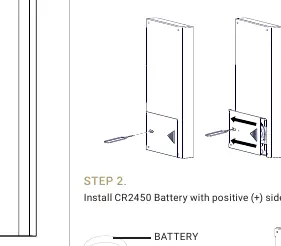
- Use a tool (such as a SIM card pin or mini screwdriver) to push the battery cover release button.
- Slide the battery cover open.
- Install a CR2450 battery with the positive (+) side facing up.
- Slide the cover back to lock it.
- Note: Remove the battery isolation tab before first use.
Installer Setup
Pairing the Remote
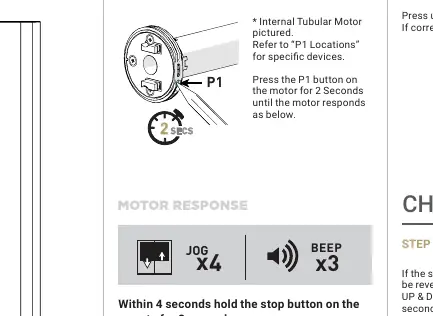
- Locate the P1 button on the motor (location varies by motor type).
- Press the P1 button on the motor for 2 seconds until the motor jogs.
- Within 4 seconds, hold the STOP button on the remote for 3 seconds. The motor will respond with a Jog and Beep.
Setting Limits
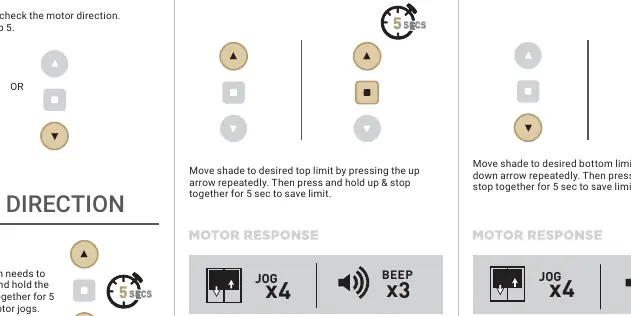
Set Top Limit: Move the shade to the desired top position using the UP arrow. Press and hold the UP and STOP buttons together for 5 seconds to save.
Set Bottom Limit: Move the shade to the desired bottom position using the DOWN arrow. Press and hold the DOWN and STOP buttons together for 5 seconds to save.
Changing Direction
If the shade moves in the wrong direction, press and hold the UP and DOWN arrows together for 5 seconds until the motor jogs. This is only possible during initial setup.
Factory Reset
To reset all settings, press and hold the P1 button on the motor for 14 seconds. You will see 4 independent jogs followed by 4 beeps.
User Operations
Controlling the Shade
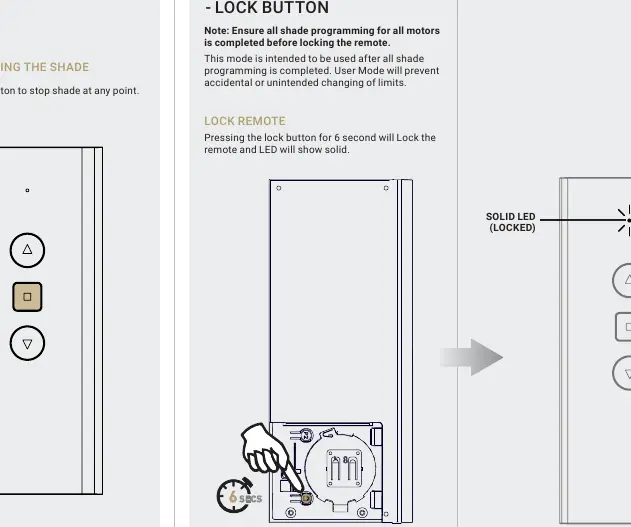
Use the UP and DOWN arrows to move the shade. Press the STOP button to stop the shade at any point.
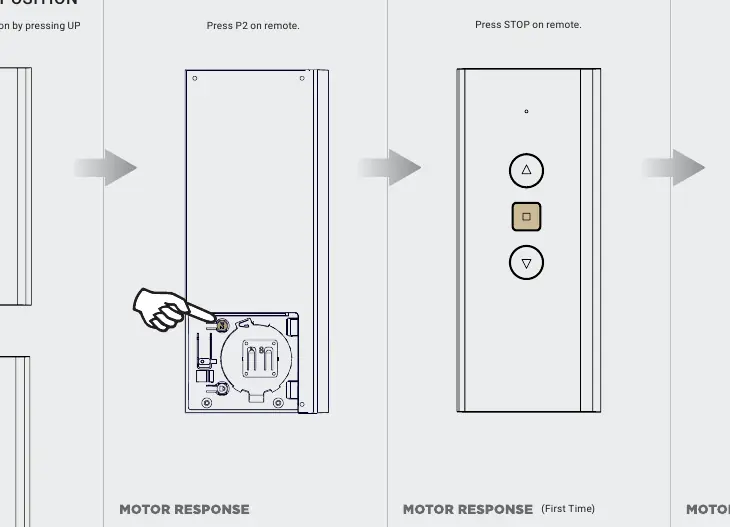
Favorite Position
Set: Move the shade to the desired position. Press P2 on the remote, then press STOP. Press STOP again to confirm.
Delete: Press P2 on the remote, then press STOP. Press STOP again to remove the favorite position.
Locking and Unlocking
Lock: Press and hold the Lock button for 6 seconds. The LED will show solid, indicating the remote is locked to prevent accidental changes.
Unlock: Press and hold the Lock button for 6 seconds. The LED will flash, indicating the remote is unlocked.
Practical help
Common problems
Motor does not respond to remote
Check if the battery is installed correctly (CR2450) and not depleted. Ensure the remote is not locked.
Shade moves in the wrong direction
Use the 'Change Direction' procedure: hold the UP and DOWN buttons together for 5 seconds until the motor jogs.
Cannot change limits or settings
The remote may be locked. Hold the Lock button for 6 seconds to unlock it (LED will flash).
Before use
- Remove the battery isolation tab from the remote.
- Ensure the motor is powered and charged.
- Identify the P1 button location on your specific motor type.
- Have a small tool (SIM pin or screwdriver) ready for the P1 button.
- Ensure all shade programming is completed before locking the remote.
Images and diagrams
- The P1 button location varies depending on whether you have an Internal Tubular, Cord Lift, or Tilt Motor.
- The LED indicator on the remote provides visual feedback for Lock (solid) and Unlock (flashing) states.
Model compatibility
- Compatible with Automate motors including Internal Tubular, 0.8 Cord Lift, 0.6 Cord Lift, Curtain, Large Tubular, and Tilt Motors.

Manual page author
David Miller
Documentation analyst
Organizes user manual content into clear summaries, with attention to model details, product context, and everyday usability.