Accessories / Mounts & Stands
Installation Guide for Av Link 129.166UK Tilt Wall Mount
Step-by-step installation guide for the Av Link 129.166UK Tilt Wall Mount. Includes instructions for wood stud and concrete wall mounting, VESA compatibility, and safety guidelines for screens up to 70 inches.
Table of contents
Manual images
Click an image to enlargeQuick Guide and Safety
The Av Link 129.166UK is a tilt wall mount designed for flat-screen TVs up to 70 inches and a maximum weight of 35kg (77lbs). Before installation, ensure the wall structure is capable of supporting the combined weight of the mount and the television. Always use the appropriate hardware for your wall type (wood stud or concrete/brick). Do not overtighten screws during assembly.
Parts List
Ensure all parts are present before beginning installation:
- Wall plate (A)
- TV brackets (B, C)
- Hardware kit: M6x30 (M-A), M8x30 (M-B), M8x50 (M-C), D8 washers (M-D), spacers (M-E, M-F)
- Wall mounting hardware: Lag bolts (W-A), Wall plugs (W-B), Washers (W-C)
Installation on Wood Studs
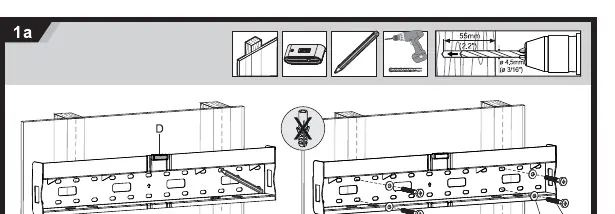
- Locate the wall studs using a stud finder.
- Position the wall plate (D) against the wall, ensuring it is level.
- Mark the mounting holes.
- Drill pilot holes (4.5mm diameter) into the center of the studs.
- Secure the wall plate to the wall using the provided lag bolts (W-A) and washers (W-C).
Installation on Concrete or Brick
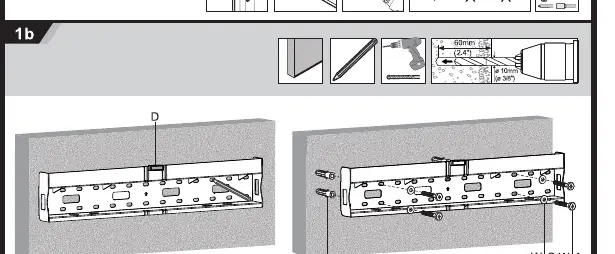
- Position the wall plate (D) against the wall, ensuring it is level.
- Mark the mounting holes.
- Drill holes (10mm diameter) into the wall.
- Insert the wall plugs (W-B) into the holes.
- Secure the wall plate to the wall using the provided lag bolts (W-A) and washers (W-C).
Attaching Brackets to TV
Select the correct screws (M-A, M-B, or M-C) based on your TV's mounting hole depth. Use spacers (M-E or M-F) if necessary to ensure a secure fit. Attach the TV brackets (B and C) to the back of the TV using the selected screws and washers (M-D).

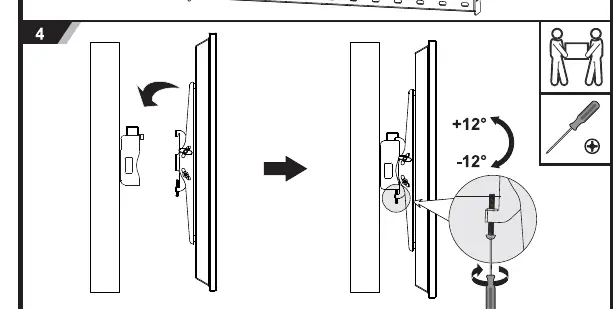
Mounting and Tilt Adjustment
Once the wall plate is secured and brackets are attached to the TV, hook the TV brackets onto the wall plate. Ensure the safety mechanism is engaged. To adjust the tilt, loosen the tilt adjustment screws on the side of the brackets, set the desired angle (up to +12° or -12°), and tighten the screws to lock the position.
Practical help
Common problems
TV is not level after mounting
Loosen the wall plate screws slightly, adjust the plate level, and re-tighten.
Screws do not fit the TV
The kit includes multiple screw sizes (M6/M8). If the TV requires a different size, do not force them; consult your TV manual for the correct bolt size.
Before use
- Verify the wall can support 35kg (77lbs).
- Check that your TV VESA pattern is supported (200x200 to 600x400).
- Ensure you have a drill, level, and screwdriver.
- Check for hidden electrical wires or pipes in the wall before drilling.
- Confirm you have all parts listed in the manual.
Specs in practice
- Max Screen Size
- 70 inches.
- VESA Compatibility
- Supports 200x200, 300x300, 400x200, 400x400, 600x400 patterns.
Images and diagrams
- Step 1a: Shows drilling pilot holes for wood stud installation.
- Step 1b: Shows drilling holes and inserting wall plugs for concrete/brick installation.
- Step 2: Illustrates the correct order of screws, washers, and spacers for attaching brackets to the TV.
- Step 4: Demonstrates how to adjust the tilt angle and lock it in place.
Model compatibility
- Designed for indoor use only.
- Compatible with wood studs and solid concrete/brick walls.

Manual page author
Michael Turner
Technical manual editor
Reviews PDF manuals for structure, safety notes, and practical product details so readers can find the right information quickly.