Electronics / AV Converters
User Manual for av:link Mini HDMI to CVBS Converter 128512UK
Quick guide for the av:link 128512UK Mini HDMI to CVBS Converter. Learn how to connect your HDMI devices to older AV displays, check specifications, and understand panel layouts.
Table of contents
Manual images
Click an image to enlargeQuick guide from the manual
The av:link Mini HDMI to CVBS converter is designed to convert high-definition HDMI video and audio signals into standard composite video (CVBS) and stereo audio (FL/FR). This allows you to play content from modern HDMI devices on older televisions, VHS VCRs, or DVD recorders. The device is plug-and-play, requiring no driver installation, and is powered via USB.
Package contents
- 1x Main unit (HDMI to AV Converter)
- 1x USB Cable
- 1x User Manual
Specifications
- Input ports: 1x HDMI
- Output ports: 1x RCA (Yellow for video, White and Red for audio)
- Supported HDMI Input Resolutions: 640x480@60Hz, 800x600@60Hz, 1024x768@60Hz, 1280x720@60Hz, 1280x1024@60Hz, 1360x768@60Hz, 1600x1200@60Hz, 1920x1080@60Hz, 480i/60Hz, 480p/60Hz, 576i/60Hz, 576p/60Hz, 720p50/60Hz, 1080i50/60Hz, 1080p50/60Hz
- CVBS Output Formats: PAL, NTSC_M, NTSC_J
- Dimensions: 66(D) x 55(W) x 20(H) mm
- Weight: 40g
Panel descriptions
The device features three main sections:
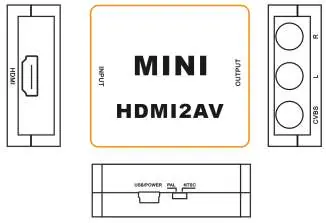
- Back Panel: Contains the HDMI input port for connecting your source device.
- Front Panel: Contains the RCA output ports (Yellow, White, Red) for connecting to your display.
- Side Panel: Contains the USB power input and the PAL/NTSC format switch.
Connection diagram
To set up the device, follow these steps:
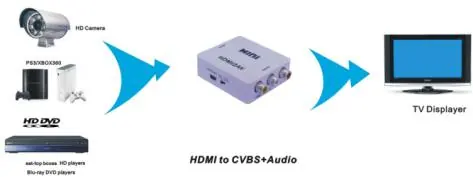
- Connect your HDMI source device (e.g., HD camera, game console, DVD player) to the HDMI input port on the back of the converter.
- Connect your display device (TV) to the RCA output ports on the front of the converter using an RCA cable.
- Connect the provided USB cable to the converter to supply power.
- Use the switch on the side of the unit to select the correct TV format (PAL or NTSC) based on your region and display requirements.
Practical help
Common problems
No image on the display
Ensure the USB power cable is securely connected. Verify that the HDMI source is active and that the RCA cables are plugged into the correct ports on both the converter and the TV.
Image is rolling or colors are incorrect
Check the PAL/NTSC switch on the side of the unit. Ensure it is set to the format supported by your television.
Before use
- Ensure you have an HDMI source device (e.g., console, DVD player).
- Verify you have an older display with RCA (composite) inputs.
- Check that the package includes the converter, USB cable, and manual.
- Confirm your TV's regional format (PAL or NTSC) to set the switch correctly.
Specs in practice
- PAL/NTSC Switch
- A physical switch to toggle between video standards to ensure compatibility with your TV.
Images and diagrams
- The connection diagram illustrates the signal path: HDMI Source -> Converter -> TV Display.
- The panel description diagram identifies the location of the HDMI input, RCA outputs, and the power/format switch.
Model compatibility
- Compatible with HDMI 1.3.
- Supports standard-definition output (480i, 576i).
- Supports NTSC and PAL TV formats.

Manual page author
Michael Turner
Technical manual editor
Reviews PDF manuals for structure, safety notes, and practical product details so readers can find the right information quickly.