Home Appliances / Commercial Kitchen Equipment
User Manual for Avantco 177SAL17M Electric Salamander Broiler
Quick guide for the Avantco 177SAL17M and 177SAL23M Electric Salamander Broilers. Includes installation, operation, cleaning, troubleshooting, and technical specifications.
Quick answers from the manual
Quick answer
- The Avantco Electric Salamander Broiler is a commercial cooking unit. To operate, plug it into a 208/240V outlet, pre-heat using the infinite control dial, adjust the housing height using the bakelite handle, and use the 15-minute timer for cooking duration. p. 4
Key actions
- Attach heat deflector p. 4
- Adjust cooking height p. 4
- Clean the unit p. 5
First start
- Remove packaging and install heat deflector p. 4
- Plug into appropriate voltage outlet p. 4
Problems and fixes
Power indicator does not turn on
Check outlet connection, fuse box, or replace indicator light.
p. 5
Upper housing is stuck
Remove back panel and check for obstructions in the track.
p. 5Maintenance and reset
- Daily cleaning p. 5
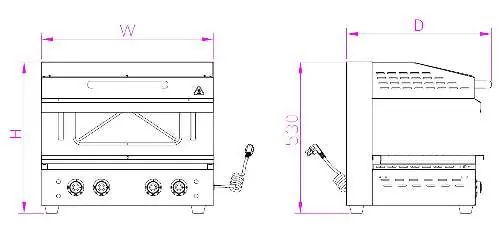
Technical specifications
| Parameter | Value | Meaning | Pages |
|---|---|---|---|
| Voltage | 208/240V | Operating voltage | p. 3 |
| Vertical Clearance | 2 1/4" to 7 3/4" | Adjustable height range | p. 3 |
Where to find it in the PDF
- Specifications p. 3
- Installation & Operation p. 4
- Cleaning & Troubleshooting p. 5
- Parts Diagram p. 7
Table of contents
Manual images
Click an image to enlargeQuick guide from the manual
The Avantco Electric Salamander Broiler is a commercial-grade appliance designed for broiling and warming. Key operational requirements include:
- Commercial Use Only: This unit is not intended for residential use.
- Clearance: Always maintain at least 12 inches of open space around all sides of the unit.
- Power: Do not use extension cords; plug directly into a grounded outlet of the appropriate voltage (208/240V).
- Daily Maintenance: Clean the unit daily to ensure longevity and hygiene.
Safety Warnings
- Do not touch hot surfaces; use the bakelite handle.
- Do not immerse the unit, cord, or plug in liquid.
- Unplug the unit when not in use and before cleaning.
- Do not operate unattended.
- Do not use outdoors or on uneven surfaces.
- Do not use if the cord or plug is damaged.
- All repairs must be performed by authorized professionals.
Installation
- Remove the unit from the box and ensure all plastic, tape, and packing materials are removed.
- Attach the heat deflector to the front of the unit using the two included screws.
- Place the unit on a firm, level, and secure surface with at least 12 inches of clearance on all sides.
- Verify that a 208/240V outlet is nearby and plug the unit in directly.
Operation
1. Plug the unit in; the green power light will turn ON.
2. Turn the infinite control dial clockwise to set the temperature; the orange indicator light will turn ON to show the heating element is active. Allow the unit to pre-heat.
3. Use the bakelite knob to slide out the cooking tray. Place food directly on the grate, in a pan, or on a cast iron griddle (sold separately).
4. Use the bakelite handle to adjust the upper housing height. Use the laser-engraved 1-5 markings on the back wall for repeatable results.
5. Use the 15-minute audible timer to set cooking or warming time. Note that the timer does not turn the machine OFF.
6. When finished, raise the housing and remove the food. If the unit is not in use, set it to LOW to maintain residual heat.
Cleaning and Maintenance
- Turn off, unplug, and let the unit cool completely before cleaning.
- Clean with a damp cloth using soap or detergent (non-acidic, non-abrasive).
- Use a synthetic scrub sponge if necessary; do not use steel wool.
- Never use direct water jets to clean the appliance.
- The stainless steel drip tray and cooking grate can be removed for cleaning by removing the front screws.
- Rinse with clean water and wipe dry.
Troubleshooting
If the unit malfunctions, check the following:
- Power indicator does not turn on: Check outlet connection, fuse box, or indicator light.
- Heating element on but indicator light off: Check for loose wiring or malfunctioning light.
- Heating elements do not work: Check heating elements or thermostat.
- Upper housing is stuck: Check for obstructions in the track or broken parts.
Technical Specifications
The unit is available in two models: 177SAL17M and 177SAL23M. Both operate on 208/240V, 60Hz power with a 6-20P outlet. Vertical clearance ranges from 2 1/4" to 7 3/4".
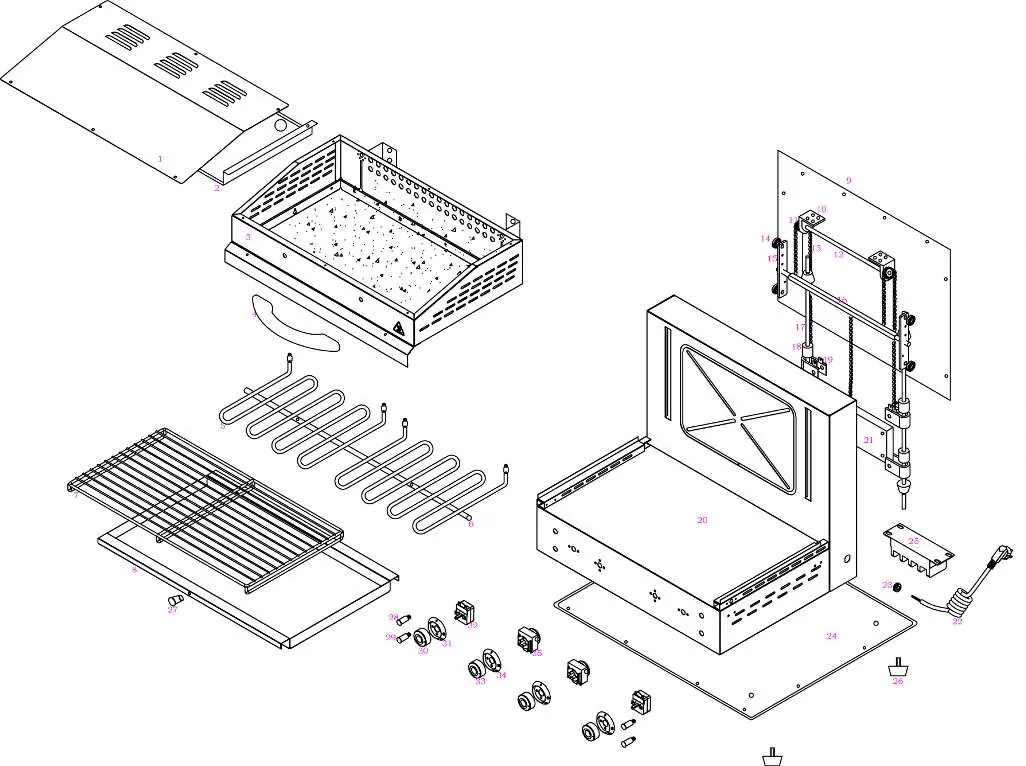
Exploded Parts Diagram
Refer to the parts diagram for identification of components such as the top cover, heating elements, gears, chains, and control knobs. Always contact authorized service for repairs.
Manufacturer information
Avantco Equipment
Practical help
Common problems
Power indicator does not turn on
Check the outlet connection or fuse box. If the indicator light is broken, replace the light.
Heating element turns on but cooking indicator light is off
The indicator light may be malfunctioning or the circuit connection is loose. Reconnect wiring or replace the light.
Heating elements do not work
The heating elements may be broken or the thermostat is malfunctioning. Replace the heating element or thermostat.
Upper housing is stuck
Check for something stuck in the track or a broken part. Remove the back panel to inspect.
Before use
- Remove all plastic, tape, and packing materials.
- Attach the heat deflector using the two included screws.
- Place on a firm, level, and secure surface.
- Ensure at least 12 inches of open space around all sides.
- Verify the outlet is 208/240V and do not use an extension cord.
Specs in practice
- Vertical Clearance
- Adjustable height range from 2 1/4" to 7 3/4".
Images and diagrams
- The exploded parts diagram identifies 35 individual components including heating elements, gears, and control knobs.
- Wiring diagrams show the electrical path for both the single-control (177SAL17M) and dual-control (177SAL23M) models.
Model compatibility
- Compatible with 176CIG2095 cast iron griddle (sold separately).
- Compatible with 471ALMSZ11 oval aluminum sizzler platter (sold separately).

Manual page author
Michael Turner
Technical manual editor
Reviews PDF manuals for structure, safety notes, and practical product details so readers can find the right information quickly.