Home Appliances / Commercial Kitchen Equipment
User Manual for Avantco Churro Stuffer
Comprehensive user guide for the Avantco Churro Stuffer. Includes assembly instructions, operation steps, cleaning procedures, and parts diagrams for models 177CS11V, 177CS15V, 177CS20V, 177CS30V, and 177CS7V.
Quick answers from the manual
Quick answer
- The Avantco Churro Stuffer is a manual food preparation device. To operate, assemble the plunger and canister, fill with mixture, and use the handle to extrude. Clean immediately after use with hot soapy water and apply food-grade lubricant to all moving parts. p. 1, 3, 5, 6
Key actions
- Assemble the plunger and pressure release valve. p. 3
- Mount the canister into the housing. p. 4
- Clean and lubricate all parts immediately after use. p. 5
First start
- Assemble the plunger with the seal and valve kit. p. 3
- Attach the handle to the desired gear shaft. p. 3
- Lubricate the inside of the canister before filling. p. 4, 6
Problems and fixes
Handle spins back
Release the handle slowly when the plunger is pulled out of the canister.
p. 6Maintenance and reset
- Clean all parts in hot soapy water and lubricate with food-grade lubricant. p. 5
Where to find it in the PDF
- Safety Regulations p. 2
- Assembly and Installation p. 3, 4
- Cleaning p. 5
- Operation p. 6
- Parts List p. 7
Table of contents
Manual images
Click an image to enlargeQuick Guide
This manual provides instructions for the Avantco Churro Stuffer. Key safety requirements include wearing ANSI Z87.1 compliant eye protection and ensuring the unit is stable during use. Important: Always clean the unit immediately after use and apply food-grade lubricant to the canister and internal components before and after each use.
Assembly and Installation
Plunger Assembly:
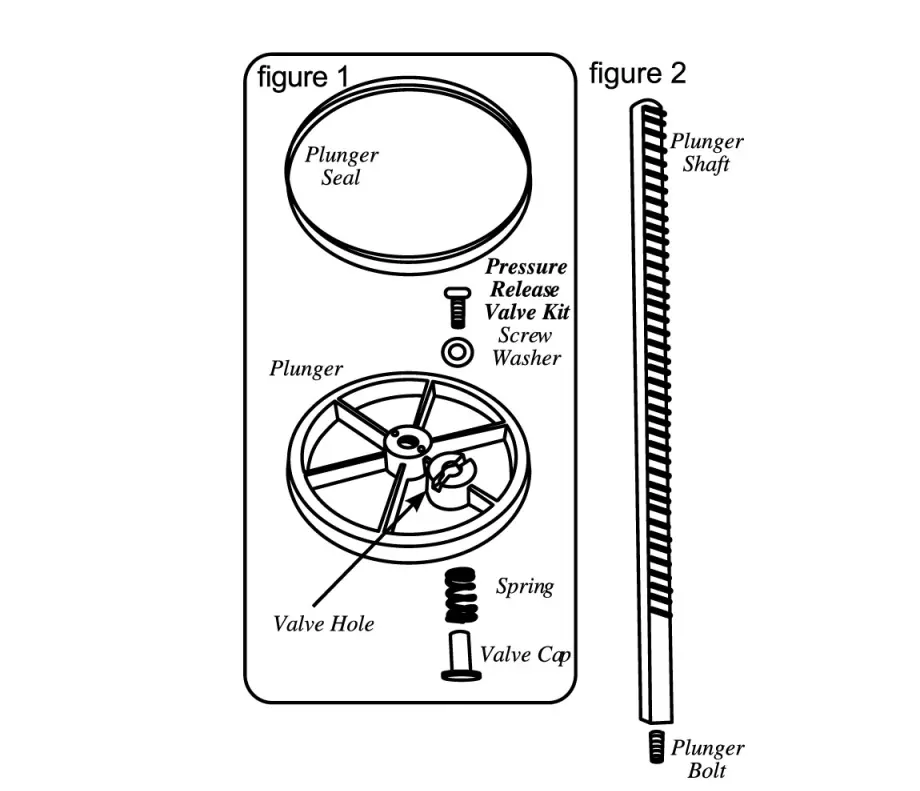
- Slide the Plunger Seal onto the Plunger.
- Assemble the Pressure Release Valve Kit: Place the Washer onto the Valve Hole, insert the Screw through the Washer, then attach the Spring and Valve Cap from the underside of the Plunger.
- Screw the Plunger Bolt onto the Plunger Shaft.
- Attach the assembled Plunger to the end of the Plunger Shaft.
Stuffer Assembly:
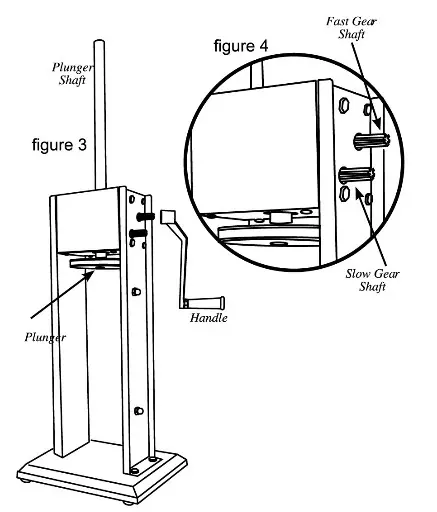
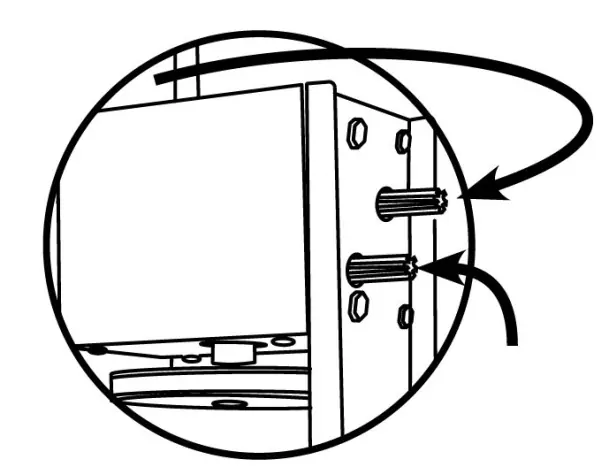
- Attach the Handle by sliding it onto either the Fast or Slow Gear.
- Crank the Handle to bring the Plunger to the top.
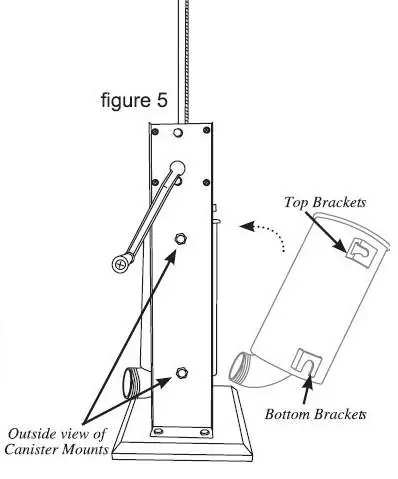
- Rest the Canister's Bottom Brackets onto the Canister Mounts inside the housing, then pivot the Canister into the housing until the Top Brackets snap into place.
- Insert the desired Stuffing Funnel through the Front Ring Nut and screw it onto the mouth of the Canister. Do not overtighten.
- Coat the inside of the Canister with food-grade lubricant.
Stuffing Instructions
Caution: When the plunger is pulled out of the Canister, release the handle slowly to prevent injury from the handle spinning back.
- Tilt out the Canister.
- Fill the Canister with the churro mixture and seasoning.
- Press the mixture down firmly to release trapped air.
- Pivot the Canister back into the upright position and snap the Top Brackets onto the Canister Mounts.
- Turn the Handle to extrude the mixture.
Disassembly and Cleaning
Note: Clean all parts immediately after use.
- Remove the Stuffing Funnel by unscrewing the Front Ring Nut.
- Turn the Handle until the Plunger comes out of the Canister.
- Pivot the Canister outward and remove it from the housing.
- Unscrew the Plunger from the shaft and disassemble the pressure release valve and seal.
- Wash all parts in hot soapy water, rinse, and dry thoroughly.
- Sterilize as needed.
- Lubricate the Shaft, Canister, Pressure-Release Valve components, and Front Ring Nut with food-grade lubricant.
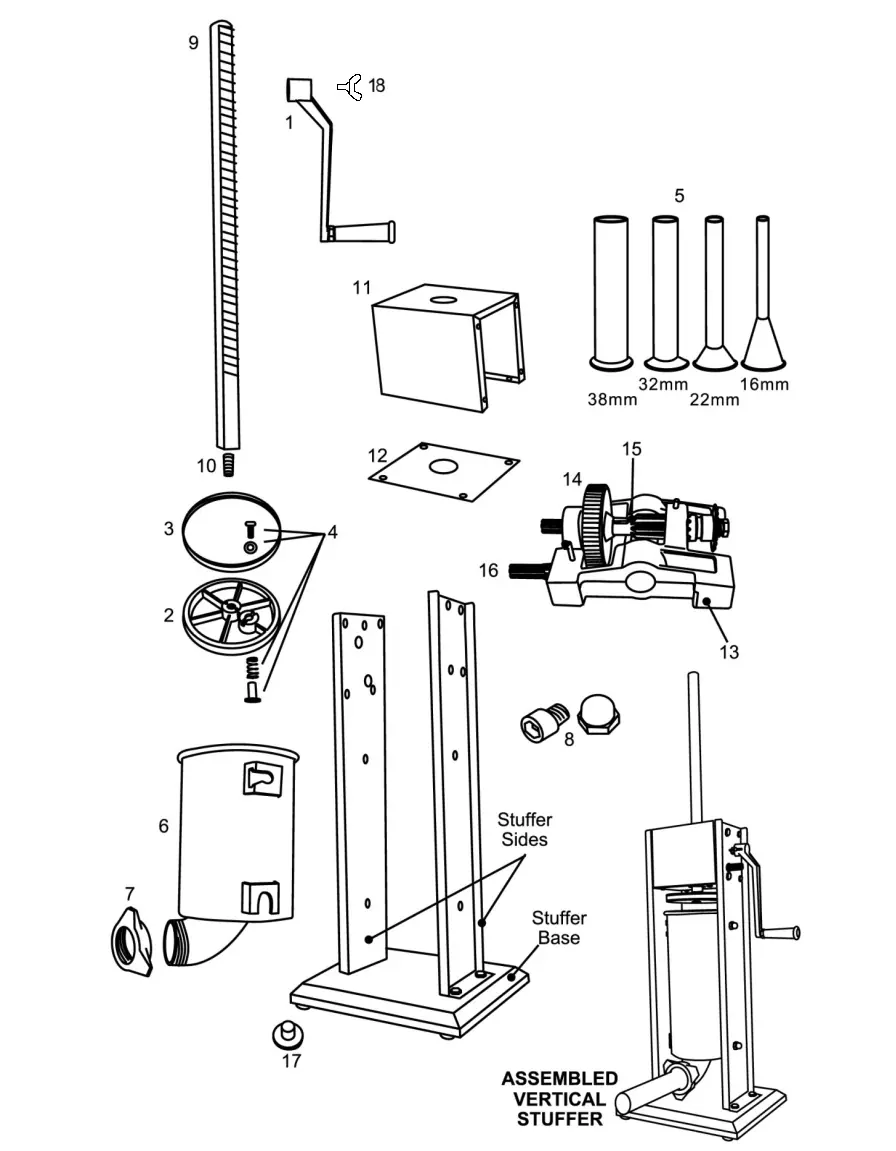
Parts List
The unit consists of several key components, including the Handle, Plunger, Plunger Seal, Pressure Release Valve, Stainless Steel Canister, Front Ring Nut, Plunger Shaft, and various gears. Refer to the exploded diagram for specific part numbers and hardware kits.
Manufacturer information
Avantco Equipment
Practical help
Common problems
Handle spins back quickly
Release the handle slowly when the plunger is pulled out of the canister to avoid injury.
Binding or stiff operation
Check for damaged parts, ensure proper mounting, and verify that all components are properly lubricated.
Funnel damage
Do not overtighten the Front Ring Nut when attaching the funnel.
Before use
- Check for damaged parts.
- Ensure the stuffer is stable.
- Wear ANSI Z87.1 compliant eye protection.
- Coat the inside of the canister with food-grade lubricant.
- Verify the plunger and pressure release valve are correctly assembled.
Specs in practice
- Fast vs. Slow Gear
- Use the Fast Gear for quicker operation and the Slow Gear for more controlled extrusion.
- Pressure Release Valve
- Essential component for proper plunger function; must be assembled correctly with the washer, spring, and cap.
Images and diagrams
- Figure 1-2: Details the assembly of the Plunger and Pressure Release Valve.
- Figure 3-4: Shows how to attach the Handle to the Fast or Slow Gear shafts.
- Figure 5-7: Illustrates the Canister mounting process and lubrication application.
- Figure 8: Demonstrates filling the Canister with mixture.
Model compatibility
- Indoor use only.
- Use only factory original parts and accessories.
- Repair must be done by an authorized dealer.

Manual page author
Emily Carter
User documentation editor
Prepares concise manual descriptions and highlights the most useful setup, operation, and maintenance information for readers.