Home Appliances / Commercial Kitchen Equipment
User Manual for Avantco Vertical Contact Bun Toaster
Comprehensive user guide for the Avantco Vertical Contact Bun Toaster. Includes assembly, installation, operating instructions, conveyor adjustment, cleaning, and troubleshooting steps for models 184BT18A, 184BT18AXL, 184BT18H, and...
Quick answers from the manual
Quick answer
- The Avantco Vertical Contact Bun Toaster is a commercial appliance. To operate, preheat for 15-30 minutes, set temperature (approx. 400°F) and speed (4-6), and use the butter roller to apply oil to buns before feeding them into the chute. p. 6
Key actions
- Install the non-stick sheet p. 5
- Adjust conveyor pressure p. 7
First start
- Preheat the unit p. 6
Problems and fixes
Buns stick to grill
Install non-stick sheet, use correct oil, or increase temperature.
p. 9Maintenance and reset
- Replace non-stick sheet p. 7
Technical specifications
| Parameter | Value | Meaning | Pages |
|---|---|---|---|
| 184BT18A | 120V 1600W | Voltage and power rating | p. 8 |
| 184BT18H | 208/240V 2400/3200W | Voltage and power rating | p. 8 |
Where to find it in the PDF
- Installation p. 4, 5
- Operating Instructions p. 6
- Conveyor Adjustment p. 7
- Cleaning and Maintenance p. 7
- Troubleshooting p. 9
Table of contents
Manual images
Click an image to enlargeQuick guide from the manual
This manual provides instructions for the Avantco Vertical Contact Bun Toaster. Key operational requirements include installing the adjustable feet, using the provided non-stick sheet to prevent burning, and preheating the unit for 15-30 minutes depending on the voltage. The toaster requires regular cleaning and maintenance, including lubricating chains and adjusting conveyor pressure if toasting is uneven.
Safety Precautions
- Commercial use only: This appliance is intended for commercial environments.
- Hot surfaces: Do not touch hot surfaces during operation.
- Electrical safety: Keep cords and plugs away from liquids. Do not operate with a damaged cord.
- Supervision: The appliance must be supervised during operation.
- Prohibited items: Do not insert metal utensils, oversized foods, or flammable materials into the toaster.
- Cleaning: Disconnect from power and allow to cool before cleaning. Do not use metal scouring pads.
Installation & Assembly
The unit is shipped with components packed separately. Follow these steps for assembly:
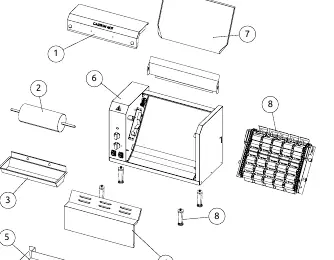
- Feet: Lay the unit on its side and screw in the adjustable feet. The unit must be level and used with feet attached.
- Components: Remove the butter roller, butter pan, top panel, and bottom panel.
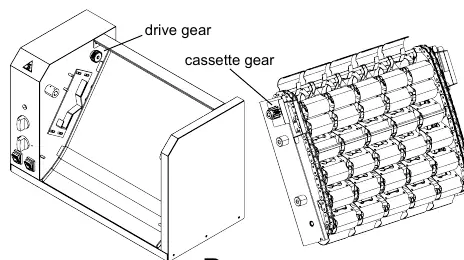
- Conveyor: Install the conveyor cassette by placing locating pins into the hanger brackets. Push gently to engage the drive gear.
- Reassembly: Replace the bottom panel, top panel, butter pan, and butter roller in order.
Non-stick Sheet Installation
It is highly recommended to install the non-stick sheet to prevent buns from sticking and burning.
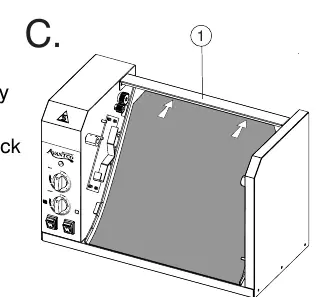
- Lay the sheet flat and measure 2 inches from the end.
- Notch the corners at 45 degrees and fold a 2-inch flap.
- Remove the bun feeder chute.
- Slip the 2-inch fold under the retainer bracket at the rear.
- Bring the sheet forward and smooth it against the grill plate.
- Reinstall the feeder chute.
Operating Instructions
Follow these steps for daily operation:
- Preheat: Turn on the main switch. Wait 15-20 minutes for 208/240V models or 20-30 minutes for 120V models.
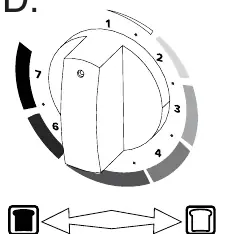
- Settings: Set temperature to approx. 400°F (scale 6-7). If using a non-stick sheet, increase to approx. 450°F (scale 6.5). Set conveyor speed between 4 and 6.
- Oil: Fill the butter tray 2/3 full with high-quality edible oil. Turn on the butter roller.
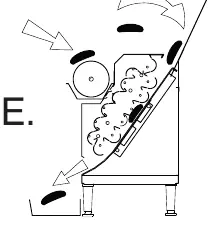
- Toasting: Slide the sliced side of the bun onto the butter roller, then drop it into the feeder chute.
Conveyor Adjustment
If toasting is not optimal, adjust the conveyor position:
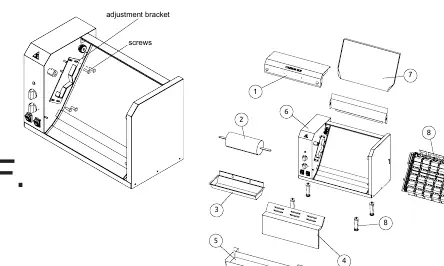
- Switch off and cool the unit.
- Remove the butter roller, tray, feed chute, and panels.
- Remove the conveyor cassette.
- Loosen the hanger adjustment brackets and move them equally towards the grill plate in 1/8-inch increments.
- Retighten screws and adjust drive gear engagement bolts if necessary.
Cleaning & Maintenance
- Panels: Removable panels can be cleaned in a sink with hot water and detergent or in a dishwasher.
- Conveyor: Clean the conveyor cassette in a sink with regular detergent. Lubricate chains after cleaning with suitable toaster oil.
- Grill Plate: Clean with a suitable grill plate scourer. Apply a light film of toaster oil after drying.
- Replacement: Replace the non-stick sheet every 30 days or when buns start sticking.
Manufacturer information
Avantco Equipment
Practical help
Common problems
Buns sticking to grill plate
Install the included non-stick sheet, ensure proper oil application, or increase grill temperature.
Buns toasting unevenly
Adjust conveyor pressure, ensure even oil coating, or check that buns are sliced correctly.
Unit dead / No power
Check supply circuit breaker, ensure plug is connected, and verify the main switch is on.
Conveyor not moving
Check for loose connections, ensure the conveyor is properly engaged, or check for binding.
Before use
- Verify voltage and outlet compatibility.
- Install adjustable feet.
- Install the non-stick sheet.
- Preheat the unit for 15-30 minutes.
- Fill butter tray 2/3 full with edible oil.
Specs in practice
- Temperature Scale (1-7)
- 1=85°F, 2=140°F, 3=200°F, 4=285°F, 5=350°F, 6=410°F, 7=480°F.
- Heat up time
- 15-20 mins for 208/240V models; 20-30 mins for 120V models.
Images and diagrams
- Diagram A: Assembly of panels and components.
- Diagram B: Conveyor cassette installation and gear engagement.
- Diagram C: Non-stick sheet installation under the retainer bracket.
- Diagram D: Temperature control scale.
- Diagram E: Bun feeding process.
Model compatibility
- 120V models: 184BT18A, 184BT18AXL.
- 208/240V models: 184BT18H, 184BT18HXL.

Manual page author
David Miller
Documentation analyst
Organizes user manual content into clear summaries, with attention to model details, product context, and everyday usability.