Home Appliances / Commercial Kitchen Equipment
User Manual for Avantco Electric Portable Hot Plates
Quick guide for Avantco Electric Portable Hot Plates (177EB200A, 177EB202SBSA, 177EB202F2BA). Includes installation, operation, safety, and maintenance instructions.
Quick answers from the manual
Quick answer
- Avantco Electric Portable Hot Plates are commercial-grade appliances for pan frying, sautéing, and simmering. They require a 120V AC outlet and must be installed in a non-combustible area with specific clearance requirements. p. 1, 4, 5
Key actions
- Install adjustable legs before operation. p. 4
- Turn control knob to OFF and unplug after use. p. 5
First start
- Unbox, remove plastic coating, install legs, and place on a flat, non-combustible surface. p. 4
Problems and fixes
Unit fails to operate
Check power source, circuit breaker, pilot light, and voltage compatibility.
p. 6Maintenance and reset
- Clean with damp cloth/sponge and mild detergent; do not immerse in liquid. p. 6
Technical specifications
| Parameter | Value | Meaning | Pages |
|---|---|---|---|
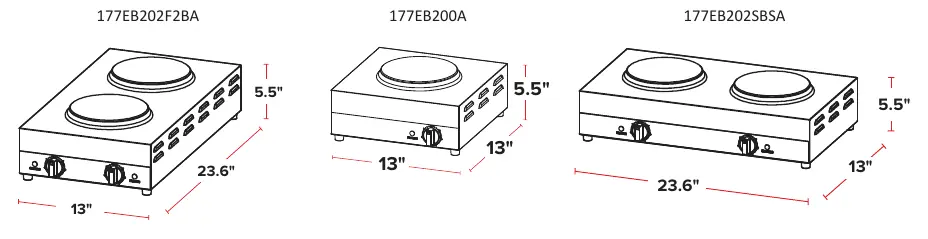
| 177EB200A | 1500W | 120V, 12.5A, Single 7 inch coil | p. 4 |
| 177EB202SBSA | 1800W | 120V, 15A, (2) Side-to-Side 7 inch coils | p. 4 |
| 177EB202F2BA | 1800W | 120V, 15A, (2) Front-to-Back 7 inch coils | p. 4 |
Where to find it in the PDF
- Safety Information p. 3
- Specifications p. 4
- Installation p. 4
- Operation p. 5
- Care and Maintenance p. 6
Table of contents
Important Information
This manual covers the Avantco Electric Portable Hot Plates, models 177EB200A, 177EB202SBSA, and 177EB202F2BA. These units are designed for commercial, indoor use only. Always ensure the unit is placed on a flat, well-ventilated surface and supervised during operation.
Installation
- Location: Install only in non-combustible locations. Maintain a clearance of at least 18 inches from the sides, front, and rear, and 40 inches above the appliance.
- Legs: Install the adjustable legs into the pre-threaded holes in the base. The unit must be operated with these legs.
- Preparation: Remove all plastic coating from stainless steel surfaces before first use.
- Personnel: Installation must be performed by qualified personnel.
Operation
- Power: Connect to a standard 120V AC electrical outlet. Do not use extension cords.
- Usage: Place cookware on the heating element and adjust the control knob to the desired heat level (Lo to Hi).
- Limitations: These units are designed for pan frying, sautéing, or simmering. Do not use for boiling.
- Cookware: Do not use pots or pans wider than the burner. 120V models are not designed for saucepots over 4 quarts.
- Shutdown: Turn the control knob to the OFF position and unplug the unit after use.
Care and Maintenance
- Safety: Always unplug the unit and allow it to cool completely before cleaning.
- Cleaning: Use a damp cloth or sponge with mild detergent. Do not use abrasive cleaners or pads.
- Restrictions: Do not immerse the product in liquid or place it in a dishwasher. Do not attempt to remove the heating elements.
Troubleshooting
If the unit fails to operate, check the following:
- Ensure the unit is connected to a live power source.
- Check the circuit breaker.
- Verify the power switch is on and the pilot light is glowing.
- Check the data plate to ensure you are using the proper voltage.
Manufacturer information
Avantco Equipment
Practical help
Common problems
Unit does not turn on
Check power connection, circuit breaker, and ensure the pilot light is glowing.
Incorrect voltage usage
Verify the power source matches the requirements on the unit's data plate.
Before use
- Remove all plastic coating from stainless steel surfaces.
- Install the adjustable legs into the base.
- Place on a flat, level, non-combustible surface.
- Ensure proper ventilation (18 inches sides/front/rear, 40 inches above).
- Clean the equipment thoroughly.
Specs in practice
- 177EB202SBSA
- 1800W (900W+900W), 15A, (2) Side-to-Side 7 inch coils.
- 177EB202F2BA
- 1800W (900W+900W), 15A, (2) Front-to-Back 7 inch coils.
Model compatibility
- Not designed for boiling.
- Do not use saucepots over 4 quarts.
- Do not use pots/pans wider than the burner.
- For commercial use only.

Manual page author
David Miller
Documentation analyst
Organizes user manual content into clear summaries, with attention to model details, product context, and everyday usability.