Home Appliances / Commercial Kitchen Equipment
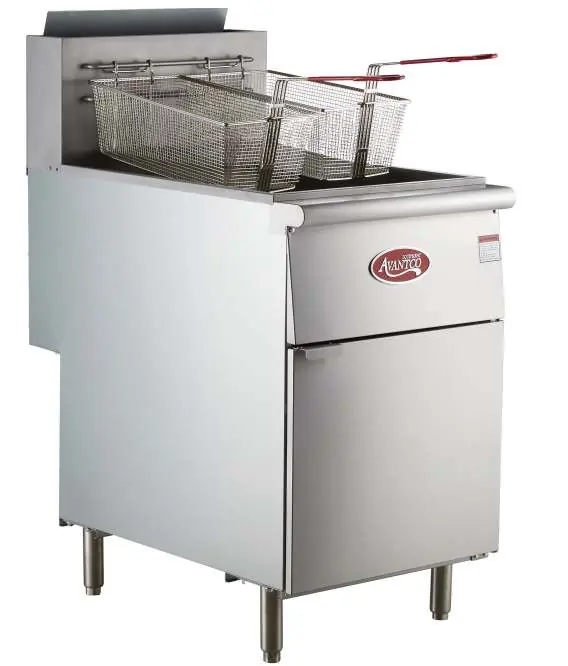
User Manual for Avantco Floor Fryers 177FF40N, 177FF40L, 177FF50N, 177FF50L, 177FF100N, 177FF100L
Comprehensive user guide for Avantco floor fryers. Includes installation, gas connection, lighting procedures, cleaning, maintenance, and troubleshooting steps for models 177FF40N, 177FF40L, 177FF50N, 177FF50L, 177FF100N, and 177FF100L.
Quick answers from the manual
Quick answer
- To light the fryer, turn the thermostat to 'OFF', set the gas valve to 'PILOT', press and hold the knob while igniting the pilot, hold for 30 seconds, then turn the valve to 'ON'. p. 11
Key actions
- Lighting the pilot p. 11
- Cleaning the fry pot p. 14, 15
First start
- Unpack and inspect for shipping damage. p. 5
- Install legs or casters and level the unit. p. 6
- Connect gas supply and test for leaks. p. 9, 10
Problems and fixes
Burners do not come on
Check gas supply, combination gas valve position, pilot light, and thermostat setting.
p. 18Maintenance and reset
- High Limit Control Reset p. 13
Technical specifications
| Parameter | Value | Meaning | Pages |
|---|---|---|---|
| Manifold Pressure (Natural) | 4" W.C. | Required pressure for natural gas operation. | p. 4, 9 |
| Manifold Pressure (Propane) | 10" W.C. | Required pressure for propane operation. | p. 4, 9 |
Where to find it in the PDF
- Specifications p. 4
- Installation p. 5, 6, 7, 8
- Operation p. 11, 12
- Cleaning p. 14, 15
Table of contents
Manual images
Click an image to enlargeQuick Guide
This manual covers the installation, operation, and maintenance of Avantco Floor Fryers. These units are intended for commercial use only. Always ensure the unit is installed by a qualified technician to maintain warranty validity. Key safety precautions include keeping the area free of combustibles, ensuring proper ventilation, and never using an open flame to check for gas leaks.
Installation
Installation must conform to local codes and the National Fuel Gas Code. Follow these steps:
- Unpacking: Inspect for shipping damage immediately upon arrival.
- Legs and Casters: Install the provided legs or casters. Ensure the unit is level to maintain performance.
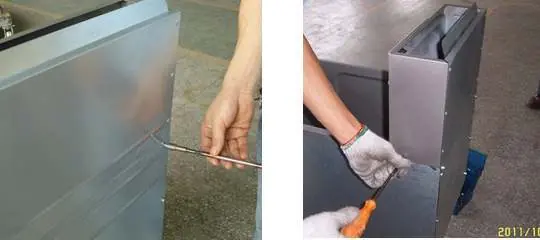
- Flue Installation: Assemble the flue box and flue wrap using the provided self-tapping screws.
- Clearances: Maintain at least 6 inches of clearance from combustible construction on sides and rear. Ensure at least 16 inches of space between the fryer and adjacent surface flames.
- Ventilation: The unit must be installed under a ventilation hood.
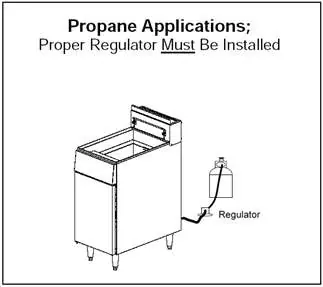
- Gas Connection: Connect to the appropriate gas type (Natural or Propane) as indicated on the serial plate. Use a 3/4" NPT male connector. Ensure manifold pressure is set to 4" W.C. for natural gas or 10" W.C. for propane.
Operation
Filling the Fry Pot: Close the drain valve completely. If using solid shortening, pack it into the zone below and between the heat tubes before lighting. Never melt solid shortening on top of the heat tubes.
Lighting Procedure:
- Open the front burner compartment door.
- Turn the thermostat to "OFF".
- Turn the combination gas valve knob to "PILOT".
- Press and hold the knob to release gas, then ignite the pilot light.
- Hold the knob for 30 seconds after ignition.
- Once the pilot stays lit, turn the knob to "ON".
- Turn the thermostat to the desired temperature only after the fry pot is filled with oil.
Cleaning
Daily Cleaning: Drain the fry pot, remove sediment, wipe the basket support frame and interior, and strain the oil. Refill to the MIN oil level mark.
Weekly Cleaning: Follow daily cleaning steps, then fill the pot with a solution of warm water and boil-out compound. Bring to a gentle boil for 5 minutes, scrub the walls and tubes, rinse, and dry.
Stainless Steel Surfaces: Clean with soap and water. Avoid using steel wool, wire brushes, or circular motions, which can damage the finish.
Service and Maintenance
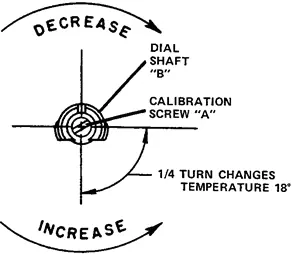
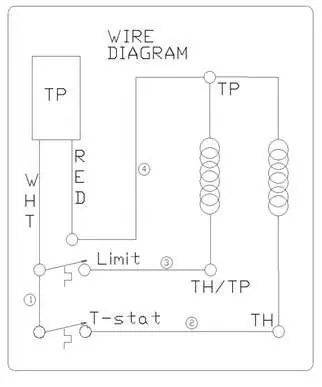
Service should only be performed by qualified technicians. The manual provides instructions for checking and adjusting main burners, the pressure regulator, thermostat calibration, and the auto safety pilot. A wiring diagram is included for electrical troubleshooting.
Troubleshooting
If the burners do not ignite, check the gas supply, ensure the combination gas valve is not in the "OFF" position, and verify the pilot is lit. If the pilot will not stay lit, check for a bad thermopile, clogged orifice, or draft conditions.
Manufacturer information
Avantco Equipment
Practical help
Common problems
Burners do not come on
Check if gas supply is on, ensure combination gas valve is in 'ON' position, check if pilot is lit, and ensure thermostat is turned on.
Pilot will not stay ignited
Check for bad thermopile, clogged orifice, draft conditions, or improper ventilation.
Burners produce carbon deposits
Verify correct orifice size, check gas supply type, and ensure flue is not obstructed.
Before use
- Ensure the unit is level.
- Verify gas type matches the serial plate.
- Check that the fry pot is filled with oil or melted shortening.
- Ensure ventilation hood is operational.
- Test all gas connections for leaks using soapy water.
- Ensure the appliance regulator is installed for propane units.
Specs in practice
- Manifold Pressure (Natural Gas)
- 4" W.C.
- Manifold Pressure (Propane)
- 10" W.C.
- Gas Connection
- 3/4" NPT male connector
Images and diagrams
- Flue installation: Shows how to slide the flue box and wrap over the flue and secure with screws.
- Propane Regulator: Illustrates the requirement for an external regulator on propane applications.
- Thermostat Calibration: Shows how to adjust the calibration screw 'A' to increase or decrease temperature.
- Wiring Diagram: Provides the electrical circuit layout for the fryer components.
Model compatibility
- Intended for commercial use only.
- Propane units require an additional appliance regulator.
- Suitable for installation on combustible floors.

Manual page author
Emily Carter
User documentation editor
Prepares concise manual descriptions and highlights the most useful setup, operation, and maintenance information for readers.