Home Appliances / Commercial Kitchen Equipment
User Manual for Avantco 177HP and 177HEAT Series Heated Holding Cabinets
Comprehensive user guide for Avantco 177HP and 177HEAT Series Heated Holding Cabinets. Includes installation, operation, cleaning, maintenance, and troubleshooting instructions.
Quick answers from the manual
Quick answer
- The Avantco 177HP and 177HEAT series are commercial heated holding cabinets. They require a dedicated 120V circuit. Operation involves preheating the unit, filling the water pan for proofing or moisture-required holding, and adjusting the heat/humidity dials. p. 1, 7
Key actions
- Preheat the cabinet for approximately 45 minutes before placing food inside. p. 7
- Fill the water pan halfway with clean, HOT tap water for proofing or holding applications requiring moisture. p. 7
First start
- Plug the unit into a dedicated 120V circuit, set to heat mode, set dial to 9, and run for 1 hour to burn in elements. p. 4
Problems and fixes
Unit not turning on
Check power connection, voltage, and circuit breaker.
p. 12Error codes
| Code | Meaning | Action | Pages |
|---|---|---|---|
| LL | Sensor error | Replace the thermostat. | p. 12 |
| HH | Cabinet temperature is too high | Lower the temperature of the cabinet. | p. 12 |
Technical specifications
| Parameter | Value | Meaning | Pages |
|---|---|---|---|
| Voltage | 120V | Electrical requirement | p. 7 |
| Power | 1440W | Heating element power | p. 7 |
Where to find it in the PDF
- Safety Precautions p. 3
- Installation p. 4
- Controls p. 6
- Operation p. 7, 8
- Cleaning p. 10
- Troubleshooting p. 12
Table of contents
Manual images
Click an image to enlargeQuick Guide
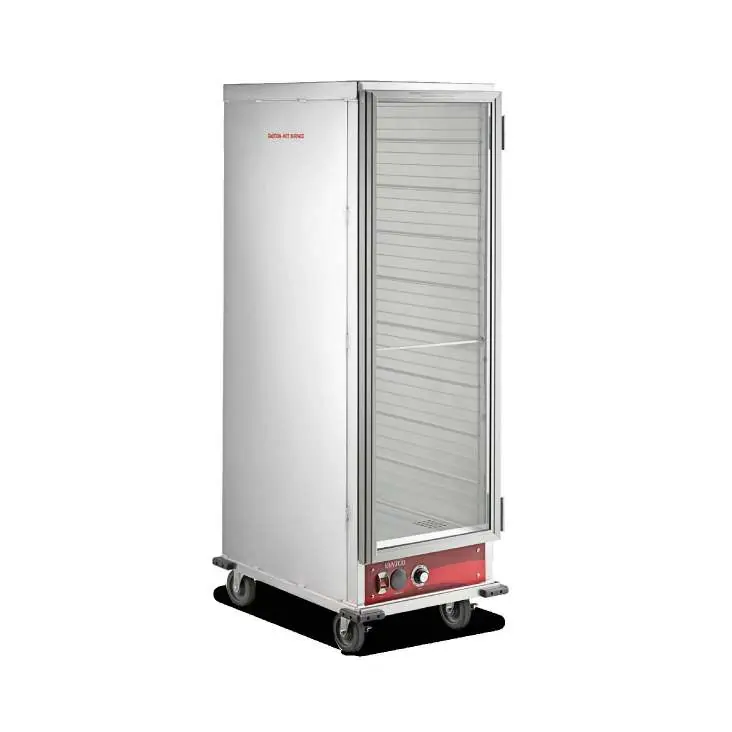
The Avantco 177HP and 177HEAT series are commercial heated holding cabinets designed for indoor use. Before first use, ensure the unit is unpacked, placed on a stable surface with locked casters, and plugged into a dedicated 120V, 15 or 20 amp circuit. Run the unit at maximum setting 9 for at least 1 hour to burn in the elements and remove manufacturing odors.
Safety Precautions
- For commercial and indoor use only.
- Always unplug the cabinet before cleaning or servicing.
- Do not wash the cabinet with a water jet or high-pressure water.
- Use a food probe to check internal food temperature; cabinet temperature is not the same as internal food temperature.
- This is not a cooking or rethermalizing appliance.
Installation
Upon delivery, inspect for shipping damage. Remove all tape and packing materials. Plug into a dedicated grounded 120V circuit. If using a GFCI outlet, the heater element may need to be dried out by running the unit on a non-GFCI outlet for 30-60 minutes if it trips the breaker.

Controls
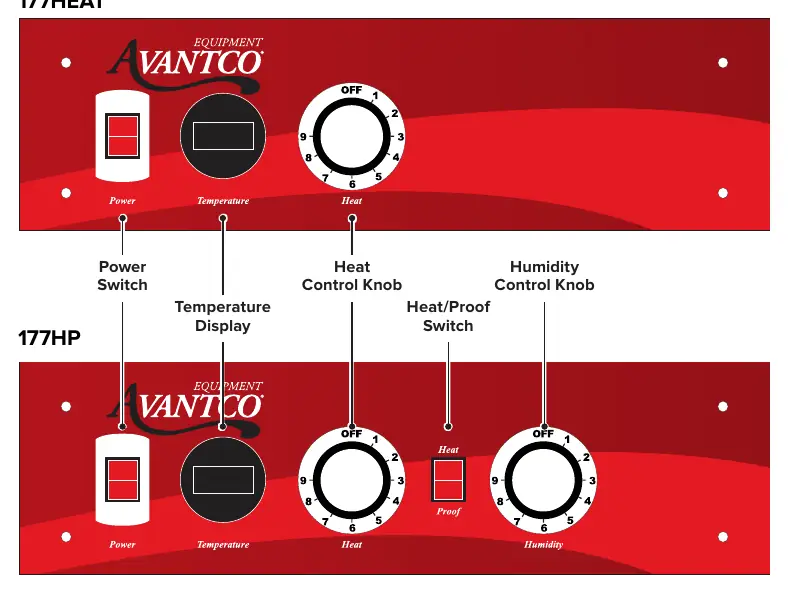
The control panel features a power switch, temperature display, heat control knob, and (on 177HP models) a humidity control knob and heat/proof switch. The dial settings 1-9 do not correspond to specific calibrated temperatures; users must familiarize themselves with the unit's performance.
Operation
Heating/Holding Instructions
- Set HEAT/PROOF switch to HEAT (177HP models).
- Set POWER switch to ON.
- Set TEMPERATURE control to 9 to preheat.
- Preheat until desired temperature is reached (approx. 45 minutes to reach 160°F).
- Adjust TEMPERATURE control to desired setting (6-8 is typical for 150°F-160°F).
Proofing Instructions (177HP Models)
- Set HEAT/PROOF switch to PROOF.
- Set POWER switch to ON.
- Set TEMPERATURE control to 2.
- Set HUMIDITY control to 9.
- Preheat until desired temperature and humidity are reached.
Cleaning
Always unplug and allow the unit to cool before cleaning. Do not spray water into the heated control drawer module. Wipe interior and exterior surfaces with a mild detergent and clean cloth. For the polycarbonate door panel, use cleaners recommended for polycarbonate plastics to avoid scratches.
Troubleshooting
If the unit does not turn on, check if it is plugged in, check the voltage, and reset the circuit breaker. If the heat drawer malfunctions, inspect for loose or disconnected wires. Error code 'LL' indicates a sensor error (replace thermostat), and 'HH' indicates the cabinet is too hot (lower the temperature).
Manufacturer information
Avantco Equipment
Practical help
Common problems
Unit not turning on
Check if the unit is plugged in, verify the outlet voltage, and check the circuit breaker.
GFCI trips immediately
The heater element may have absorbed moisture. Run the unit on a non-GFCI outlet for 30-60 minutes to dry it out.
Temperature reading not accurate
Replace the LED thermometer and its power supply transformer.
Error Code LL
Sensor error; replace the thermostat.
Error Code HH
Cabinet temperature is too high; lower the temperature setting.
Before use
- Inspect for shipping damage upon delivery.
- Remove all tape and packing material from inside and outside.
- Place on a stable surface and lock casters.
- Plug into a dedicated 120V, 15 or 20 amp circuit.
- Run the unit at setting 9 for 1 hour to burn in elements.
Specs in practice
- Temperature Range
- 80-185°F (Heating/Holding)
- Humidity Range
- 30-100% (Proofing)
Images and diagrams
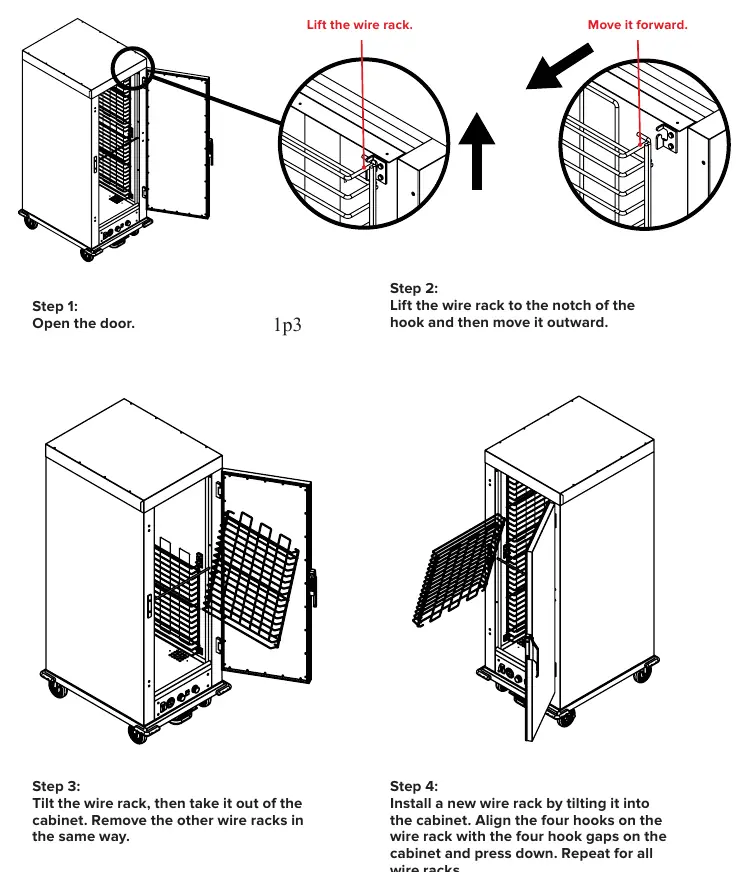
- Wire rack installation: Lift rack to the notch, move outward, tilt to remove.
- Control panel: Includes power switch, temperature display, heat knob, and humidity knob (177HP only).
Model compatibility
- Commercial use only.
- Indoor use only.
- Not for cooking or rethermalizing food.

Manual page author
Michael Turner
Technical manual editor
Reviews PDF manuals for structure, safety notes, and practical product details so readers can find the right information quickly.