Home Appliances / Commercial Kitchen Equipment
User Manual for Avantco 177HWD15G Hot Water Dispenser
Quick guide for the Avantco 177HWD15G Hot Water Dispenser. Includes installation steps, plumbing connection, thermostat adjustment, and safety warnings.
Quick answers from the manual
Quick answer
- The Avantco 177HWD15G is a commercial hot water dispenser. To operate, connect to a water supply (30-80 PSI), plug into a power source, and turn the toggle switch to ON. It takes approximately 20 minutes to heat up. p. 1, 3
Key actions
- Adjusting the thermostat p. 4
- Connecting water supply p. 3
First start
- Ensure the Tank Heater Switch is in the OFF position before connecting to the power supply. p. 2, 3
Maintenance and reset
- Cleaning the exterior p. 4
Technical specifications
| Parameter | Value | Meaning | Pages |
|---|---|---|---|
| Power | 1450W | Electrical power consumption | p. 2 |
| Capacity | 5-6 liters | Water tank capacity | p. 2 |
Where to find it in the PDF
- Specifications and Warnings p. 2
- Installation and Operation p. 3
- Cleaning and Thermostat Adjustment p. 4
Table of contents
Manual images
Click an image to enlargeQuick guide from the manual
The Avantco 177HWD15G is a commercial hot water dispenser. Before connecting to power, ensure the Tank Heater Switch is in the OFF position. The unit requires approximately 20 minutes to reach the proper temperature after being switched on. If you notice excess water flowing from the drain spout during initial heat-up, this is normal due to water expansion.
Safety Warnings
- Designed for commercial use only.
- Place on a level surface capable of supporting the unit's weight.
- Never immerse the appliance in water.
- Do not unplug with wet hands or by pulling the cord.
- Ensure the power cord does not come into contact with hot parts.
- If the power cord is damaged, contact a qualified service agent.
Installation
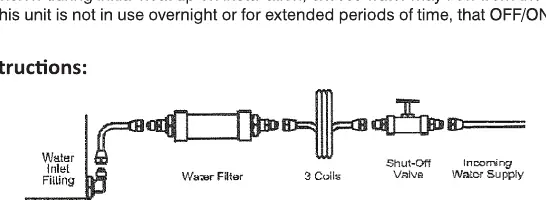
Plumbing Connection:
- Place the dispenser on a sturdy, level, heat-resistant, non-flammable surface.
- Form three coils of 1/2 inch O.D. copper tubing (not supplied) to connect to the cold water line; this allows the dispenser to be moved for cleaning.
- It is recommended to install an optional shut-off valve and water filter.
- Attach the water line to the inlet fitting on the rear of the dispenser using a wrench.
- Turn on the water supply and check for leaks.
- The unit operates with water pressure between 30 and 80 PSI. If pressure exceeds 80 PSI, install a water pressure regulator.
Electrical Connection:
- Connect the power cord to a proper power supply as indicated on the electrical nameplate.
- Ensure the toggle switch is in the OFF position before connecting to power.
Operation
- Plug in the equipment.
- Turn the toggle switch to the ON position. The unit will fill automatically and stop when the water reaches the proper level.
- The heater will begin to work once the water reaches the adequate level.
- Allow approximately 20 minutes for the water to reach the proper temperature. The yellow light will turn off when ready.
- Place a container under the faucet and pull the handle towards you.
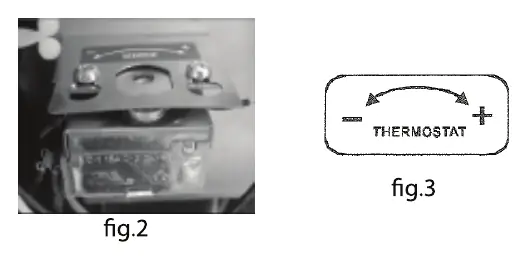
Adjusting the Thermostat
The thermostat is factory-set to maintain water between 190°F (88°C) and 205°F (96°C). To adjust:
- Turn the toggle switch to OFF, unplug the unit, and allow it to cool.
- Remove the rear cover.
- Locate the thermostat adjustment screw.
- Turn the screw clockwise to increase temperature, counter-clockwise to reduce. Do not adjust more than 1/8 of a turn at a time.
- Replace the cover, reconnect power, and turn the switch ON.
- Allow the unit to reach full temperature before checking.
Cleaning
- Turn the toggle switch to OFF, unplug, and allow to cool before cleaning.
- Use a damp cloth for the exterior.
- If necessary, use a non-corrosive, non-abrasive detergent.
- Do not attempt to open or clean the inside of the dispenser unless you are a trained and qualified repair technician.
Manufacturer information
Avantco Equipment
Practical help
Common problems
Water leaks at the inlet
Tighten the fittings with a wrench.
Excess water flowing from drain spout
This is normal during initial heat-up due to water expansion.
Water temperature not in range
Adjust the thermostat screw by no more than 1/8 turn at a time.
Before use
- Ensure the surface is level and sturdy.
- Verify water pressure is between 30 and 80 PSI.
- Ensure the Tank Heater Switch is in the OFF position.
- Flush the incoming water line before connecting.
- Install an optional shut-off valve and water filter.
Specs in practice
- Water Capacity
- 5-6 liters
- Operating Pressure
- 30-80 PSI
- Temperature Range
- 190°F (88°C) to 205°F (96°C)
Images and diagrams
- Fig 1: Shows the plumbing connection sequence: Water Inlet Fitting -> Water Filter -> 3 Coils -> Shut-Off Valve -> Incoming Water Supply.
- Fig 2 & 3: Shows the thermostat adjustment screw location and direction (+/-) for temperature control.
Model compatibility
- For installations less than 25 feet, use 1/4 inch O.D. copper tubing.
- For installations more than 25 feet, use 3/8 inch O.D. copper tubing.

Manual page author
David Miller
Documentation analyst
Organizes user manual content into clear summaries, with attention to model details, product context, and everyday usability.