Home Appliances / Commercial Kitchen Equipment
Avantco 177HWDA2 Hot Water Dispenser User Manual
Quick guide for the Avantco 177HWDA2 Hot Water Dispenser. Includes installation steps, operation instructions, daily cleaning, and technical specifications.
Quick answers from the manual
Quick answer
- The Avantco 177HWDA2 is a commercial hot water dispenser. It requires a 110/120V power supply and a water line connection. Always use filtered and softened water to prevent limescale. p. 1, 3
Key actions
- Install the water line to the rear inlet and connect to a 110/120V power source. p. 3
- Perform daily cleaning with a damp cloth and neutral soap. p. 5
First start
- Place on a level surface, connect the water line, check for leaks, and plug into a 110/120V outlet. p. 3
Maintenance and reset
- Deliming should be performed at least once every six months by an authorized technician. p. 5
Technical specifications
| Parameter | Value | Meaning | Pages |
|---|---|---|---|
| Voltage | 110-120 V | Operating voltage | p. 5 |
| Wattage | 1500W | Power consumption | p. 5 |
| Capacity | 2 Gallons | Water storage capacity | p. 5 |
Where to find it in the PDF
- Safety Information p. 2
- Installation p. 3
- Operation p. 4
- Cleaning and Specifications p. 5
Table of contents
Manual images
Click an image to enlargeQuick guide from the manual
The Avantco 177HWDA2 is a commercial hot water dispenser designed for indoor use. Before starting, ensure the unit is placed on a sturdy, level surface and connected to a 110/120V power outlet. It is critical to use filtered and softened water to prevent limescale buildup, which reduces thermal efficiency and the machine's lifespan.
Safety Information
- Commercial Use Only: This appliance is not for residential use.
- Electrical Safety: Do not use an extension cord. Ensure the chassis is electronically grounded. Do not alter the power cord or plug.
- Operation: Always place the unit in a fully vertical position. Unplug before cleaning or servicing. Be cautious of hot surfaces to avoid burns.
- Water Supply: Do not power up the boiler if the water supply is off.
Installation
- Unpack the unit and check for damage or missing parts.
- Place the dispenser on a sturdy, level, heat-resistant, and non-flammable surface.
- Attach the water line to the inlet on the rear of the dispenser. Use a wrench to hold the fitting while tightening.
- Turn on the water supply and check for leaks at the inlet.
- Connect the power cord to a 110/120V outlet. Ensure the machine is switched OFF before connecting.
Operation Instructions

- Plug the machine into the power supply.
- Verify the water supply is on and press the ON/OFF button (A) to turn the unit on.
- The unit will automatically fill and heat. The Heating indicator light (B) will be on during this process.
- Once the water reaches the target temperature, the unit enters Keep Warm status (C).
- To dispense, place a container under the faucet and pull the handle towards you. Release the handle to stop.
Daily Cleaning and Maintenance
Cleaning should be performed at the end of every workday.
- Exterior: Turn the unit OFF, unplug, and allow it to cool. Use a clean cloth with hot water and a neutral dish soap (e.g., Noble Chemical Sunbright) to clean the outside. Use a damp cloth for dirt smudges.
- Deliming: Must be performed at least once every six months by an authorized technician. Areas with hard water require more frequent deliming.
- Restrictions: Do not use harsh chemicals or abrasive materials. Do not submerge or saturate the unit with water.
Manufacturer information
Avantco Equipment
Practical help
Common problems
Limescale buildup
Use filtered and softened water. Perform deliming at least every six months.
Leaks at water inlet
Check the connection at the rear of the dispenser and tighten the fitting if necessary.
Unit not heating
Ensure the unit is plugged into a 110/120V outlet and the ON/OFF button is pressed.
Before use
- Ensure the surface is sturdy, level, and heat-resistant.
- Verify the water supply is filtered and softened.
- Check that the water line is connected and free of leaks.
- Ensure the power outlet is 110/120V.
- Confirm the unit is switched OFF before plugging it in.
Specs in practice
- Water Input Pressure
- 10-58 psi; ensure your water supply meets this range.
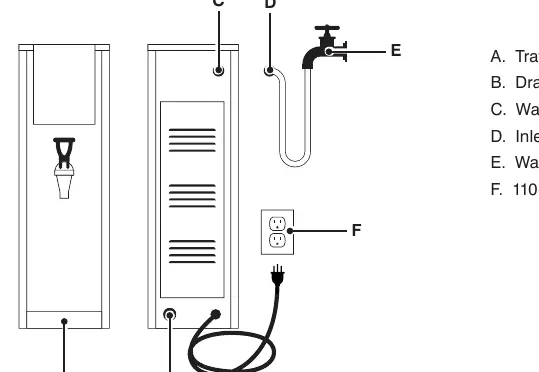
Images and diagrams
- B: Drain Outlet
- C: Water Inlet
- D: Inlet Pipe
- E: Water Faucet
- F: 110-120V Power Connection

Manual page author
Emily Carter
User documentation editor
Prepares concise manual descriptions and highlights the most useful setup, operation, and maintenance information for readers.