Home Appliances / Commercial Kitchen Equipment
User Manual for Avantco 177KSLICER80 Kebab Slicer
Quick guide for the Avantco 177KSLICER80 Kebab Slicer. Includes setup, operation, blade replacement, sharpening instructions, and safety guidelines.
Quick answers from the manual
Quick answer
- The Avantco 177KSLICER80 is a professional kebab slicer. This manual provides instructions for safe operation, cleaning, blade replacement, and sharpening. p. 1
Key actions
- Replace the circular knife p. 4
- Sharpen the blade p. 6
- Clean the unit p. 5
First start
- Inspect the power cable, ensure the knife protector is securely fastened, and verify the power plug is compatible before use. p. 3
Technical specifications
| Parameter | Value | Meaning | Pages |
|---|---|---|---|
| Voltage | 120V | Operating voltage | p. 2 |
| Wattage | 80W | Power consumption | p. 2 |
Where to find it in the PDF
- Product Description p. 2
- Safety Instructions p. 3
- Knife Replacement p. 4
- Cleaning p. 5
- Sharpening p. 6
- Exploded View p. 7
Table of contents
Manual images
Click an image to enlargeQuick Guide
The Avantco 177KSLICER80 is a professional kebab slicer designed for catering use. This manual provides essential instructions for safe operation, maintenance, and cleaning. Always ensure the knife protector is correctly mounted before use and disconnect the power supply before performing any maintenance or adjustments.
Product Description
The slicer features an ergonomic handle, a power cord with a protective sleeve, and an adjustable cutting mechanism. Key components include the knife, knife protector, adjustment ring, and adjustment screw for setting the cutting thickness.

Operation
To operate the slicer:
- Ensure the meat is on a secure stand.
- Only cut grilled meat.
- Adjust the cutting thickness between 0.5mm and 8mm using the adjustment screw (Left = Larger, Right = Smaller).
- Always work from the top to the bottom of the kebab.
- Only turn on the slicer when it has been applied to the meat.
Cleaning and Hygiene
Regular cleaning is essential for food safety and device longevity:
- Disconnect the slicer from the power supply before cleaning.
- Do not submerge the unit in water or clean it in a dishwasher.
- Remove the knife and clean food contact surfaces with a fat solvent or dishwashing detergent.
- Rinse and dry all parts thoroughly before reassembly.
- Wash hands before and after contact with food and disinfect devices daily.
Blade Replacement
If the knife becomes dull or damaged, follow these steps:
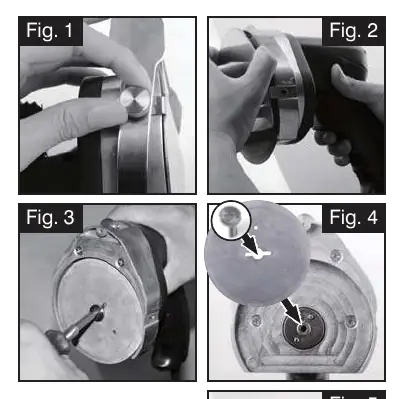
- Disconnect the slicer from the power supply.
- Remove the lock screw and adjustment ring.
- Remove the knife protector.
- Remove the fastening screw and the old knife.
- Insert the new knife, ensuring the sharpened side faces toward the motor.
- Reattach the retention disc, fastening screw, knife protector, and lock screw.
Sharpening the Blade
To maintain cutting efficiency:
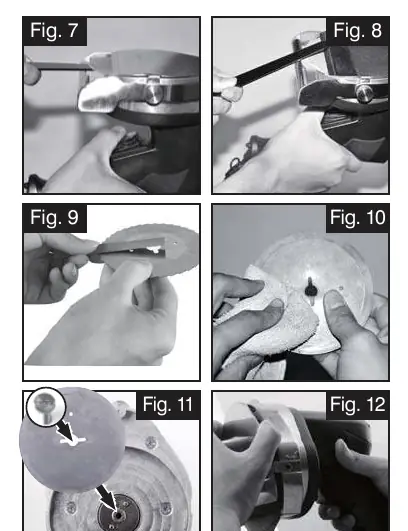
- Disconnect the slicer from the power supply.
- Sharpen the circular knife at a very flat angle from the bottom for 1-2 seconds.
- Deburr from the top side.
- Deburr the ground section from the front.
- Clean the knife with a soft towel before reassembling.
Technical Parameters
- Voltage: 120V
- Wattage: 80W
- Knife Diameter: 3.94 inches (100mm)
- Cutting Thickness: 0-0.32 inches (0-8mm)
Manufacturer information
Avantco Equipment
Practical help
Common problems
Slicer not cutting effectively
The blade may be dull. Follow the sharpening procedure or replace the blade if damaged.
Risk of electric shock
Ensure the power cable is not damaged, keep the unit away from water, and do not submerge the device.
Incorrect cutting thickness
Adjust the cutting thickness using the adjustment screw. Turning left increases thickness; turning right decreases it.
Before use
- Inspect the power cable for any damage.
- Ensure the knife protector is correctly mounted and securely fastened.
- Check that the scraper is clean and functioning properly.
- Wash hands thoroughly before handling food.
- Ensure the power plug is compatible with the wall socket.
Specs in practice
- Knife Diameter
- 3.94 inches (100mm) blade size.
- Cutting Thickness
- Adjustable range from 0 to 8mm.
Images and diagrams
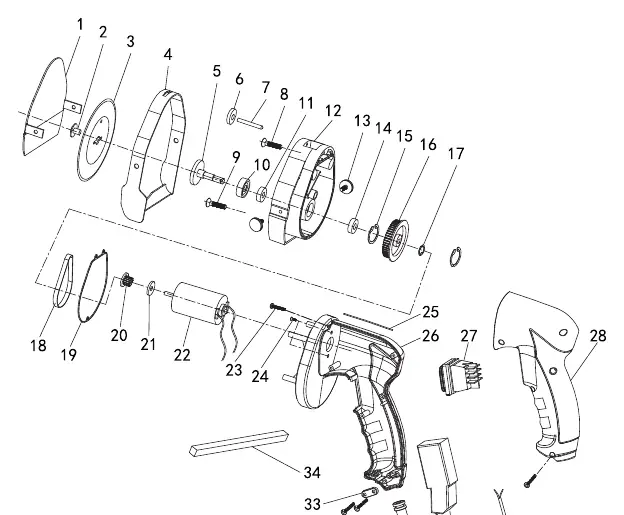
- The exploded view on page 7 details all internal components, including the motor, gear box, and bearings, for maintenance reference.
- The circuit diagram on page 6 illustrates the electrical connections for the control circuit board.
Model compatibility
- Intended for professional use in catering.
- Only use with original accessories.
- Not for residential use.

Manual page author
Emily Carter
User documentation editor
Prepares concise manual descriptions and highlights the most useful setup, operation, and maintenance information for readers.