Lighting / Stage Lighting
User Manual for AVSL 151.744UK Butterfly Effect 3-in-1 Light
Quick guide for the AVSL 151.744UK Butterfly Effect 3-in-1 LED and Laser light. Includes setup, DMX channel mapping, remote control operation, and safety instructions.
Table of contents
Manual images
Click an image to enlargeQuick guide from the manual
The AVSL 151.744UK Butterfly Effect is a 3-in-1 lighting fixture combining a butterfly effect, 6x 1W RGB PARs, and a dual-colour laser. It can be operated via integrated automatic programs, sound-to-light mode, DMX control, or the included IR remote.
Product description
The unit is a compact fixture designed for stage or event lighting. It features:
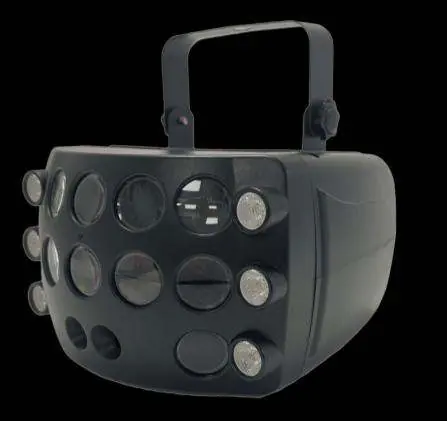
- Butterfly Effect: Colourful light patterns.
- RGB PARs: 6x 1W LEDs for wash effects.
- Laser: Dual-colour laser output.
- Control: 13-channel DMX, IR remote, or manual menu.
Safety and placement
Warning: This product contains a Class 3B laser. It should only be installed and used by persons trained in the management of laser radiation. Do not point the laser directly at eyes.
- Use the included mounting bracket to fix to a stand or lighting truss.
- Use secondary safety fixings if mounting overhead.
- Keep the unit away from damp or dusty environments.
- Ensure adequate airflow around the fixture housings.
- Do not open the cover; the unit contains high voltage and is not user-serviceable.
Rear panel controls
The rear panel provides the interface for manual operation and connections:
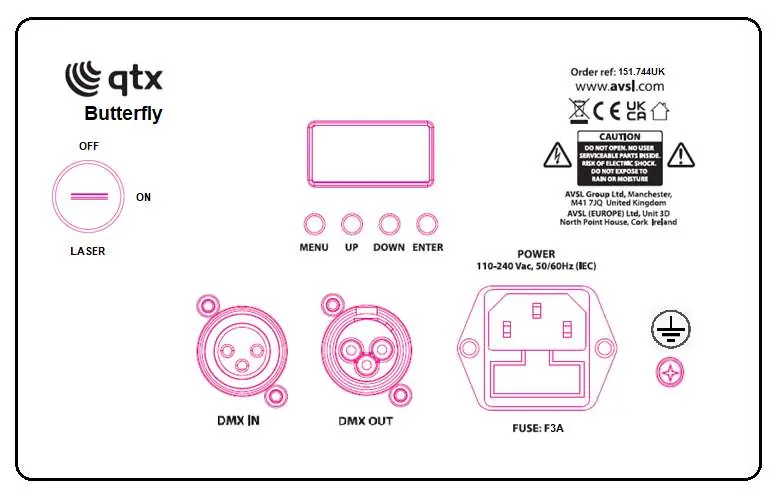
- Laser Key: Used to enable/disable the laser output.
- DMX In/Out: 3-pin XLR connections for DMX control.
- Control Panel: Includes MENU, UP, DOWN, and ENTER buttons for navigating settings.
- LCD Display: Shows current mode or DMX address.
- Power Input: IEC mains input.
Manual control menu
Press the MENU button to enter the settings menu, use UP and DOWN to navigate, and ENTER to confirm.
- d001 - d512: DMX address settings.
- A1 - A4: Butterfly effect modes (Red, Green, Blue, White) with speed control.
- A5 - A6: PAR colour jump/fade modes.
- A7 - A8: Laser control (Red/Green) with speed control.
- C1 - C2: Auto modes.
- S1 - S3: Sound-activated modes.
Remote control
The included IR remote allows for quick access to:
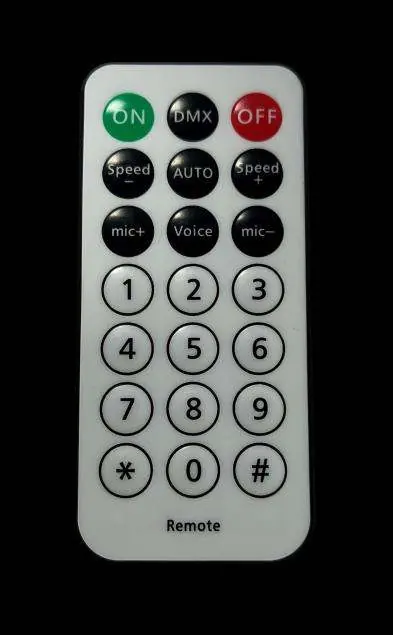
- ON/OFF: Power control.
- DMX: Switch to DMX mode.
- Speed +/-: Adjust effect speed.
- Auto/Voice: Toggle between auto and sound-activated modes.
- Direct access: Buttons 1-9 and symbols for specific effects and laser control.
DMX mode
To enter DMX mode, select d001 from the menu and set the start address. The unit uses 13 channels:
- CH1: Total dimming.
- CH2-CH5: Butterfly colour dimming.
- CH6: Butterfly strobe.
- CH7: Butterfly motor control.
- CH8-CH9: PAR colour and speed.
- CH10-CH11: Laser control.
- CH12: Laser motor control.
- CH13: Mode selection (Auto/Sound).
Specifications
- Power supply: 110-240Vac, 50/60Hz (IEC)
- Power consumption: 38W
- Fuse rating: F5A
- Laser class: 3B
- Dimensions: 130 x 200 x 240mm
- Weight: 1.18Kg
Troubleshooting
- No power: Check mains voltage, outlet, IEC lead, and fuse.
- No light output: Check control panel mode settings and DMX controller dimmer levels.
- Unresponsive to DMX: Ensure unit is in DMX mode (A on address flashes), check DMX controller settings (blackout, fixture page), and verify DMX cables.
- No Laser output: Ensure the laser key on the rear panel is turned on.
Practical help
Common problems
No power
Check mains voltage, outlet, IEC lead, and fuse. If fuse continually blows, refer to your dealer.
No light output
Check control panel mode settings and DMX controller dimmer levels.
Unresponsive to DMX
Ensure unit is in DMX mode (A on address flashes), check DMX controller settings (blackout, fixture page), and verify DMX cables.
No Laser output
Ensure the laser key on the rear panel is turned on.
Before use
- Check contents: main unit, IR remote, UK IEC mains lead, manual.
- Ensure the unit is kept away from damp or dusty environments.
- Verify the laser key is inserted and turned on.
- If mounting overhead, use secondary safety fixings.
- Ensure adequate airflow around the fixture.
Specs in practice
- Power supply
- 110-240Vac, 50/60Hz (IEC)
- DMX channels
- 13 channels for precise control
Images and diagrams
- Rear panel: Includes DMX In/Out, Power input, Fuse, and Control buttons (Menu, Up, Down, Enter).
- Remote control: Provides direct access to modes, speed adjustment, and specific effects.
Model compatibility
- Requires DMX controller for advanced operation.
- Compatible with standard 3-pin XLR DMX cables.

Manual page author
Emily Carter
User documentation editor
Prepares concise manual descriptions and highlights the most useful setup, operation, and maintenance information for readers.