Lighting / LED Strips
Lyyt DIY COB LED Tape Kit
Quick guide for the Lyyt DIY COB LED Tape Kit. Learn how to prepare, cut, install, and reconnect your LED strip safely. Includes specifications and usage tips for models 153.806UK, 153.807UK, and 153.808UK.
Table of contents
Manual images
Click an image to enlargeQuick guide from the manual
This document provides instructions for the Lyyt DIY COB LED Tape Kit. Before beginning installation, ensure you have read the instructions carefully. If you are unsure about any installation details, consult a professional. The tape is designed for indoor use on surfaces like counter tops, shelves, cupboards, or ceiling alcoves.
Kit Contents
- 5m COB LED Tape
- UK Power supply
- Solder free connector
Preparation
Before fitting the tape, ensure the mounting surface is clear of dust and dirt. Clean the surface thoroughly and allow it to dry completely. Unravel the tape and connect the power supply to test that all LEDs are functioning correctly before installation. If any faults are found, return the product to your retailer.
Cutting the Tape
WARNING: Always disconnect from the power supply before attempting any cutting.
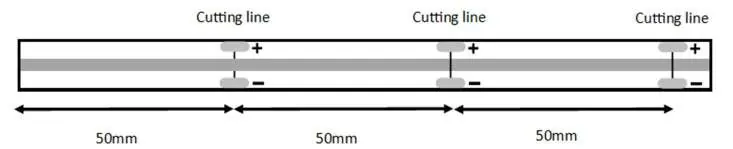
Measure the required section and cut with sharp scissors at the marked 50mm intervals. Do not discard excess tape, as it can be reconnected and used again.
Fitting and Installation
Clear the area where you intend to install the tape. Remove the backing paper to expose the adhesive and push the tape firmly onto the surface. It is recommended to work in 50mm sections at a time to ensure a professional finish. When you reach the end of your installation, cut at the marked cutting point.
Reconnecting
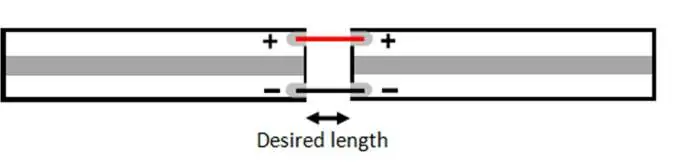
You can reconnect two pieces of tape using the included solder-free connector or by soldering. The tape features two tracks for DC voltage: the positive (+) pole is at the top, and the negative (-) pole is at the bottom. If soldering, ensure you connect the DC wire to the relative terminals and avoid short circuits, as this can damage the power supply.
Important Safety Points
- Only use the supplied power adaptor for the length of tape in the kit.
- Only cut the tape at the highlighted 50mm intervals.
- Do not connect another reel to operate from a single power supply, as this will affect performance.
- Do not illuminate the tape while it is still coiled on the reel.
- Ensure wires are connected to the correct terminals.
- We recommend using heat shrink tubing to protect soldered connections.
- Check that everything operates correctly before final installation.
Specifications
- Voltage: 24V
- Power Consumption: 10.5W/m
- Current: 438 mA/m
- PSU: 24V 60W 2.5A
- No of LEDs: 480 p/m
- Cut interval: 50mm
- IP Rating: IP20
Practical help
Common problems
LEDs not working after installation
Check the power supply connection and ensure all LEDs were tested and functioning before installation.
Short circuit during soldering
Ensure wires are connected to the correct positive (+) and negative (-) terminals and use heat shrink tubing to protect the connection.
Tape not adhering to surface
Ensure the surface is clean, dry, and free of dust and dirt before applying the adhesive tape.
Before use
- Clean the mounting surface thoroughly.
- Unravel the tape completely.
- Connect the power supply to test all LEDs.
- Measure the required length before cutting.
- Ensure the power is disconnected before cutting.
Specs in practice
- Cut interval: 50mm
- The tape can only be cut at specific 50mm marks to maintain electrical continuity.
- IP Rating: IP20
- The product is not waterproof and is intended for indoor use only.
Images and diagrams
- Cutting line: Indicates the specific points at 50mm intervals where the tape can be safely cut.
- Polarity: Shows the positive (+) and negative (-) tracks on the tape for correct wiring.
Model compatibility
- Do not connect multiple reels to a single power supply.
- Only use the supplied power adaptor.

Manual page author
Michael Turner
Technical manual editor
Reviews PDF manuals for structure, safety notes, and practical product details so readers can find the right information quickly.