Electronics / Microphones
User Manual for AVSL U-MIC 171.800UK Wireless Microphone System
Quick guide for the AVSL U-MIC 171.800UK wireless microphone system. Learn how to set up the USB receiver, install batteries, connect to mixers or amplifiers, and operate the handheld transmitters.
Quick answers from the manual
Quick answer
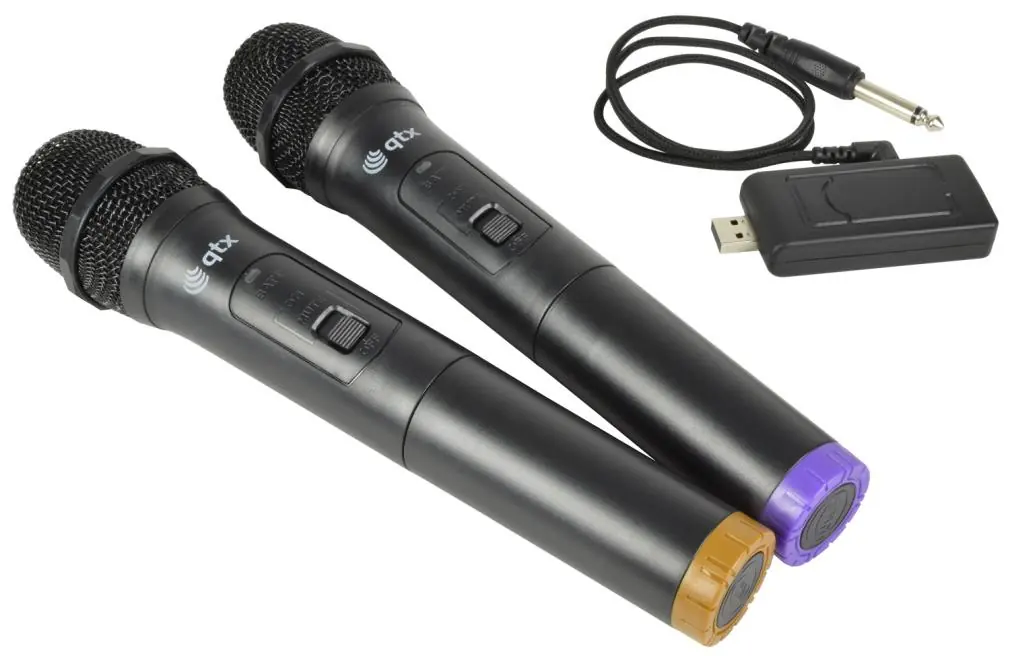
- The U-MIC 171.800UK is a dual wireless microphone system. Connect the USB receiver to a 5V power source and the 3.5mm output to your mixer or amplifier. Insert 2x AA batteries into each microphone to begin. p. 2, 3
Key actions
- Connect receiver to power p. 2
- Install batteries p. 3
- Mute microphone p. 3
First start
- Connect USB power, connect audio cable, insert batteries, turn on. p. 2, 3
Problems and fixes
LED lit constantly
Batteries are low on charge and need replacing.
p. 3Technical specifications
| Parameter | Value | Meaning | Pages |
|---|---|---|---|
| Carrier frequency | 863.2MHz + 864.8MHz | Operating frequency | p. 4 |
| Wireless range | Up to 50m | Maximum operating distance | p. 4 |
Where to find it in the PDF
- Introduction and Layout p. 2
- Operation p. 3
- Specifications p. 4
Table of contents
Manual images
Click an image to enlargeQuick guide from the manual
The U-MIC system provides a wireless microphone solution. To set up, connect the USB receiver to a 5V 1000mA power source and the 3.5mm audio output to your mixer or amplifier. Insert 2x AA batteries into each microphone to begin operation.
Layout
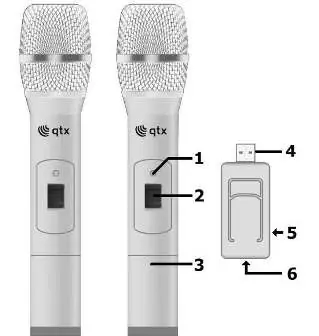
- 1. LED power indicator
- 2. Power switch
- 3. Battery compartment
- 4. USB type A plug
- 5. 3.5mm audio output
- 6. USB type A socket
Setting up
The system includes two handheld transmitters and a USB receiver. Connect the USB type A plug to a 5V 1000mA USB port (power adaptor or power bank). Note that the USB port is for power only; audio is not transmitted via USB. If you need to connect a USB stick, you can use the USB type A socket on the rear of the receiver.
Operation
Before connecting, turn down the volume on your mixer or amplifier to prevent loud noises. Connect the 3.5mm plug to the receiver and the 6.3mm plug to the mixer/amplifier input. Insert 2x AA alkaline batteries into the microphones, ensuring correct polarity. Move the switch to 'on'. If the LED is lit constantly, replace the batteries. Use the 'mute' position on the switch to silence the microphone while keeping the signal active.
Specifications
- Carrier frequency: 863.2MHz + 864.8MHz
- Wireless range: Up to 50m
- Power supply (receiver): 5Vdc 1000mA
- Power supply (transmitter): 2 x AA batteries each
- Output: 3.5mm mono jack
Practical help
Common problems
LED lit constantly
Batteries are low on charge and need replacing with new ones.
Loud noises when connecting
Turn down the volume level on the microphone input of the mixer or amplifier before connecting.
Before use
- Ensure a 5V 1000mA USB power source is available for the receiver.
- Install 2x AA alkaline batteries in each microphone.
- Check battery polarity before closing the compartment.
- Turn down the volume on the mixer or amplifier before connecting the receiver.
- Ensure the microphone switch is in the 'off' position before inserting batteries.
Specs in practice
- Carrier frequency
- 863.2MHz + 864.8MHz
- Wireless range
- Up to 50m
- Power supply (receiver)
- 5Vdc 1000mA (USB)
Images and diagrams
- The USB receiver features a USB plug for power and a 3.5mm output for audio.
- The handheld microphones feature an on/off/mute switch and a battery compartment.
Model compatibility
- Receiver requires 5V 1000mA USB power.
- Output is mixed to a single 3.5mm mono jack.

Manual page author
David Miller
Documentation analyst
Organizes user manual content into clear summaries, with attention to model details, product context, and everyday usability.