Automotive / Car Audio
User Manual for Banda Audioparts VIKING 8000 Amplifier
Get the most out of your Banda Audioparts VIKING 8000 amplifier. This guide covers installation, wiring diagrams, LED status indicators, technical specifications, and troubleshooting steps.
Quick answers from the manual
Quick answer
- The VIKING 8000 is a high-power car audio amplifier. This manual provides wiring instructions, LED status definitions, and troubleshooting steps for common issues like overheating or low voltage. p. 4, 8
Key actions
- Connect the amplifier to the vehicle chassis (GND), remote (Drive Input), and 12V positive. p. 4
- Check LED indicators to diagnose status (Yellow=Low Voltage, Blue=ON, Red=Protection). p. 4
Problems and fixes
Amplifier temperature limit reached
Ensure well-ventilated installation.
p. 8
Short circuit or low impedance
Check speaker cables and impedance.
p. 8Technical specifications
| Parameter | Value | Meaning | Pages |
|---|---|---|---|
| Input Voltage | 9 - 15V | Operating voltage range | p. 6 |
| Recommended Fuse | 2 x 225 | Required external fuse rating | p. 7 |
Where to find it in the PDF
- Power Unit and LEDs p. 4
- Connection Examples p. 5
- Technical Specifications p. 6, 7
- Troubleshooting p. 8
Table of contents
Manual images
Click an image to enlargeQuick guide from the manual
The Banda Audioparts VIKING 8000 is a high-performance car audio amplifier. To ensure optimal operation, verify that your power supply is stable (9-15V), use the recommended 70mm / 0 AWG power cables, and ensure your speaker impedance matches the amplifier's rated specifications. Always use an external fuse for safety.
Description and Power Unit
The amplifier features a power unit with three main connections:
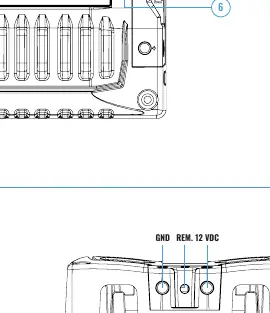
- GND INPUT: Connect to the vehicle chassis (Ground).
- DRIVE INPUT 12VDC (+): Connect to the electrical antenna (Remote).
- 12VDC POSITIVE INPUT: Main power connection.
Front Panel LEDs:
- Yellow (flashing): Battery voltage is below the specified range.
- Blue (ON): The amplifier is powered on.
- Red (SHORT): Protection mode triggered due to output short circuit or temperature exceeding the limit.
Installation and Connections
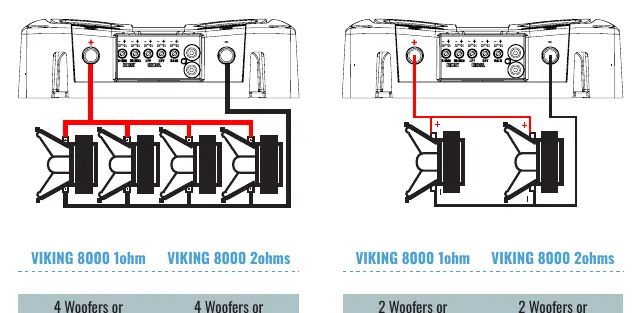
The amplifier supports various configurations for woofers or subwoofers. When connecting speakers, ensure the total impedance does not fall below the amplifier's rated minimum. The manual provides diagrams for parallel wiring configurations for both 1-ohm and 2-ohm models, allowing for 2 or 4 woofer setups to achieve the desired RMS power output.

Technical Specifications
Key technical parameters include:
- Input Voltage: 9 - 15V
- Input Sensitivity: 200mV - 8V
- Bass Boost: 30 - 80Hz @ 12dB
- HPF (Subsonic): 16Hz - 120Hz @ 12dB/octave Linkwitz-Riley
- LPF (Crossover): 50Hz - 8KHz @ 12dB/octave Linkwitz-Riley
- Recommended Fuse: 2 x 225
- Weight: 6.3 kg
Troubleshooting
If you encounter issues, check the LED status on the front panel:
- Blue & Red LED On: Amplifier has reached the operating temperature limit. Ensure proper ventilation.
- Blue LED on, Red flashing, no audio: Indicates a short circuit in the output or impedance is too low. Check speaker cables and impedance.
- Blue LED on, Red flashing with music: Indicates clipping (distortion > 5%).
- Flashing Yellow LED: Input voltage is below 9V. Check battery charge and power cable connections.
- Red & Yellow LED on: Internal problem. Contact an authorized service center.
Warranty
The warranty is valid for 12 months from the date of purchase. It covers manufacturing defects but does not cover damage from accidents, improper installation, or unauthorized alterations. For repairs, contact the dealer or Banda Audioparts directly at their address in Paulínia, SP, Brazil.
Manufacturer information
Banda Audioparts
Practical help
Common problems
Blue & Red LED On
Amplifier temperature has reached the operating limit. Install in a well-ventilated place and ensure ventilation is not obstructed.
Blue LED on and Red flashing with no audio
Short circuit in audio output or impedance is below the rated limit. Check speaker cables and ensure impedance is correct.
Flashing Yellow LED
Input voltage below 9V. Check battery charge and ensure power cables have good contact.
Before use
- Ensure the amplifier is installed in a well-ventilated area.
- Use an external fuse.
- Verify that speaker impedance matches the amplifier's rated impedance.
- Use power cables of at least 70mm / 0 AWG.
- Check that the input voltage is between 9V and 15V.
Specs in practice
- Maximum Power
- Peak output power under specific voltage and impedance conditions.
- Input Sensitivity
- The range of input signal voltage the amplifier can accept (200mV - 8V).
- Variable Bass Boost
- Adjustable bass enhancement frequency range (30-80Hz).
Images and diagrams
- Power Unit: Shows the location of GND, Remote, and 12V Positive terminals.
- Connection Examples: Illustrates how to wire 2 or 4 woofers/subwoofers in parallel.
Model compatibility
- Requires 12V DC power source.
- Minimum power cable size: 70mm / 0 AWG.
- Output cables recommended minimum: 2 x 6mm / 2 x 3 AWG.

Manual page author
Emily Carter
User documentation editor
Prepares concise manual descriptions and highlights the most useful setup, operation, and maintenance information for readers.