Tools / Saws
User Manual for Batavia BT-CCD003 Cordless Combi Drill
Quick guide for the Batavia BT-CCD003 Cordless Combi Drill. Learn about operation, safety, maintenance, and technical specifications.
Table of contents
Quick guide from the manual
This manual provides essential information for the safe and effective operation of the Batavia BT-CCD003 Cordless Combi Drill. Please note that the battery and charger are not included with the tool and must be purchased separately.
Device Overview
The drill features the following components:
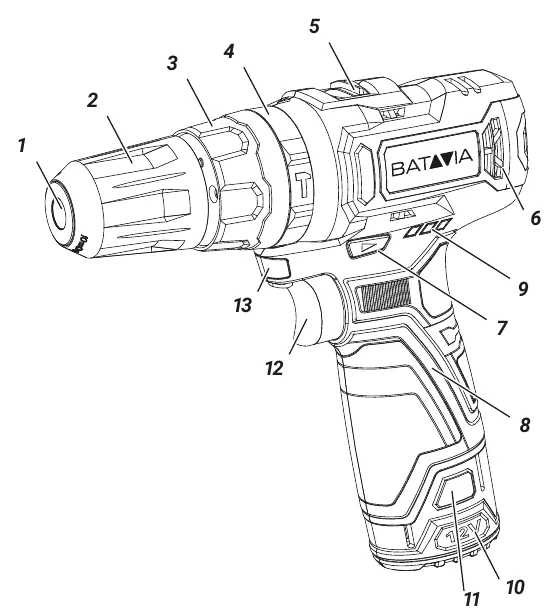
- 1: Chuck Jaws
- 2: Chuck Collar
- 3: Torque Selector
- 4: Mode Selector
- 5: Gear Switch
- 6: Motor Vents
- 7: Forward/Reverse Switch
- 8: Hand Grip
- 9: Battery Charge Indicator
- 10: Battery (not included)
- 11: Battery Release Button
- 12: Trigger Switch
- 13: Work Light
Operation
Direction Control
Use the Forward/Reverse Switch (7) to set the rotation direction. Pushing the switch to the right enables anti-clockwise rotation, while pushing it to the left enables clockwise rotation. When in the central position, the drill is locked.
Mode and Torque Selection
The Mode Selector (4) allows you to choose between screwing, drilling in masonry/concrete, wood, or metal. The Torque Selector (3) adjusts the torque; a higher number provides higher torque.
Speed Setting
The Gear Switch (5) allows you to choose between two speeds:
- Position 1: For slow drilling, large drilling diameters, or screw driving. Provides higher torque at low speed.
- Position 2: For fast drilling or small drilling diameters. Provides lower torque at high speed.
Maintenance and Cleaning
Always remove the battery before performing any maintenance or cleaning. Keep the motor vents (6) free from dust and dirt to prevent overheating. Clean the tool regularly with a damp cloth and mild soap. Do not use solvents, as they may damage plastic components.
Technical Data
- Speed: 0 – 400 / 1300 min-1
- Impacts per Minute: 0 – 6000/19500 min-1
- Chuck Capacity: 10 mm
- Torque: 28 Nm
- Weight: 0.84 kg
Manufacturer information
Batavia
Practical help
Common problems
Tool gets excessively hot during use.
Stop using the tool immediately and allow it to cool. You can speed up cooling by running the drill at maximum speed without load.
Motor slips before the screw is fully tightened.
Increase the torque setting on the Torque Selector.
Drill bit is not secure.
Ensure the drill bit is properly fixed in the chuck and the chuck collar is tightened.
Before use
- Check the machine for transport damage.
- Ensure the battery is charged (not included).
- Use a detector to check for hidden utility lines in the workpiece.
- Secure the workpiece using clamps or a vice.
- Ensure the Forward/Reverse switch is in the desired position.
Images and diagrams
- The drill features a mode selector (4) to switch between screwing, drilling, and hammer drilling.
- The gear switch (5) is located on top of the tool to toggle between speed 1 and 2.
- The trigger switch (12) controls both the activation and the rotation speed.
Model compatibility
- Battery and charger are not included.
- Use only accessories with an allowable speed matching at least the highest no-load speed of the tool.

Manual page author
Emily Carter
User documentation editor
Prepares concise manual descriptions and highlights the most useful setup, operation, and maintenance information for readers.