Tools / Drills
Owner's Manual for Bauer 2144C-B 20V Rotary Hammer
Comprehensive user guide for the Bauer 2144C-B 20V Lithium-Ion Rotary Hammer. Includes setup instructions, operating modes, maintenance procedures, safety warnings, and troubleshooting.
Quick answers from the manual
Quick answer
- The Bauer 2144C-B is a 20V cordless rotary hammer. To operate, charge the battery, install an SDS Plus bit, select the desired mode (Drill, Hammer/Drill, or Chisel), and use the variable speed trigger. p. 8, 9, 10
Key actions
- Changing bits p. 9
- Adjusting mode p. 10
First start
- Charge the battery, inspect the tool for damage, install the bit, and adjust the auxiliary handle. p. 8, 9
Show 4 more answers Show less
Problems and fixes
Tool will not start
Check battery connection and charge level.
p. 14
Overheating
Clear blocked vents and do not force the tool.
p. 14Maintenance and reset
- Lubricate bit shank with grease before each use. p. 13
Technical specifications
| Parameter | Value | Meaning | Pages |
|---|---|---|---|
| Battery | 20V Li-ion | Power source | p. 8 |
| No Load Speed | 0-1300/min | Rotational speed | p. 8 |
Where to find it in the PDF
- Operation p. 11, 12
- Maintenance p. 13, 14
Table of contents
Manual images
Click an image to enlargeQuick guide from the manual
The Bauer 2144C-B is a 20V cordless rotary hammer designed for drilling and chiseling. Before using the tool, ensure the battery is fully charged and the work area is clear. Always wear appropriate personal protective equipment, including eye, ear, and respiratory protection. The tool features three distinct modes: Drill, Hammer/Drill, and Chisel. Always stop the motor before changing modes or bits.
Device overview
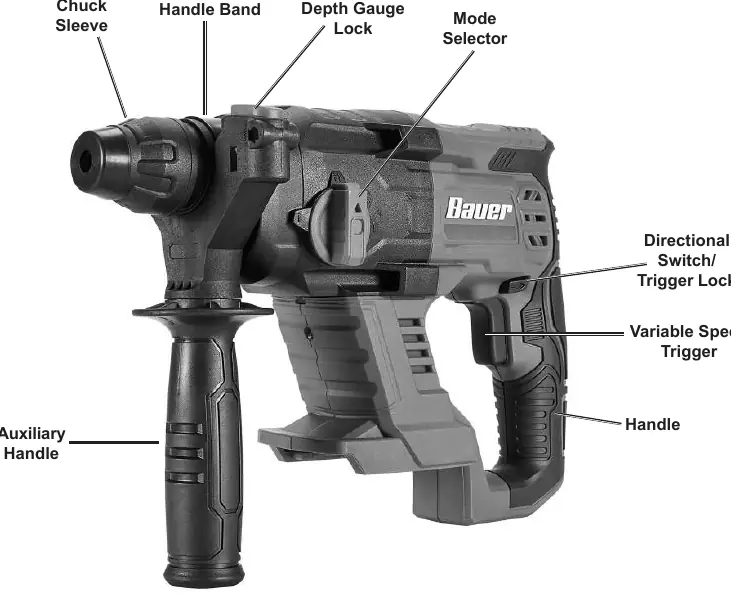
The tool consists of a variable speed trigger, directional switch, mode selector, auxiliary handle, and chuck sleeve. The auxiliary handle can be adjusted for better control, and the depth gauge allows for precise drilling depth.
Setup and preparation
- Charging: Charge the battery pack fully before the first use. Follow the instructions provided with your specific battery charger.
- Auxiliary Handle: Turn the handle counterclockwise to loosen the band, rotate to the desired position, and turn clockwise to secure.
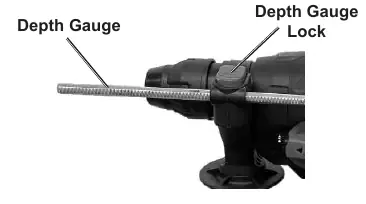
- Depth Gauge: Press the depth gauge lock, insert the gauge to the desired depth, and release the lock.
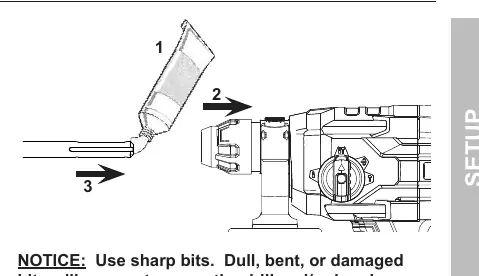
- Bit Installation: Clean the loading end of the bit and lubricate it with grease. Pull back on the chuck, insert the bit, twist until it seats, and release the chuck. Ensure the bit is secure by pulling on it.
Operating modes
Use the Mode Selector to choose the function. Only adjust the mode when the motor is stopped.
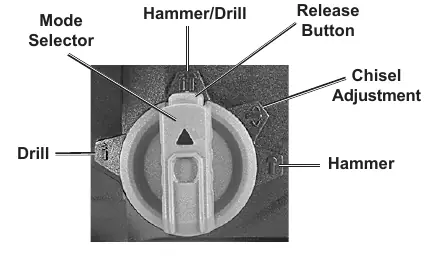
- Drill: For standard drilling.
- Hammer/Drill: For drilling into masonry or concrete.
- Chisel Adjustment: Used to set the angle of the chisel bit.
- Chisel: For chiseling applications.
Maintenance and care
- Cleaning: Wipe external surfaces with a clean cloth after use.
- Lubrication: Lubricate the bit shank with grease before each installation to maintain the internal mechanism.
- Storage: Store the tool, battery, and charger in a dry, indoor area away from children and metal objects.
- Battery: Recycle or dispose of Li-Ion batteries properly. Do not incinerate or open.
Safety warnings
Always use the auxiliary handle to maintain control. When drilling, brace the tool properly. If the bit jams, release the trigger immediately. Be aware of hidden wiring when drilling into walls. Use NIOSH-approved respiratory protection when drilling concrete to prevent silicosis.
Practical help
Common problems
Tool will not start
Check if the battery is properly connected and charged. Ensure there are no obstructions in the battery port.
Tool operates slowly
Do not force the tool; allow it to work at its own rate. Check if the battery is wearing out.
Overheating
Ensure motor housing vents are not blocked. Check for misaligned or dull accessories.
Before use
- Charge the battery pack fully.
- Inspect the tool for damage, loose hardware, or cracked parts.
- Ensure the work area is clean and well-lit.
- Wear ANSI-approved safety goggles and ear protection.
- Lubricate the bit shank with grease.
- Verify the mode selector is set correctly for the task.
Show more Show less
Specs in practice
- Battery Type
- Bauer 20V Li-ion
- No Load Speed
- 0-1300/min
Images and diagrams
- Mode Selector: Located on the side of the tool; allows switching between Drill, Hammer/Drill, and Chisel modes.
- Auxiliary Handle: Adjustable handle for two-handed operation and better control.
- Depth Gauge: Rod used to control the depth of the hole being drilled.
Model compatibility
- Use only Bauer 20V Li-ion battery packs and chargers.
- Compatible with SDS Plus type bits only.

Manual page author
Michael Turner
Technical manual editor