Lighting / Fixtures
User Manual for beamZ PANTHER Quatro Beam Bar
Quick guide for the beamZ PANTHER Quatro Beam Bar. Includes installation, DMX wiring, control menu settings, channel configurations, and maintenance instructions.
Table of contents
Manual images
Click an image to enlargeQuick guide from the manual
This manual provides essential information for the safe installation, operation, and maintenance of the beamZ PANTHER Quatro Beam Bar. Always read the safety instructions before use. Ensure the unit is installed in a well-ventilated area, kept away from moisture, and that the ambient temperature remains between -5°C and +45°C.
Installation and Power
Before connecting to power, verify that the mains voltage matches the specifications on the unit. Do not connect the unit to a dimmer pack. When mounting at a height greater than 100 cm, always secure the fixture with an appropriate safety rope. Ensure at least 50 cm of free air space around the unit for ventilation.

Daisy-chaining: You can link a maximum of four units (at 230V/16A) in a row using the power connector input and output. Use an approved three-core cable with a cross-section of at least 1.5 mm².
DMX Control
Connect the DMX output of your controller to the DMX input of the first fixture. Continue connecting the output of one unit to the input of the next. At the last fixture in the chain, you must terminate the DMX line by connecting a 120 Ohm resistor between signal (-) and signal (+) on an XLR connector.

Control Menu
The control menu allows you to configure various settings:
- DMX ADDR: Set the DMX address (001-512).
- DMX CHANNEL: Select channel mode (6Ch, 10Ch, 19Ch, 32Ch, 56Ch).
- SLAVE MODE: Set slave mode (SL 1-4).
- AUTO MODE: Select random show or show modes 1-16, and adjust speed.
- SOUND MODE: Enable sound control and adjust sensitivity.
- PAN/TILT INVERSE: Invert pan or tilt movement for individual heads or all heads.
- SETTINGS: Reset, display settings, firmware version, and function test.
Maintenance
Regular cleaning is required to maintain light output and prevent overheating. Disconnect the power and allow the unit to cool completely before cleaning. Use a soft, lint-free cloth and a weak detergent solution for glass components. Do not use aggressive solvents.
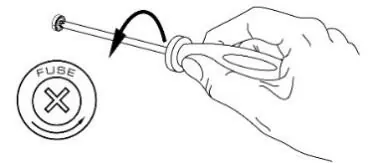
Replacing the Fuse: If the fuse is defective, replace it with one of the same type and value. Disconnect the power, open the fuse holder on the rear panel with a screwdriver, replace the fuse, and reinsert the holder.
Troubleshooting
If the fixture does not respond, check the power supply and connections. If it resets but does not respond to the controller, verify the DMX line, addressing, and termination. If the light output cuts out intermittently, ensure the fixture is not overheating and that there is sufficient airflow.
Manufacturer information
beamZ
Practical help
Common problems
No response from fixture
Check that power is turned on, inspect cables and connections, and check if the fuse is blown.
Fixture resets but does not respond to controller
Check DMX controller connection, inspect DMX line for damage, ensure the line is terminated with a 120 Ohm resistor, and verify DMX address/mode settings.
Light output cuts out intermittently
Allow the fixture to cool, reduce ambient temperature, ensure free airflow, and clean the fixture if dirty.
Before use
- Check for transportation damage before use.
- Verify mains voltage matches the equipment specifications.
- Ensure no ventilation slots are blocked.
- Use a safety rope for mounting heights above 100 cm.
- Ensure ambient temperature is between -5°C and +45°C.
Specs in practice
- Light source
- 4-in-1 LED (Red, Green, Blue, White), 40W per LED.
- DMX channels
- Supports 6, 10, 19, 32, or 56 channel modes.
- Head movement
- 540° Pan and 180° Tilt.
Images and diagrams
- DMX Wiring: Shows the connection from DMX OUT to DMX IN and the installation of a 120 Ohm terminator resistor on the last fixture.
- Fuse Replacement: Illustrates using a screwdriver to open the fuse holder on the rear panel.
Model compatibility
- Indoor use only.
- Do not connect to a dimmer pack.
- Maximum 4 units can be linked in a row (at 230V/16A).

Manual page author
David Miller
Documentation analyst
Organizes user manual content into clear summaries, with attention to model details, product context, and everyday usability.