Home Appliances / Irons
User Manual for Beautural 1800-Watt Steam Iron
Quick guide for the Beautural 1800-Watt Steam Iron. Learn how to fill the water tank, set temperatures, use steam functions, clean the soleplate, and troubleshoot common issues.
Quick answers from the manual
Quick answer
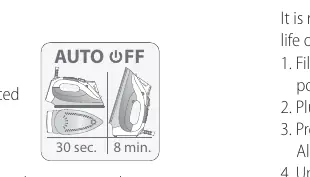
- The Beautural 1800-Watt Steam Iron features a digital LCD display, 9 temperature settings, and auto-shutoff. Fill the tank to MAX, select the temperature based on fabric, and ensure the steam knob is set correctly before ironing. p. 3, 4, 5
Key actions
- Filling the water tank p. 4
- Performing self-cleaning p. 6
First start
- Remove all labels, fill with water, turn on, and let stand for 90 seconds before ironing. p. 4
Problems and fixes
Water drips from soleplate
Wait until fabric type stops flashing or press Steam Burst button at 5-second intervals.
p. 8Error codes
| Code | Meaning | Action | Pages |
|---|---|---|---|
| ERR 1 | NTC short-circuit | Unplug, let cool, plug in again. If persists, contact service. | p. 5 |
| ERR 2 | NTC lower than 50°C | Unplug, let cool, plug in again. If persists, contact service. | p. 5 |
| ERR 3 | Soleplate over 270°C±15°C | Unplug, let cool, plug in again. If persists, contact service. | p. 5 |
Maintenance and reset
- Use the Self Clean function once every two weeks. p. 6
Technical specifications
| Parameter | Value | Meaning | Pages |
|---|---|---|---|
| Rated Power | 1800W | Power consumption | p. 8 |
| Water Tank Capacity | 340ml | Capacity | p. 8 |
Where to find it in the PDF
- Safety Instructions p. 1
- Getting to Know Your Iron p. 3
- Troubleshooting p. 8
Table of contents
Manual images
Click an image to enlargeQuick guide from the manual
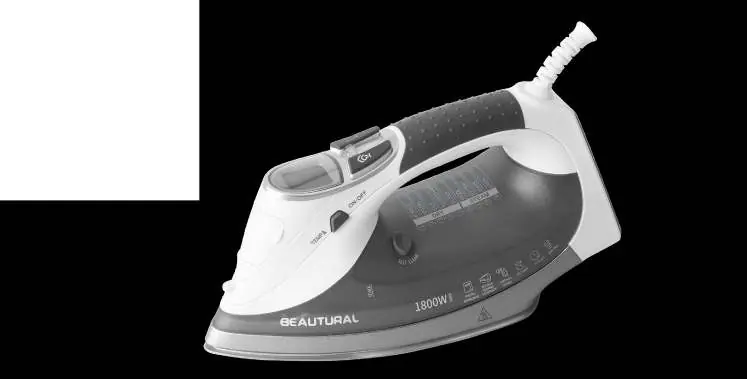
The Beautural 1800-Watt Steam Iron is designed for household use. Key features include a digital LCD display with 9 temperature settings, an automatic shutoff system, and a self-cleaning function. Always use distilled, purified, or filtered water to prevent mineral buildup and ensure optimal performance. Never use additives like starch or perfume in the water tank.
Getting to know your steam iron
The iron features a soleplate, spray nozzle, water tank opening, digital display, steam burst button, variable steam knob, spray mist button, self-clean button, and a heel rest. Familiarize yourself with these components before first use.
Getting started
Remove all labels, stickers, and tags from the iron. The ceramic-coated soleplate does not require a protective film. For best performance, turn the iron on and let it stand for 90 seconds before beginning to iron. Always stand the iron on its heel rest when powered on but not in use.
Filling with water
Tilt the iron and pour water into the water tank opening using a clean filling cup until it reaches the MAX level. Do not overfill. If you need to add water while ironing, unplug the iron first.
Setting the temperature
Plug in the iron; it will enter Standby mode. Press the Temperature Setting button to select a setting from 1 to 9. The digital display will show the setting number and fabric type. The fabric type will flash while heating and stop when the target temperature is reached. Ensure the Variable Steam Knob is in the dry position while the iron is heating.
Ironing modes
Dry Ironing: Ensure the Variable Steam knob is in the dry position. If dry ironing for more than 20 minutes, empty the reservoir.
Ironing with Steam: Fill the tank to MAX. Select a temperature between level 6 and 9. Once the temperature is reached, slide the Variable Steam knob to the desired steam position.
Burst of Steam: Use only at temperature levels 7 to 9 to prevent leaking. Press the Steam Burst button at 5-second intervals.
Vertical Ironing: Suitable for hanging clothes and drapes. Hold the iron 15 to 30mm away from the fabric and press the Steam Burst button while moving the iron.
Maintenance and cleaning
Auto-Cleaning System: Perform this every two weeks. Fill the tank to MAX, set to level 9, and heat for 3 minutes. Unplug, hold over a sink with the soleplate facing down, and press the Self Clean button while shaking the iron gently until empty.
Cleaning the Exterior: Unplug and let cool. Wipe with a soft cloth dampened with water and mild detergent. Do not immerse in water.
Storing: Unplug, let cool, empty the water tank, set the steam knob to the dry position, and store on the heel rest.
Troubleshooting
If water drips from the soleplate, ensure the iron is hot enough or reduce the frequency of steam bursts. If the iron stops, use larger movements to avoid triggering the auto-shutoff feature. If brown streaks appear, stop using water additives and perform a self-cleaning operation.
Specifications
The iron operates at 120V~60Hz with 1800W of power. It features a 340ml water tank and a temperature range of 60 to 220°C.
Manufacturer information
Beautural
Practical help
Common problems
Water drips from soleplate
Wait until the fabric type on the LCD display stops flashing (iron is not hot enough) or press the Steam Burst button less frequently.
Brown streaks on linen
Stop using ironing water additives (starch, scented water). Perform a self-cleaning operation.
Iron stops working periodically
The auto-shutoff feature is activated by lack of movement. Use larger movements while ironing.
Steam or water leaks during filling
Ensure the Variable Steam Knob is set to the dry position and do not overfill the tank past the MAX line.
Before use
- Remove all labels, stickers, and tags from the iron body.
- Fill the water tank with distilled, purified, or filtered water to the MAX level.
- Ensure the iron is placed on a stable surface.
- Check the garment label to determine the correct temperature setting.
- Let the iron stand for 90 seconds after turning it on for optimum performance.
Specs in practice
- Water Tank Capacity
- 340ml (11.4oz)
- Temperature Range
- 60-220°C (140-428°F)
Images and diagrams
- 4. Power/Temperature Setting Button
- 5. Digital Display
- 7. Variable Steam Knob
- 10. Self Clean Button
Model compatibility
- Use distilled, purified, or filtered water to reduce mineral buildup.
- Do not use rainwater, water from condensation (dryer/AC), or water with additives (starch, perfume).
- Ironing with steam is only possible at temperature levels 6 to 9.

Manual page author
David Miller
Documentation analyst
Organizes user manual content into clear summaries, with attention to model details, product context, and everyday usability.