Lighting / Fixtures
User Manual for BEGA 23967.2 LED Ceiling Light
Quick guide for the BEGA 23967.2 LED Ceiling Light. Includes installation steps, electrical connection details, DALI control setup, maintenance, and technical specifications.
PDF source: Français · summary: English
Quick answers from the manual
Quick answer
- The BEGA 23967.2 is an indoor ceiling luminaire. Installation must be performed by a qualified electrician. It supports DALI control and features thermal protection. p. 1, 2
Key actions
- Install the luminaire p. 2
- Connect DALI control p. 2
Problems and fixes
Luminaire not dimming
Connect DALI control lines to DA, DA terminals.
p. 2Show 3 more answers Show less
Maintenance and reset
- Clean luminaire regularly with solvent-free cleansers. p. 2
Technical specifications
| Parameter | Value | Meaning | Pages |
|---|---|---|---|
| Total Power | 11.2 W | Luminaire connected wattage | p. 2 |
| Module Power | 9.5 W | Module connected wattage | p. 2 |
| Voltage | 220-240 V | Operating voltage | p. 1 |
| Weight | 1.1 kg | Luminaire weight | p. 1 |
Where to find it in the PDF
- Product Overview and Dimensions p. 1
- Installation and Technical Data p. 2
- Maintenance and Spare Parts p. 3
Table of contents
Quick guide from the manual
The BEGA 23967.2 is an indoor ceiling luminaire featuring handblown opal glass and an aluminum housing. Installation must be performed by a qualified electrician in accordance with national safety regulations. The luminaire supports DALI digital control and includes thermal protection (BEGA Thermal Control) to protect sensitive components.
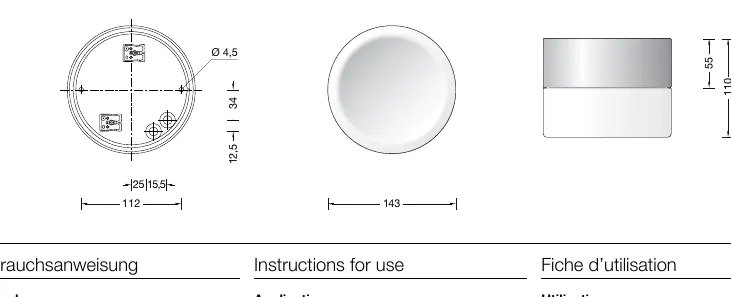
Installation
Follow these steps to install the luminaire:
- Remove the glass by turning it counter-clockwise.
- Undo the knurled screws and remove the cover plate.
- Lead the mains supply cable (diameter 7-10.5mm) through the cable entry into the housing.
- Fasten the luminaire housing to the mounting surface using the supplied or suitable fastening material.
- Use the enclosed protection against accidental contact.
- Establish the earth conductor connection and make the electrical connection to the terminals.
- For digital control, use the DA, DA terminals. If not used, the luminaire operates at full light output.
- Make the earth conductor connection between the cover plate and the luminaire housing.
- Assemble the cover plate.
- Screw the glass with the gasket into the luminaire housing, ensuring the gasket is positioned correctly.
Maintenance and Cleaning
Clean the luminaire regularly using solvent-free cleansers. The LED module can be replaced by qualified persons using standard tools. Always disconnect the system from the power supply before opening the luminaire for maintenance or module replacement. Inspect gaskets during maintenance and replace if necessary. Defective glass must be replaced.
Technical Specifications
The luminaire is available in two variants (3000K and 4000K). Key specifications include:
- Voltage: 220-240 V, 0/50-60 Hz (DC 176-276 V)
- Total Connected Wattage: 11.2 W
- Module Connected Wattage: 9.5 W
- Safety Class: I
- Weight: 1.1 kg
- DALI: 1 address
Manufacturer information
BEGA
Practical help
Common problems
Luminaire not dimming via DALI
Ensure the DALI control lines are connected to the DA, DA terminals. If these terminals are not connected, the luminaire operates at full light output.
Difficulty removing the glass
Turn the glass counter-clockwise to unscrew it from the luminaire housing.
Before use
- Ensure power is disconnected before starting installation.
- Verify the mounting surface is suitable for the luminaire.
- Check that the mains supply cable diameter is between 7-10.5mm.
- Ensure a qualified electrician performs the installation.
- Verify that the gasket is correctly positioned when reassembling the glass.
Show more Show less
Specs in practice
- DALI-controllable
- Compatible with DALI digital lighting control systems.
- Safety Class I
- The luminaire requires an earth connection for safety.
Images and diagrams
- The dimension drawing shows the luminaire diameter (143mm) and height (110mm).
Model compatibility
- Compatible with DALI control systems.
- Requires mains supply cable 7-10.5mm, max 5G1.5.

Manual page author
Michael Turner
Technical manual editor